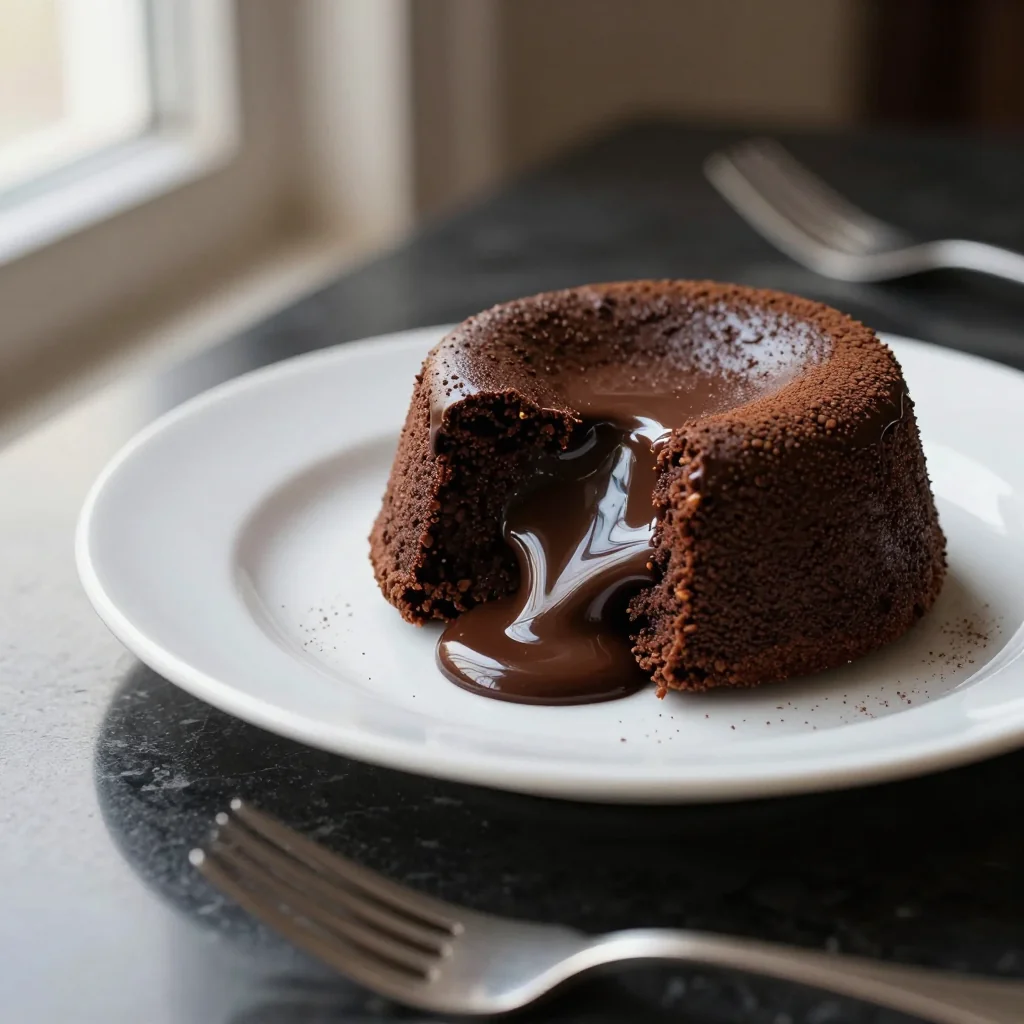
Indulge in a molten chocolate masterpiece that oozes warmth and richness with every bite.
There’s a particular moment in my culinary journey that still makes my heart flutter: the first time I tasted a perfectly executed lava cake, its outer crust giving way to a river of silky chocolate that seemed to melt my worries away. I was in a tiny Parisian pâtisserie, the scent of cocoa enveloping the air, and I realized that dessert could be both elegant and comfortingly indulgent.
Chocolate lava cake, known in French as “fondant au chocolat,” hails from the 1980s, credited to a French chef who wanted a quick, impressive dessert for a busy restaurant. Its allure lies in the contrast— a crisp, cake‑like exterior and a luscious, flowing interior that bursts forth when the plate is tapped.
In this guide, I’ll walk you through every nuance of creating that magical center, from selecting the right chocolate to mastering the precise baking time. You’ll learn why a butter‑rich batter, tempered eggs, and a hot oven are the secret trio that guarantees a flawless lava flow.
Grab your whisk, preheat that oven, and let’s embark on a sweet adventure that will make your kitchen smell like a chocolate boutique.
🌟 Why This Recipe Will Win Your Heart
Whether you’re celebrating a special occasion or simply craving a luxurious treat, this chocolate lava cake delivers drama, flavor, and a touch of romance on a plate.
- ✨ Perfectly Balanced Sweetness: The ratio of dark chocolate to butter creates a deep cocoa flavor without being overly sweet, pleasing both chocolate purists and those who prefer a milder dessert.
- ✨ Foolproof Timing: Detailed temperature cues and visual markers ensure the outer cake sets while the interior stays molten, removing the guesswork.
- ✨ Minimal Ingredients, Maximum Impact: With just seven core components, you won’t need a pantry full of exotic items to achieve a restaurant‑grade result.
- ✨ Quick and Elegant: From prep to plate in under half an hour, making it ideal for last‑minute dinner guests or spontaneous celebrations.
- ✨ Versatile Presentation: Serve warm with vanilla ice cream, fresh berries, or a dusting of powdered sugar for a customizable finish.
- ✨ Impressive Yet Accessible: The recipe is designed for home cooks with medium skill, offering a professional feel without demanding advanced techniques.
🥗 The Ingredients
📝 Complete Ingredient List
For the batter:
For the garnish:
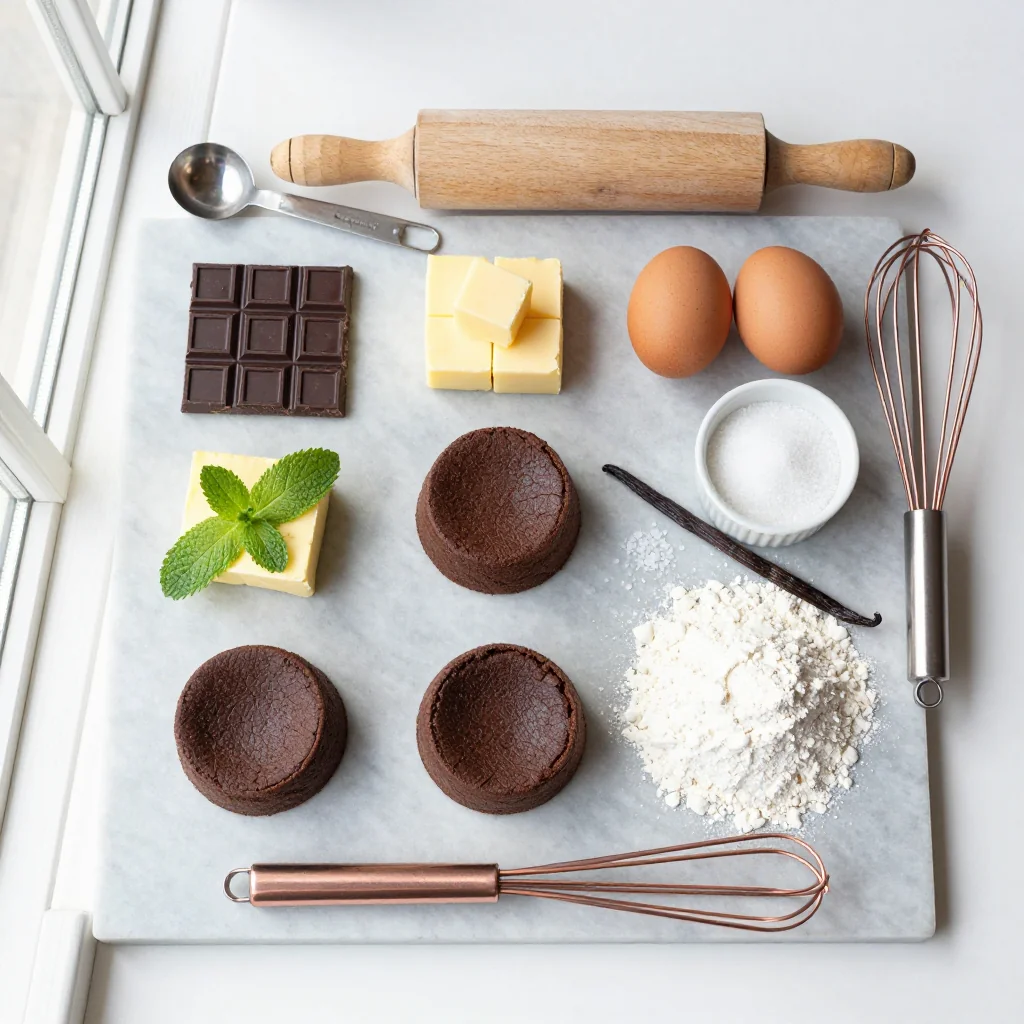
🔍 Focus on Key Ingredients
Dark Chocolate (70% cocoa)
Choosing a high‑quality dark chocolate with at least 70% cocoa solids gives the cake its deep, slightly bitter backbone. Look for chocolate that lists cocoa mass as the first ingredient and has minimal added sugar. The cocoa butter in good chocolate contributes to the glossy, fluid center that defines a lava cake.
Unsalted Butter
Unsalted butter provides a clean, creamy richness without overwhelming the chocolate’s flavor. Use European‑style butter if possible; its higher fat content yields a silkier batter and a more tender crumb.
Eggs
Eggs act as the structural scaffold, trapping air when whisked and creating a light, airy texture. The combination of whole eggs and extra yolks adds both lift and richness, ensuring the outer cake sets while the interior stays molten.
🔄 Quick Substitutions
| If you don’t have... | Use instead... |
|---|---|
| Dark chocolate (70% cocoa) | Bittersweet chocolate (60‑65% cocoa) |
| Unsalted butter | Salted butter (reduce added salt) |
| All‑purpose flour | Pastry flour (for a lighter crumb) |
👨🍳 Step‑by‑Step Instructions
Follow these detailed steps to create a molten masterpiece that looks as impressive as it tastes.
📋 Phase 1: Preparation & Mise en Place
Set up your workspace, pre‑heat the oven, and prepare the ramekins.
Preheat the oven and butter the ramekins
Set your oven to 220°C (428°F) and allow it to fully preheat. While it heats, generously butter two 6‑ounce ramekins, then dust each with a thin layer of cocoa powder or flour to prevent sticking. Tap out any excess—this creates a non‑stick surface that also adds a subtle chocolate aroma to the finished cake.
Melt chocolate and butter together
Combine the chopped dark chocolate and butter in a heat‑proof bowl. Place the bowl over a pot of simmering water (double‑boiler method) and stir gently until both melt into a glossy, homogeneous mixture. Remove from heat and let it cool slightly—this prevents the eggs from scrambling later.
🔥 Phase 2: Mixing & Baking
Combine wet and dry components, then bake quickly at high heat.
Whisk eggs, yolks, and sugar
In a separate bowl, whisk together the whole eggs, egg yolks, and granulated sugar until the mixture becomes pale, thick, and triples in volume. This process incorporates air, which will lift the cake during baking.
Fold chocolate mixture into the egg mixture
Gently pour the slightly cooled chocolate‑butter blend into the egg mixture. Using a rubber spatula, fold in a circular motion until just combined—avoid vigorous stirring to keep the batter light.
Incorporate flour and salt
Sift the all‑purpose flour and pinch of salt over the batter. Fold gently until the flour disappears, ensuring a uniform batter with no lumps. The flour gives the outer crust its structure while the salt enhances the chocolate flavor.
✨ Phase 3: Finishing & Serving
Bake, test, and plate your lava cakes with style.
Portion batter into ramekins and bake
Divide the batter evenly between the prepared ramekins (about ½ cup each). Slide the ramekins onto a baking sheet and place them in the preheated oven. Bake for exactly 10 minutes—edges should be firm while the center remains wobbly.
Check for doneness
Gently touch the top of each cake; it should feel set but still give slightly under the thumb. If you’re unsure, a quick visual cue— the edges pulling away from the ramekin—signals readiness.
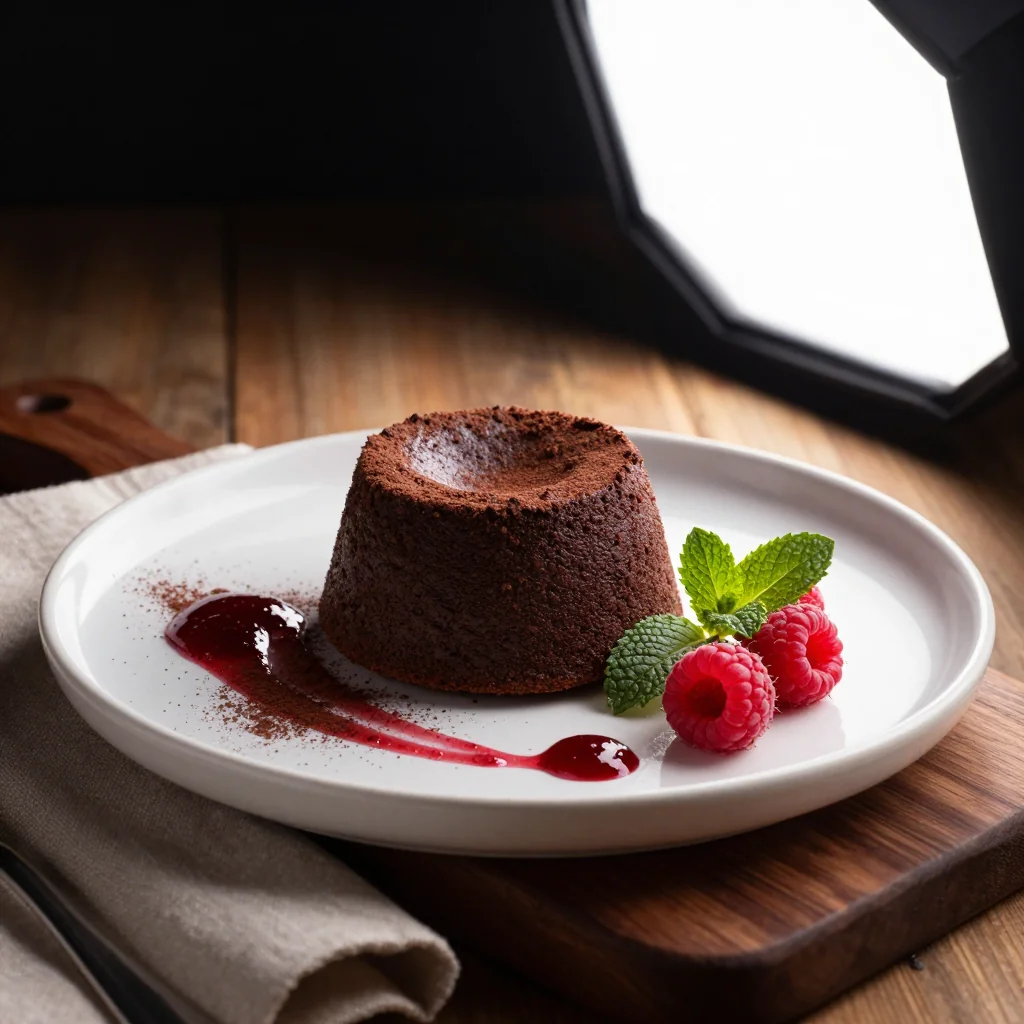
Unmold and garnish
Allow the cakes to rest for 1 minute, then run a thin knife around the edge. Invert each ramekin onto a warm plate; the cake should release with a gentle nudge. Dust with powdered sugar, scatter fresh raspberries, and add a scoop of vanilla ice cream if desired.
Serve immediately
Present the cakes while still warm—the molten center will flow luxuriously onto the plate. Pair with a chilled glass of dessert wine or a robust espresso for a complete experience.
💡 Expert Tips & Tricks
🛒 Choosing the Right Ingredients
When shopping for chocolate, read the label: the first ingredient should be cocoa mass, not sugar or vegetable oil. Look for a cocoa butter content of at least 30%. For butter, a higher fat percentage (82% or more) yields a richer batter. Fresh, free‑range eggs provide better structure and flavor than older refrigerated ones.
🔪 Preparation Techniques
Temper the chocolate gently; overheating can cause a grainy texture. After melting, let the chocolate‑butter mixture sit for a minute or two so it doesn’t scramble the eggs. When folding, use a “lift‑and‑turn” motion to keep air bubbles intact.
🌡️ Mastering the Cooking Process
The key is high heat for a short time. An oven that runs hotter than its setting will cause the outer layer to set too quickly, preventing the lava from forming. Use an oven thermometer to verify the exact temperature.
🍽️ Presentation & Service
Warm your plates in the oven for a minute before plating; this helps the cake stay molten longer. A drizzle of raspberry coulis or a pinch of flaky sea salt adds visual contrast and flavor depth.
🏆 Pro Secrets
Elevate your lava cake from delicious to unforgettable with these professional insights.
- 🎯 Precise Portion Control: Using a kitchen scale for chocolate and butter ensures the perfect 1:1 ratio, which is critical for achieving the ideal melt‑through consistency.
- 🎯 Use a Water Bath for Consistency: Placing the ramekins in a shallow pan of hot water during baking creates an even heat environment, reducing the risk of over‑cooking the edges while preserving the molten core.
- 🎯 Chill the Batter Slightly: After mixing, refrigerate the batter for 10 minutes. This firms the butter slightly, allowing the cake to rise more evenly and reducing the chance of a cracked top.
- 🎯 Finish with a Flavor Burst: Add a splash of orange liqueur or a pinch of espresso powder to the batter for an unexpected depth that complements the chocolate.
- 🎯 Serve with Temperature Contrast: Pair the warm cake with cold ice cream or chilled whipped cream; the contrast intensifies the perception of richness.
- 🎯 Plate Like a Pro: Use a wide, shallow plate, drizzle a thin line of dark chocolate ganache, and place the cake slightly off‑center for a modern, artistic look.
“A great lava cake is not just about chocolate; it’s about timing, temperature, and the love you pour into each bite.” — Chef Dominique Ansel
🔄 Variations & Adaptations
The core recipe is a canvas—feel free to experiment with flavors, dietary needs, and presentation styles.
🥬 Vegetarian / Vegan Version
Replace butter with equal parts coconut oil and use a plant‑based dark chocolate that contains no dairy. Substitute eggs with a blend of 1 tablespoon of chia seeds soaked in 3 tablespoons of water (per egg) to create a gel that mimics egg structure.
- Vegan butter alternative (coconut oil + soy lecithin) – gives a subtle coconut aroma.
- Chia “egg” – provides binding and moisture without compromising texture.
🌶️ Flavor Variations
Infuse the batter with complementary flavors to suit different cuisines or seasons.
Spicy Chili Chocolate:
Add ¼ teaspoon of finely ground cayenne pepper and a drizzle of chili‑infused chocolate ganache on top for a warm kick.
Mediterranean Orange‑Rose:
Stir in 1 teaspoon of orange zest and ½ teaspoon of rose water; garnish with candied orange peel.
Asian Matcha Twist:
Mix 1 teaspoon of high‑grade matcha powder into the batter for a subtle earthy note and a striking green‑gold contrast.
⚠️ Dietary Adaptations
Gluten‑Free:
Swap all‑purpose flour for a 1:1 gluten‑free flour blend (rice flour, tapioca starch, potato starch). Ensure the blend contains xanthan gum for elasticity.
Lactose‑Free:
Use dairy‑free dark chocolate and replace butter with a lactose‑free margarine or clarified butter (ghee).
Low‑Calorie:
Reduce sugar to 30 g, use a 60% cocoa chocolate (slightly less fat), and serve with a dollop of Greek yogurt instead of ice cream.
👶 Family / Kids Version
For younger palates, lower the cocoa percentage to 55% and add a teaspoon of honey for natural sweetness. Serve with sliced bananas or a drizzle of caramel sauce instead of raspberries.
📦 Storage & Reheating
🧊 Conservation
Refrigerator:
- Duration: Up to 2 days
- Container: Airtight glass jar or sealed plastic container
- Tip: Keep the ramekins covered with plastic wrap to prevent drying.
Freezer:
- Duration: Up to 1 month
- Method: Freeze baked but unserved cakes in their ramekins, wrapped tightly in foil.
- Defrosting: Transfer to the fridge overnight, then reheat as described below.
💡 For best texture, reheat from frozen rather than thawed to preserve the molten center.
♨️ Reheating
🔥 Oven (Recommended):
- Preheat to 180°C (350°F).
- Cover each ramekin loosely with aluminum foil.
- Heat for 8‑10 minutes.
- Remove foil and bake an additional 2 minutes to revive the crust.
⚡ Microwave (Quick):
- Place ramekin on a microwave‑safe plate.
- Cover with a microwave‑safe lid.
- Heat on medium power for 30‑45 seconds.
- Check and add 10‑second bursts if needed; avoid over‑cooking.
🍳 Stovetop:
Place the ramekin in a skillet with a thin layer of water, cover, and warm over low heat for 5‑7 minutes, ensuring the water doesn’t touch the cake.
🍷 Perfect Pairings
🥗 Side Accompaniments
- Fresh Mixed Berries: Their bright acidity cuts through the richness, balancing each bite.
- Vanilla Bean Ice Cream: Classic contrast of hot and cold, amplifying the chocolate’s depth.
- Caramelized Banana Slices: Add a caramel note that harmonizes with the molten core.
🍷 Wine & Beverage Pairings
- Ruby Port: Its sweet fruitiness mirrors the chocolate while adding a sophisticated finish.
- Late Harvest Riesling: Offers a refreshing acidity that lifts the dessert’s richness.
- Non‑Alcoholic: Sparkling pomegranate juice provides a tart sparkle without overpowering.
🍰 Complementary Courses
Begin with a light citrus salad (e.g., arugula, orange segments, toasted almonds) to awaken the palate. Follow the lava cake with a small cheese plate—soft brie or goat cheese—allowing the meal to end on a savory note that contrasts the dessert’s sweetness.
❓ Frequently Asked Questions
Q: How can I tell when the lava cake is perfectly baked?
A: The edges should feel firm to the touch while the center still jiggles slightly when the ramekin is gently shaken. If you insert a toothpick, it may leave a faint crumbly trail on the outer ring but should not penetrate the center.
Q: Can I use a different size of ramekin?
A: Yes, but adjust the baking time. Smaller 4‑ounce ramekins need about 7‑8 minutes, while larger 8‑ounce molds require 12‑13 minutes. Keep an eye on the edges; they should be set while the middle remains soft.
Q: What type of chocolate works best?
A: Look for couverture chocolate with at least 70% cocoa solids. This type contains higher cocoa butter, which melts smoothly and creates the signature lava flow. Avoid baking chips that contain stabilizers.
Q: My cake turned out dry—what went wrong?
A: Over‑baking is the most common cause. Make sure your oven is preheated to the correct temperature and set a timer. Also, using too much flour can dry the interior; stick to the specified 30 g.
Q: Can I prepare the batter ahead of time?
A: Absolutely. The batter can be mixed and refrigerated for up to 24 hours. Bring it to room temperature before filling the ramekins, and add an extra minute to the baking time if the batter is cold.
Q: How do I store leftover chocolate sauce?
A: Transfer any excess molten chocolate to an airtight container and refrigerate. Re‑heat gently over a double boiler or in short microwave bursts, stirring frequently to restore its glossy texture.
🎉 Let’s Get Baking!
This Chocolate Lava Cake for Two captures the drama of a fine‑dining dessert while remaining accessible to home cooks. Its elegant simplicity, combined with the thrill of a molten center, makes it a show‑stopper for any occasion—whether it’s a romantic dinner, a birthday surprise, or a cozy night in.
Remember, the secret lies in precise timing, high‑quality chocolate, and a dash of confidence. Give it a try, experiment with the variations, and you’ll quickly discover why this recipe has become a favorite among dessert lovers worldwide.
Have you tried this recipe?
Leave a comment and rating below! Share your photos on Instagram with #LavaLove to be featured on our site.
Chocolate Lava Cake for Two
A rich, molten chocolate dessert that impresses with every pour.
📝 Ingredients
Batter
Garnish
👨🍳 Instructions
- 1
Preheat the oven to 220°C (428°F). Butter two 6‑ounce ramekins and dust with cocoa powder.
- 2
Melt the chocolate and butter together over a double boiler, stirring until smooth.
- 3
Whisk eggs, yolks, and sugar until pale and fluffy.
- 4
Fold the melted chocolate into the egg mixture gently.
- 5
Sift flour and salt over the batter; fold until just combined.
- 6
Divide batter evenly between ramekins and bake for 10 minutes.
- 7
Remove from oven, let rest 1 minute, then invert onto plates.
- 8
Dust with powdered sugar, add raspberries, and a scoop of ice cream if desired.
- 9
Serve immediately while the center is still molten.
- 10
Enjoy the luxurious flow of chocolate and share your experience!
🥗 Nutritional Information (per serving)
*Values are estimates based on listed ingredients.
📚 You May Also Like

Classic Crème Brûlée

Raspberry Chocolate Mousse

Salted Caramel Tart


💬 Comments & Reviews
Leave a Comment
No comments yet. Be the first to share your thoughts!