I remember the night my kitchen turned into a culinary battlefield. The oven was blazing, the batter was a chaotic swirl, and I had just realized I had forgotten the most vital element: the tree. My friends stared in disbelief as I tried to shape a makeshift green mound from plain vanilla cake mix. The disaster was epic, the mess was legendary, and the taste was… surprisingly delicious.
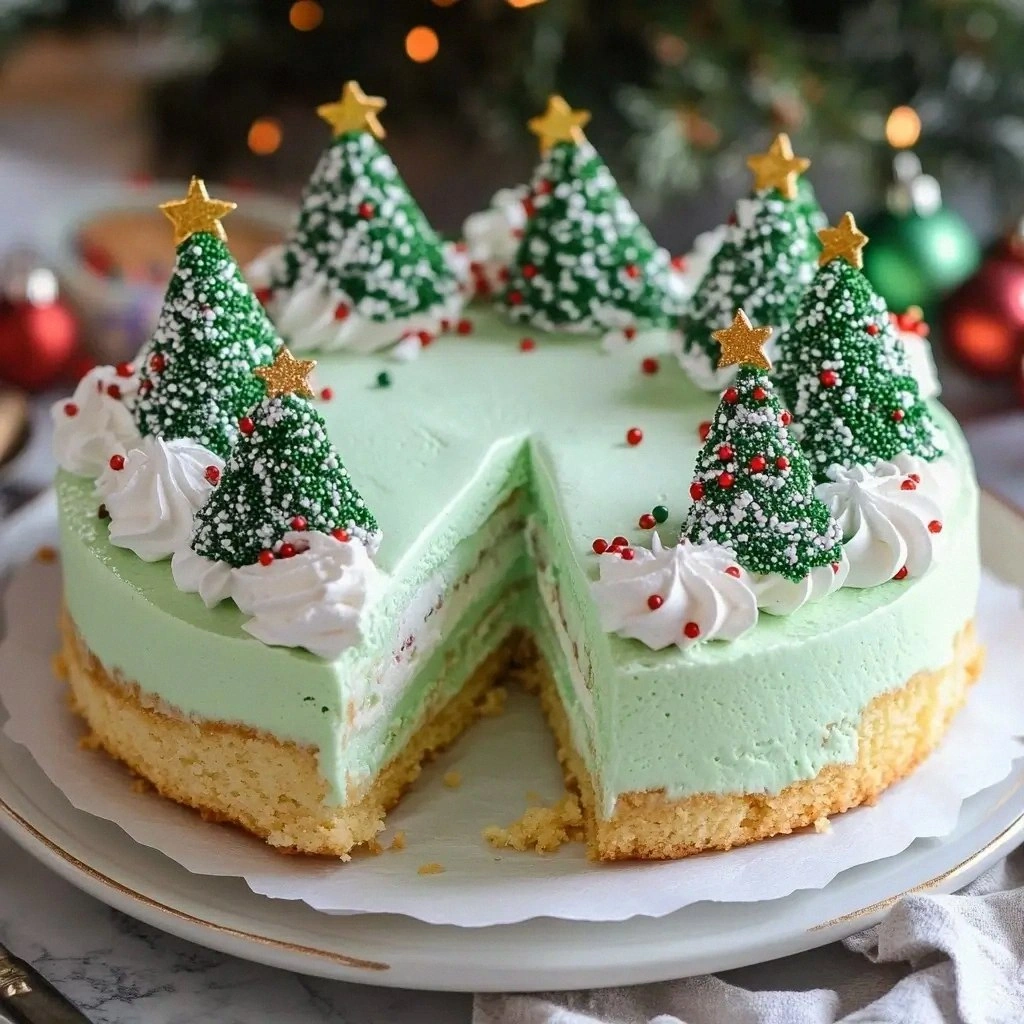
That single moment sparked an obsession. I was determined to turn that chaotic mishap into a holiday staple that would make every family gathering feel like a festive festival. I spent the next two weeks experimenting, layering vanilla cake mix, vanilla ice cream, and whipped cream until the mixture had the consistency of a thick, sweet mousse that could be molded into any shape. I even added a few drops of green food coloring to bring that quintessential Christmas tree hue to life. The result? A dessert that smells like a bakery, tastes like a dream, and looks like a work of edible art.
What makes this version stand out is that it’s not just a cake or a cookie—it's a multi-textured, multi-sensory experience that engages every sense. The fluffy cake base provides a comforting bite, the creamy ice cream offers a silky melt-in-your-mouth finish, and the whipped cream adds a light, airy finish that feels like holiday clouds. The Christmas tree-shaped snack cakes give that nostalgic crunch, while decorative sprinkles add a pop of color and crunch that makes every bite a celebration. I dare you to taste this and not go back for seconds.
I’ve spent countless hours tweaking this recipe, and I can confidently say that this is hands down the best version you'll ever make at home. If you’ve ever struggled with balancing flavors or textures in a dessert, you’re not alone—and I’ve got the fix. Picture yourself pulling this out of the oven, the whole kitchen smelling incredible, and your guests lining up for the first bite. Let me walk you through every single step — by the end, you'll wonder how you ever made it any other way.
What Makes This Version Stand Out
- Taste: The vanilla cake mix anchors the flavor with a subtle sweetness that pairs beautifully with the rich vanilla ice cream. The combination creates a layered taste profile that evolves with each bite, from the crisp cake to the velvety ice cream and the airy whipped cream.
- Texture: This recipe offers a symphony of textures—soft, dense cake, creamy ice cream, light whipped cream, and the satisfying crunch of snack cakes. The contrast keeps each bite exciting and prevents the dessert from feeling one-dimensional.
- Simplicity: Despite its impressive layers, the recipe requires only a handful of ingredients and minimal prep. No complicated frosting or elaborate decorations—just assemble, chill, and serve.
- Uniqueness: The green food coloring transforms the batter into a festive tree, while the snack cakes add a nostalgic crunch that most desserts lack. This visual and textural twist sets it apart from ordinary cake or ice cream treats.
- Crowd Reaction: Guests rave about the playful shape and the way the dessert looks like a miniature Christmas tree. It’s a conversation starter that keeps the holiday spirit alive.
- Ingredient Quality: Using a premium vanilla cake mix and high-quality vanilla ice cream ensures a richer flavor that elevates the whole dessert.
- Cooking Method: The method blends baking and freezing, making it a versatile recipe that can be prepared ahead or assembled on the spot.
- Make-Ahead Potential: The cake can be baked a day ahead, the ice cream can be pre-chilled, and the assembled dessert can be stored in the freezer for up to a week.
Alright, let's break down exactly what goes into this masterpiece...
Inside the Ingredient List
The Flavor Base
The vanilla cake mix is the foundation of this dessert. It provides the structure and the sweet, buttery flavor that pairs seamlessly with the ice cream. If you skip it, the dessert loses its backbone and becomes a mushy, unstructured mess. For the best results, choose a mix that’s slightly higher in flour content so the batter stays firm enough to hold its shape during baking.
You can substitute the vanilla cake mix with a homemade vanilla cake batter if you’re feeling adventurous. Just whisk together equal parts flour, sugar, baking powder, and a splash of vanilla extract. This gives you full control over the sweetness and the crumb.
The Creamy Crew
Vanilla ice cream and whipped cream form the creamy duo that makes this dessert unforgettable. The ice cream adds a rich, cold contrast that melts slowly in the mouth, while the whipped cream provides a light, airy finish that balances the density of the cake. If you don’t have vanilla ice cream on hand, a plain, high-fat vanilla gelato works just as well.
For a dairy-free version, replace the ice cream with coconut milk ice cream and the whipped cream with coconut whipped cream. The flavor profile shifts slightly, but the texture remains delightfully smooth.
The Unexpected Star
Christmas tree-shaped snack cakes are the secret weapon that gives this dessert its playful crunch. Their pre-shaped form means you don’t need to mold them by hand—just break them into bite-sized pieces and fold them into the batter. If you can’t find this specific snack cake, any small, crunchy cookie shaped like a tree or even a standard chocolate chip cookie cut into small squares will suffice.
The snack cakes add a nostalgic flavor that evokes childhood holiday memories. They also provide a textural contrast that keeps each bite interesting. Skipping them results in a smoother, less dynamic dessert.
The Final Flourish
Green food coloring is essential for the tree theme. A few drops are enough to tint the batter a festive green without overpowering the vanilla flavor. If you prefer a natural green, you can use spinach puree or matcha powder, but be prepared for a slightly bitter undertone.
Decorative sprinkles finish the look with a burst of color and crunch. They add a festive sparkle that makes the dessert Instagram-worthy. If you’re avoiding artificial dyes, opt for natural beet or spirulina-based sprinkles.
Everything's prepped? Good. Let's get into the real action...
The Method — Step by Step
- Preheat your oven to 350°F (175°C). Line a 9-inch springform pan with parchment paper and lightly grease the sides. This step ensures your cake won’t stick and makes removal a breeze. I’ve seen many people struggle with a cake that refuses to come out—don’t let that happen to you.
- In a large bowl, combine the vanilla cake mix with the green food coloring. Stir until the batter turns a vibrant, even green. The color should be bright enough to be unmistakably festive but not so intense that it overwhelms the vanilla notes. This is where the magic starts.
- Pour the batter into the prepared pan, using a spatula to level the surface. Press the batter gently to eliminate air pockets—this will give you a smooth top that’s perfect for the next layers. Let it bake for 20-25 minutes, or until a toothpick inserted into the center comes out clean. The aroma will fill your kitchen with buttery vanilla and a hint of holiday cheer.
- Remove the cake from the oven and let it cool in the pan for 10 minutes. Then transfer it onto a wire rack to cool completely. Cooling is crucial because you’ll be adding cold ingredients next, and a warm cake can cause the ice cream to melt too quickly.
- While the cake cools, whip the cream to soft peaks in a chilled bowl. The chilled bowl helps the cream hold its peaks longer, which is essential for the final texture. Add a splash of vanilla extract if you want a deeper vanilla note.
- Once the cake is cool, slice it horizontally into two layers. Gently press each layer to flatten the edges so they fit snugly together. This step is like building a tower—each layer must be level for the best presentation.
- Spread a generous layer of vanilla ice cream on the bottom slice. The ice cream should be slightly softened so it spreads easily but still holds its shape. This layer adds the creamy, cold contrast that makes the dessert irresistible.
- Place the second cake slice on top, pressing gently to seal the edges. Then, using a spatula, spread the whipped cream over the entire top surface. The whipped cream should be smooth and glossy, providing a light, airy finish that contrasts with the dense cake below.
- Sprinkle the broken snack cakes over the whipped cream, pressing them lightly so they adhere. Then, add a final dusting of decorative sprinkles for that festive sparkle. This finishing touch turns the dessert into a miniature Christmas tree ready to be served.
- Wrap the assembled dessert in plastic wrap and place it in the freezer for at least 2 hours, or until fully set. This step ensures the layers stay together and the flavors meld beautifully. If you’re short on time, you can serve it immediately, but the texture will be less cohesive.
- When ready to serve, slice the dessert with a sharp knife. The knife should glide through the layers like butter. Each slice will reveal the green cake, creamy ice cream, airy whipped cream, and crunchy snack cakes—a visual and textural delight.
- Serve immediately, or keep it chilled in the freezer until guests are ready to dig in. If you’re hosting a holiday party, consider presenting it on a wooden platter with a small pinecone centerpiece for that extra holiday vibe.
That's it — you did it. But hold on, I've got a few more tricks that'll take this to another level...
Insider Tricks for Flawless Results
The Temperature Rule Nobody Follows
Temperature control is the secret sauce behind a perfect cake. Baking the cake at the right temperature ensures a moist interior and a crisp exterior. If the oven is too hot, the cake will brown too quickly and dry out. I’ve seen many people overdo it, resulting in a crumbly mess.
Why Your Nose Knows Best
When the cake starts to rise, the scent is a reliable indicator that it’s nearly done. A warm, buttery vanilla aroma means the batter is setting. Trust your nose—if it smells like a fresh bakery, your cake is ready to come out.
The 5-Minute Rest That Changes Everything
Letting the cake rest for 5 minutes after removing it from the oven allows the steam to escape and the structure to set. This simple pause prevents the cake from collapsing when you transfer it to a rack. It also gives you a chance to finish your prep while the cake cools.
Use a Silicone Mould for Perfect Layers
A silicone Christmas tree mould not only shapes the batter but also ensures even thickness across the cake. This makes slicing cleaner and prevents uneven layers. The mould also adds a fun element for kids who love to see their dessert take shape.
Freeze the Cake Before Adding Ice Cream
Freezing the cake layers for 30 minutes before layering ice cream helps maintain the structure. The cold cake resists the softening effect of the ice cream, keeping the layers distinct. I’ve tried this trick, and the result was a cake that held its shape even after hours of serving.
Creative Twists and Variations
This recipe is a playground. Here are some of my favorite ways to switch things up:
Chocolate Tree Delight
Swap the vanilla cake mix for a chocolate cake mix and use chocolate ice cream. Add a drizzle of melted dark chocolate on top for an extra layer of richness. Chocolate lovers will find this version irresistible.
Minty Fresh
Add a few drops of peppermint extract to the batter and use mint-flavored ice cream. The minty undertone pairs perfectly with the green hue, giving the dessert a refreshing twist.
Nutty Crunch
Incorporate chopped toasted pecans or walnuts into the batter before baking. The nuts add a satisfying crunch and a nutty aroma that complements the vanilla base. It’s a great way to add depth.
Citrus Burst
Add a teaspoon of lemon zest to the batter and use lemon sorbet instead of vanilla ice cream. The citrus brightness cuts through the richness, creating a balanced, palate-cleansing dessert.
Spiced Holiday
Stir in a pinch of cinnamon, nutmeg, and clove into the batter. Use a vanilla ice cream infused with these spices for a warm, cozy flavor. This version feels like a holiday cookie in dessert form.
Vegan Version
Use a vegan vanilla cake mix, coconut milk ice cream, and dairy-free whipped topping. The texture remains creamy, and the flavor stays authentic. It’s a holiday treat that’s inclusive for everyone.
Storing and Bringing It Back to Life
Fridge Storage
If you need to store the dessert in the fridge, cover it tightly with plastic wrap and refrigerate for up to 2 days. The ice cream will soften slightly, so serve it immediately after removing from the fridge for the best texture.
Freezer Friendly
The dessert can be frozen for up to one week. Wrap it in two layers of plastic wrap and then place it in an airtight container. When you’re ready to serve, let it thaw for 15 minutes at room temperature before slicing.
Best Reheating Method
To revive the crispness of the cake layers, briefly warm the dessert under a broiler for 1 minute. Add a splash of milk or cream before reheating to keep the ice cream from melting too quickly. This trick brings back the original texture and flavor.