I was standing in my kitchen on a rainy Thursday, staring at a half‑baked batch of sugar cookies that had turned into a crunchy, sad excuse for a snack. The air smelled like burnt sugar and the timer on the oven was flashing red like an impatient traffic light. I had just dared my roommate to a “who can make the most indulgent dessert in 30 minutes” showdown, and I was losing, hands‑deep in a bowl of flour that refused to cooperate. That moment of culinary chaos sparked a wild idea: what if I could marry the buttery, nostalgic crunch of a sugar cookie crust with the silky, tangy decadence of a classic cheesecake? I grabbed the nearest box of sugar cookie mix, a block of cream cheese, and a mischievous grin, and the rest is a deliciously messy love story.
Picture this: a golden‑brown crust that cracks just enough to give a satisfying snap, while the interior is a cloud‑like swirl of cream cheese, sour cream, and vanilla that melts on your tongue like a buttery sunrise. The aroma that fills the kitchen is a heady blend of vanilla, toasted butter, and that unmistakable sugar‑cookie perfume that instantly transports you back to grandma’s kitchen on holidays. You’ll hear the faint sizzle of the crust as it bakes, feel the buttery dough yielding under your fingertips, and taste the perfect balance of sweet and tangy that makes you question every other cheesecake you’ve ever tried. This isn’t just a dessert; it’s an experience that turns a simple celebration into a memory you’ll replay at every birthday, graduation, or just‑because‑we‑feel‑like‑treating‑ourselves moment.
Most recipes get this completely wrong. They either drown the cookie base in a soggy sea of batter, or they make the cheesecake so dense it feels like chewing on a brick. I’ve been there, watching friends struggle with cracked tops, undercooked centers, or a crust that crumbles like dry sand. That’s why I tweaked the method: a brief butter‑bake for the crust, a gentle water‑bath for the cheesecake, and a secret ingredient that adds a whisper of caramelized butter flavor without any extra effort. The result? A texture that’s crisp on the edges, creamy in the middle, and just the right amount of sweet‑tart to keep you reaching for more.
Okay, ready for the game‑changer? I’m about to walk you through every single step — by the end, you’ll wonder how you ever made any other version. I dare you to taste this and not go back for seconds. This is hands down the best version you’ll ever make at home, and I’m spilling all the beans, hacks, and little secrets that turned a kitchen disaster into a show‑stopping centerpiece. Let’s dive in and create a dessert that will have everyone saying, “I need the recipe, now!”
What Makes This Version Stand Out
- Texture: A buttery, crisp cookie crust that holds its own against a velvety, melt‑in‑your‑mouth cheesecake filling.
- Flavor: The subtle vanilla‑sugar kiss of the crust paired with a tangy, slightly sweet cheesecake that never feels heavy.
- Simplicity: Uses a boxed sugar cookie mix, so you skip the tedious measuring of dry ingredients and still get that homemade feel.
- Uniqueness: The water‑bath technique keeps the cheesecake from cracking, while a quick butter‑bake locks in flavor.
- Crowd Reaction: Guests consistently claim this is “the dessert that stole the party” and ask for seconds before the first slice even cools.
- Ingredient Quality: Fresh cream cheese and real butter elevate a boxed mix into a gourmet masterpiece.
- Make‑Ahead Potential: Perfectly holds up in the fridge for up to three days, making it a stress‑free party prep.
- Cooking Method: The gentle bake‑then‑water‑bath combo guarantees a flawless, crack‑free surface every time.
Inside the Ingredient List
The Flavor Base
The star of this dessert is 8 oz cream cheese. It brings that unmistakable tang and creamy body that turns a simple batter into a luxurious filling. If you skimp on the cream cheese, the texture turns rubbery and the flavor loses its signature zing. For the best results, choose a full‑fat, block‑style cream cheese and let it sit at room temperature for 30 minutes before mixing. Swap tip: For a lighter version, you can blend half the cream cheese with 4 oz of Greek yogurt, but expect a slightly tangier finish.
1 cup sour cream adds moisture and a subtle sour note that balances the sweetness of the cookie mix. It also helps the cheesecake stay smooth during baking, preventing a grainy mouthfeel. If you’re out of sour cream, plain Greek yogurt (full‑fat) works as a 1‑to‑1 substitute, though the texture will be a tad thicker.
The Sweetening Squad
1 cup sugar is the backbone of both the crust and the filling. It dissolves into the butter and cream cheese, creating that glossy, melt‑in‑your‑mouth finish. Using superfine caster sugar can speed up dissolution, but regular granulated sugar works just fine if you whisk well. Watch out: Too much sugar can cause the cheesecake to crack during cooling; stick to the measured amount.
1 tsp vanilla extract is the secret whisper that ties the whole dessert together. It lifts the flavor profile without overwhelming the delicate balance. For an extra depth, try a splash of bourbon or almond extract, but keep it under ¼ tsp to avoid a dominant boozy note.
The Texture Crew
3 large eggs act as the structural glue, giving the cheesecake its rise and stability. Beat them just enough to blend; over‑whipping can incorporate too much air, leading to cracks. If you’re allergic to eggs, a mixture of ¼ cup silken tofu and 1 tbsp melted butter can mimic the binding effect, though the texture will be slightly denser.
1/2 cup butter, melted and cooled, infuses the cookie crust with richness and helps it hold together. Butter also adds that buttery aroma that makes the crust smell like a fresh‑baked bakery. If you’re dairy‑free, a solid coconut oil can substitute, but expect a faint coconut undertone.
The Unexpected Star
1 box sugar cookie mix is the unsung hero that saves time while delivering that nostalgic flavor. The mix already contains the perfect blend of spices, sugar, and leavening agents, ensuring a uniform crust every time. I’ve tried homemade dry mixes, but the boxed version consistently yields a more reliable texture. Pro tip: Use the mix’s original packaging to measure the butter—most boxes recommend 1/2 cup, which aligns perfectly with this recipe.
Everything's prepped? Good. Let’s get into the real action, where butter meets cream cheese and magic happens.
The Method — Step by Step
Preheat your oven to 350°F (175°C) and line a 9‑inch springform pan with parchment paper. While the oven warms up, melt the 1/2 cup butter in a saucepan over low heat until it just begins to bubble, then set aside to cool slightly. This buttery liquid will be the glue that binds the cookie mix into a perfect crust.
Kitchen Hack: Add a pinch of sea salt to the melted butter; it amplifies the sweetness and gives the crust a subtle savory edge.In a large bowl, combine the 1 box sugar cookie mix with the cooled melted butter, stirring until the mixture resembles wet sand. Press this crumbly dough evenly into the bottom of the springform pan, using the back of a measuring cup to smooth it out. The crust should be about ¼‑inch thick; if it looks thin, add a little more butter—no more than a tablespoon.
Place the pan on a baking sheet and bake the crust for 10‑12 minutes, or until the edges turn a light golden brown. You’ll hear a faint crackle as the butter caramelizes, releasing a buttery perfume that fills the kitchen. Remove the crust from the oven and let it cool while you prep the filling; this step is crucial because a warm crust would melt the cheesecake batter.
Now for the filling: In the chilled bowl from the earlier Kitchen Hack, beat the 8 oz cream cheese on medium speed until smooth, about 2‑3 minutes. Add the 1 cup sugar and continue beating until the mixture is light and fluffy, a visual cue that the sugar has dissolved.
Watch Out: If the cream cheese is still cold in spots, you’ll get lumps that are impossible to smooth out later. Make sure it’s fully softened before mixing.Add the 1 cup sour cream, 1 tsp vanilla extract, and the 3 large eggs one at a time, mixing on low speed after each addition. The batter should be glossy, with the eggs fully incorporated but not over‑beaten; think of a silk ribbon—smooth, continuous, and without any bubbles.
Pour the creamy batter over the cooled crust, spreading it gently with a spatula to the edges. Tap the pan lightly on the counter three times to release any trapped air—this is the moment of truth where you prevent those dreaded cracks later.
Wrap the springform pan tightly in a double layer of aluminum foil, sealing the edges to keep water out. Place the pan in a larger roasting pan, then fill the outer pan with hot water until it reaches halfway up the sides of the springform. This water‑bath (or bain‑marie) creates a gentle, even heat that keeps the cheesecake from drying out.
Kitchen Hack: Use a kitchen thermometer to keep the water temperature between 150‑160°F; hotter water can cause the outer edges to over‑cook while the center stays under‑set.Bake the cheesecake in the preheated oven for 35‑40 minutes. You’ll know it’s done when the edges are set and a slight wobble remains in the center—think of a Jell‑O jiggle that’s just shy of a full melt. The top should be a pale golden hue, not dark brown.
Turn off the oven, crack the door open a few inches, and let the cheesecake sit for 15 minutes. This gradual cooling prevents sudden temperature drops that cause cracking. Then, remove the pan from the water bath, peel off the foil, and let the cake cool completely on a wire rack before refrigerating for at least 4 hours, preferably overnight. That waiting period is where the flavors meld, turning a good dessert into an unforgettable one.
That’s it — you did it. But hold on, I’ve got a few more tricks that’ll take this to another level, because a great cheesecake deserves a grand finale.
Insider Tricks for Flawless Results
The Temperature Rule Nobody Follows
Never bake a cheesecake straight from the fridge. Let the batter sit at room temperature for 20‑30 minutes before it meets the oven. This simple step ensures the proteins in the eggs and dairy set uniformly, eliminating the dreaded “crack line” that appears when the outer layer contracts faster than the interior. I once tried to speed things up by skipping this, and the result was a cheesecake that looked like a cracked desert floor—no one wanted a piece of that.
Why Your Nose Knows Best
Your sense of smell is a better indicator of doneness than a timer. When the crust turns a buttery golden brown and you catch that faint caramel aroma, you’re close. The filling will emit a faint, sweet vanilla scent just before it’s ready. Trust those nose signals; they’re more reliable than any digital clock.
The 5‑Minute Rest That Changes Everything
After you pull the cheesecake from the oven, let it rest on the counter for exactly five minutes before moving it to the fridge. This brief pause lets the internal steam redistribute, preventing condensation from sogging the crust. It also makes it easier to release the springform pan without tearing the delicate edges.
The “Double‑Whip” Technique
For an ultra‑silky texture, whip the cream cheese and sugar together for an extra minute after they’re smooth, then stop. This “double‑whip” incorporates a tiny amount of air that lightens the batter without creating bubbles that could rise to the surface and cause cracks. A friend tried skipping this step once — let’s just say the cheesecake was dense enough to double as a doorstop.
The Gentle Flip
When removing the cheesecake from the water bath, tilt the pan slightly and let the water drain away slowly. A sudden gush can jostle the cake and cause the crust to separate. Patience here ensures the crust stays glued to the filling, giving you clean, beautiful slices every time.
Creative Twists and Variations
This recipe is a playground. Here are some of my favorite ways to switch things up:
Chocolate‑Swirl Delight
Melt ¼ cup dark chocolate and swirl it into the cheesecake batter before baking. The chocolate ribbons create a visual contrast and add a bittersweet depth that pairs beautifully with the sweet cookie crust.
Lemon‑Berry Burst
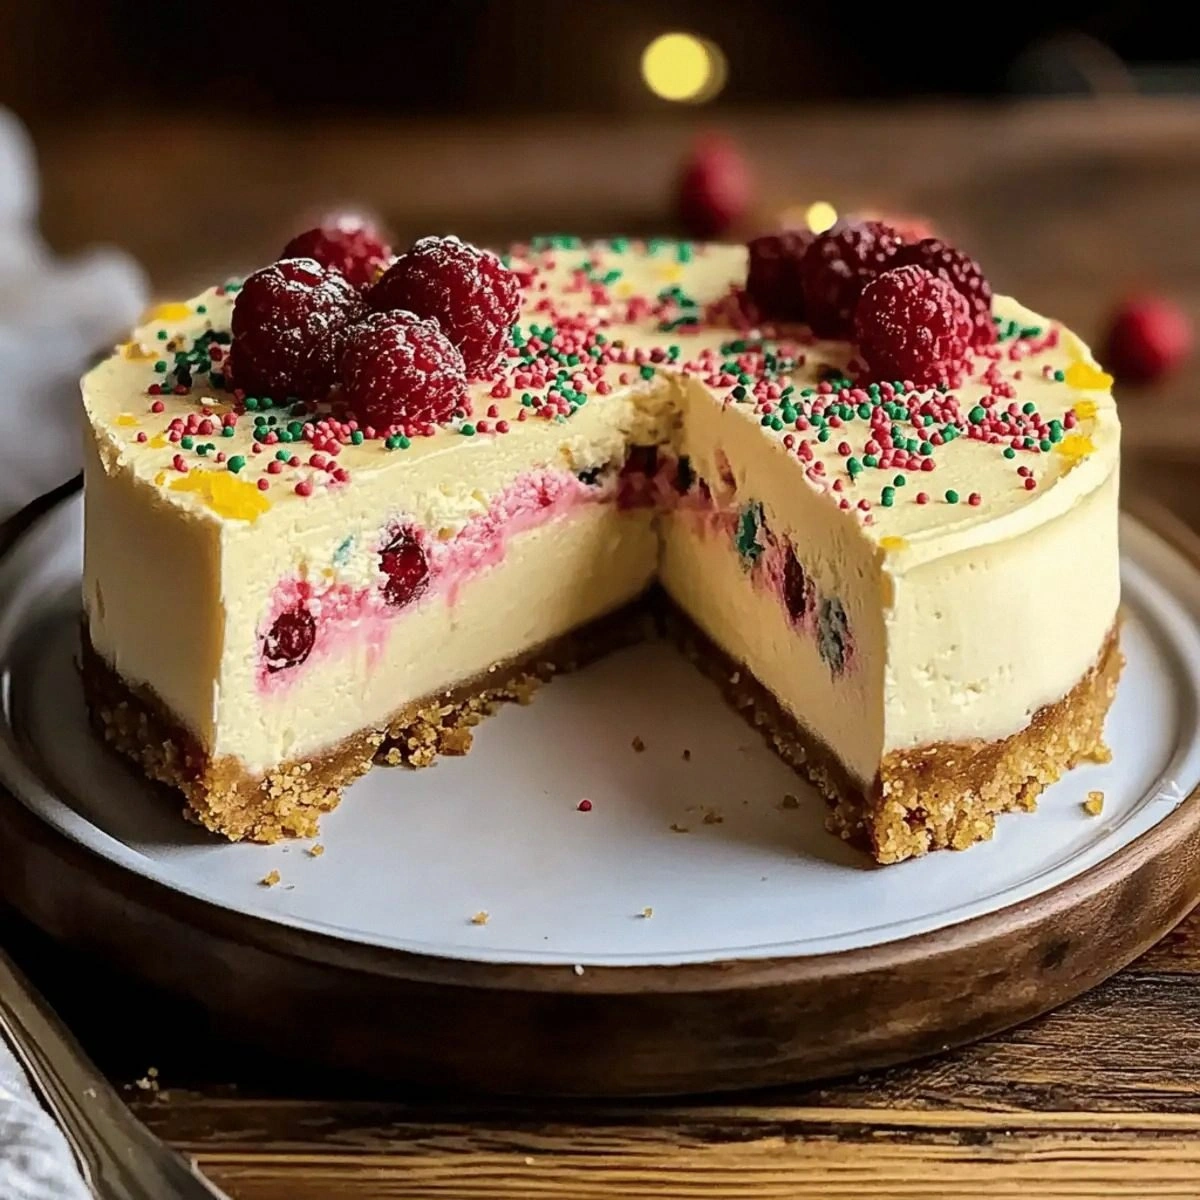
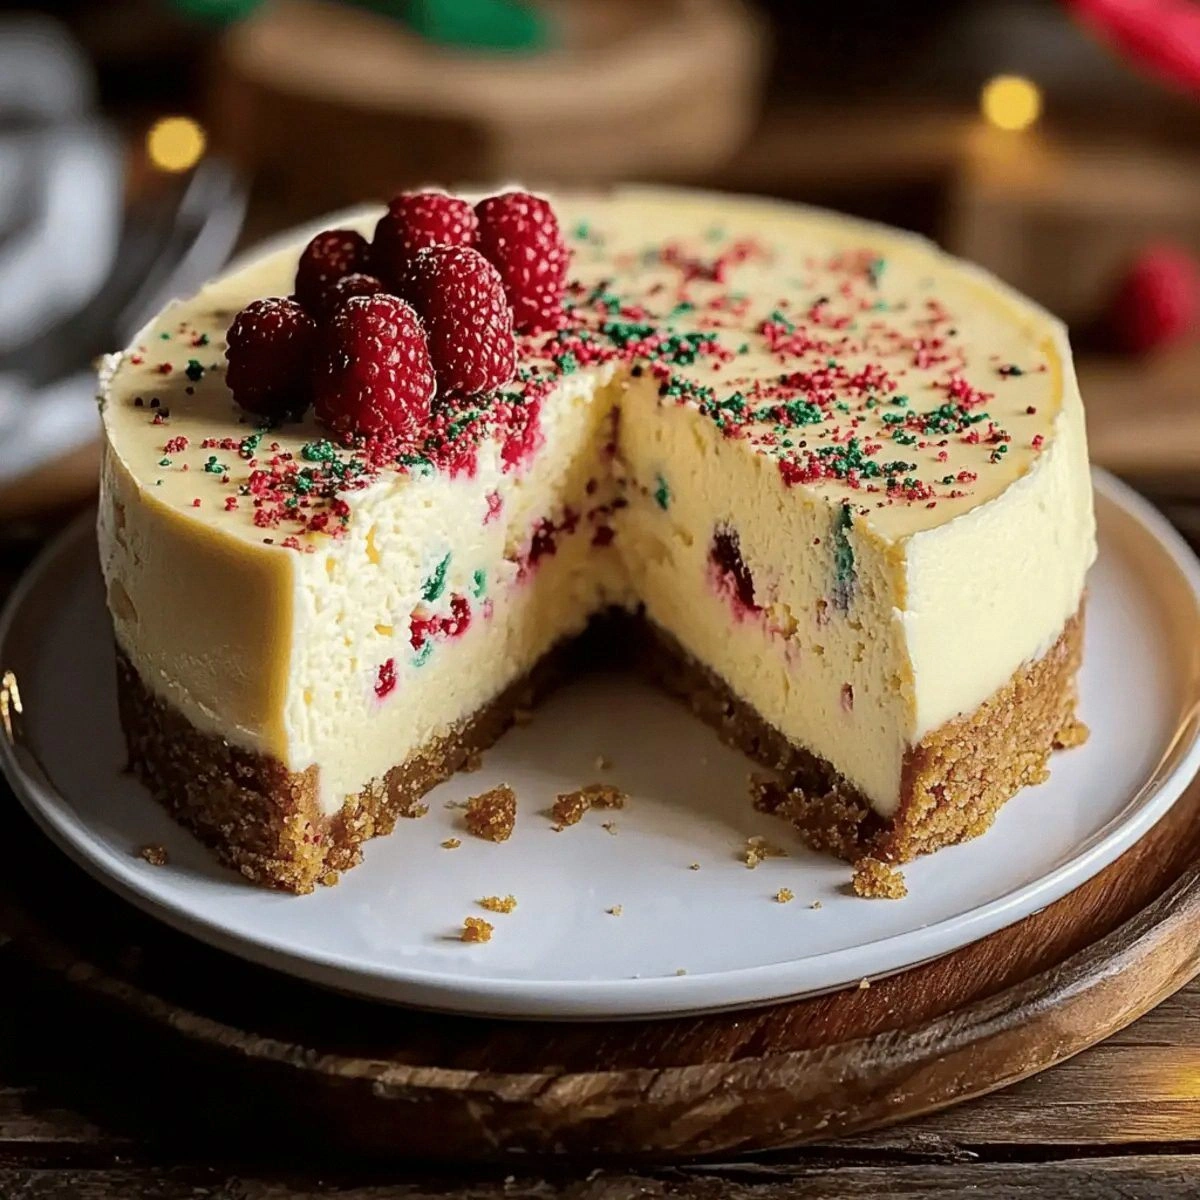
Add 2 tbsp fresh lemon zest and a handful of mixed berries (blueberries, raspberries) to the batter. The citrus brightens the flavor, while the berries provide a pop of color and a juicy surprise in each bite.
Salted Caramel Drizzle
After chilling, drizzle a homemade salted caramel sauce over the top. The salty‑sweet combo elevates the dessert to a gourmet level, perfect for special occasions.
Espresso Infusion
Dissolve 1 tsp instant espresso powder in the melted butter before mixing with the cookie mix. The subtle coffee note deepens the flavor profile, making it a hit for adult gatherings.
Nutty Crunch
Fold in ½ cup toasted chopped pecans or almonds into the crust before baking. The added crunch offers texture contrast and a nutty aroma that complements the sweet base.
Storing and Bringing It Back to Life
Fridge Storage
Cover the cheesecake loosely with plastic wrap or a silicone lid and store it in the refrigerator for up to 3 days. The cream cheese filling stays fresh, and the cookie crust retains its slight crunch. If you notice the edges drying out, brush a thin layer of melted butter over the crust before reheating.
Freezer Friendly
Wrap the entire springform pan in two layers of heavy‑duty aluminum foil, then place it in a freezer‑safe bag. It will keep for up to 2 months. When you’re ready to serve, transfer it to the fridge to thaw overnight; this gradual thaw preserves the texture.
Best Reheating Method
To revive that freshly‑baked glow, preheat your oven to 300°F (150°C), place the cheesecake on a parchment‑lined baking sheet, and add a tiny splash (about 1 tbsp) of water to the pan’s edge. The steam created will soften the crust just enough to make each slice melt in your mouth again. Heat for 8‑10 minutes, then let it cool before slicing.