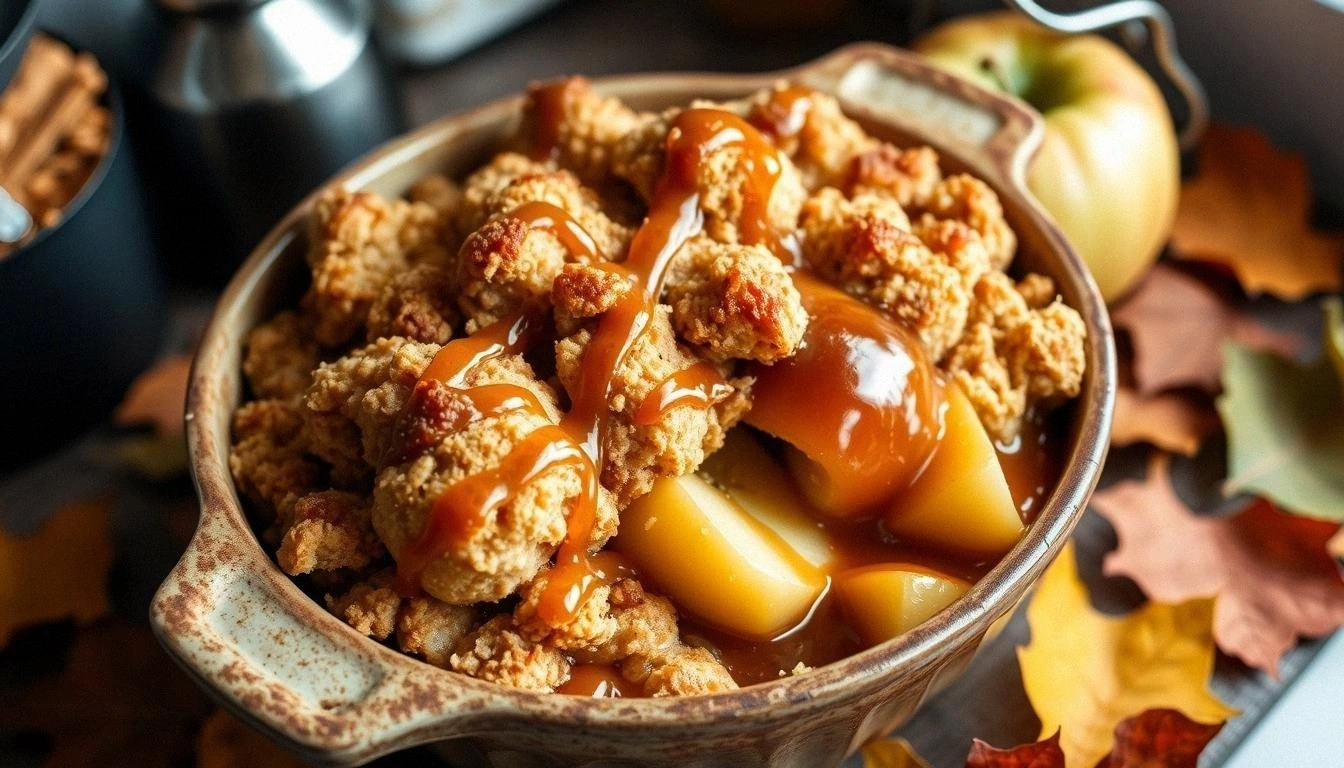
It started on a rainy Wednesday when I tried to rescue a batch of over‑cooked apples that had turned into a soggy mess. I was staring at the pot, feeling the heat rise from the stove, and decided to throw everything into a single dish, hoping for a miracle. That night, as the aroma of caramelized sugar filled the kitchen, I tasted something that felt like a hug in a bowl. The apples were tender, the caramel sauce glistening, and the crumbly topping cracked like a golden sunrise. I knew then that I had stumbled upon a recipe that would change the way I think about comfort food.
Picture this: a bubbling pan of apples, the sweet scent of brown sugar mingling with the sharp, earthy note of fresh cinnamon. The sound of the caramel sauce thickening is like a gentle drumbeat, each bubble popping with a promise of indulgence. As you stir, the kitchen feels warm and inviting, as if the oven is whispering secrets about sweet, buttery bliss. The first bite is a symphony—crisp apples, molten caramel, and a crumbly crust that crunches like a crisp autumn leaf. The flavors melt together, leaving a lingering warmth that comforts the soul.
What makes this version stand out isn’t just the ingredients, it’s the philosophy behind every step. I dare you to taste this and not go back for seconds. The caramel is made from scratch, not just drizzled but folded into the apples, ensuring every bite is coated in velvety sweetness. The topping is a simple blend of flour, butter, and brown sugar, baked to a golden crisp that snaps like fresh‑cut sugar. The balance of sweet and savory, the contrast of textures, and the aromatic spices create a dish that feels both nostalgic and brand‑new. If you’ve ever made a cobbler that tasted like a sad disappointment, this one will feel like a triumph.
I’ll be honest—when I first served this to my friends, half the plate vanished in minutes. They called it “the best cobbler” and begged for the recipe. I felt like a culinary magician, and that’s why I’m sharing every detail here. The secret lies in the caramel, the careful layering, and the simple yet powerful technique of letting the apples cook until they’re just shy of mush. Stay with me, because by the end, you’ll wonder how you ever made it any other way.
What Makes This Version Stand Out
- Taste: The caramel-infused apples deliver a rich, buttery sweetness that’s deeper than any store‑bought sauce, and the subtle hint of nutmeg adds a comforting spice.
- Texture: The topping is crisp on the outside, yet tender and slightly chewy on the inside, creating a satisfying contrast with the soft apples.
- Simplicity: With fewer than a dozen ingredients, you can whip up a showstopping dessert in less than an hour, no fancy equipment required.
- Uniqueness: The technique of cooking apples in caramel instead of sugar or syrup gives this cobbler a silky coat that melts on the tongue.
- Crowd Reaction: Guests leave with a full belly and a craving for more; I’ve seen people ask for a second plate before I even finish serving.
- Ingredient Quality: Fresh, firm apples, real butter, and homemade caramel make a difference that you can taste in every bite.
- Make‑ahead Potential: The dish can be assembled the night before, refrigerated, and baked in the morning, freeing you up for a busy day.
Inside the Ingredient List
The Flavor Base
The heart of this cobbler is the apples, chosen for their firm texture and natural sweetness. I prefer Fuji or Honeycrisp because they hold their shape during cooking and provide a crisp bite that balances the caramel. If you’re in a pinch, Gala or Gala‑Honey blends work well, but avoid overly soft varieties like McIntosh, which can turn mushy. The apples are peeled, cored, and sliced into thin rounds to maximize surface area for caramel absorption.
The caramel sauce is the soul of the dish. By simmering brown sugar, butter, and a splash of cream, you create a glossy, buttery glaze that coats the apples and adds depth. The caramel’s golden hue signals the perfect moment when the sugar has caramelized but hasn’t burned—this is where the flavor peaks. A pinch of salt is added to enhance the sweetness and bring out the natural fruitiness of the apples.
The Texture Crew
The topping is a simple blend of flour, brown sugar, baking powder, and butter. The flour provides structure, while the brown sugar adds a subtle molasses note. Baking powder ensures a light lift, preventing the topping from becoming too dense. Butter, melted and cooled just enough to stay pourable, gives the crust a buttery richness that melts in your mouth.
For an extra crunch, sprinkle chopped pecans or walnuts on top before baking. The nuts add a nutty flavor and a delightful crunch that contrasts the soft caramelized apples. If you’re watching calories, you can omit the nuts or replace them with toasted coconut flakes for a tropical twist.
The Unexpected Star
Ground cinnamon and nutmeg are the aromatic stars that elevate the dish. Cinnamon brings a warm, sweet spice that pairs beautifully with apples, while nutmeg adds a subtle earthiness that cuts through the sweetness. A dash of vanilla extract further enhances the overall flavor profile, giving the dish a comforting, almost nostalgic aroma. If you’re adventurous, a pinch of cayenne pepper can add a surprising kick, turning the dessert into a sweet‑heat hybrid.
The Final Flourish
Milk is added to the batter to create a tender crumb. It hydrates the flour, allowing the dough to spread and bake evenly. The milk also helps bind the topping together, ensuring it forms a cohesive, golden crust. The final flourish is a drizzle of extra caramel sauce over the baked cobbler, creating a glossy finish that makes the dish look as good as it tastes.
Everything’s prepped? Good. Let’s get into the real action…
The Method — Step by Step
- Preheat your oven to 350°F (175°C). While the oven warms, bring a large saucepan to a medium‑high flame and add butter, brown sugar, and a splash of heavy cream. Stir until the butter melts and the sugar dissolves into a silky caramel. Watch the mixture; once it turns a deep amber, remove it from heat to avoid burning.
- Add the sliced apples to the caramel, tossing them gently to coat every piece. Sprinkle cinnamon, nutmeg, and a pinch of salt over the apples. Let the mixture simmer for about 10 minutes, or until the apples soften but still retain their shape. This step is the moment of truth—if the apples are mushy, the cobbler will lose its bite.
- In a separate bowl, whisk together flour, baking powder, and a pinch of salt. Slowly fold in the melted butter, mixing until the dough becomes crumbly but not dry. The dough should be coarse enough to crumble when pressed between fingers.
- Transfer the caramelized apples into a greased 9‑inch baking dish. Evenly spread them out to create a uniform layer. If you’re adding nuts, sprinkle them over the apples now; they’ll toast in the oven, adding a delightful crunch.
- Gently spoon the crumbly topping over the apples, ensuring it covers them completely. The topping should be loosely packed; you want it to bake into a golden crust without becoming too dense.
- Place the baking dish in the preheated oven and bake for 30 minutes, or until the topping is golden brown and the caramel bubbles. The scent of baking sugar will fill the kitchen, creating a cozy atmosphere.
- While the cobbler bakes, prepare the final drizzle: heat a small saucepan with a little more caramel sauce until it’s silky. Once the cobbler is out of the oven, pour the warm caramel over the top, letting it soak into the crust and apples. This extra layer of sweetness turns the dish into a showstopper.
- Let the cobbler rest for 5 minutes before serving. The resting period allows the caramel to set slightly, making it easier to scoop. Serve warm with a scoop of vanilla ice cream or a dollop of whipped cream for an extra indulgence.
That's it — you did it. But hold on, I've got a few more tricks that'll take this to another level. The secret sauce is in the details: timing, temperature, and a few small adjustments that elevate the entire experience.
Insider Tricks for Flawless Results
The Temperature Rule Nobody Follows
Many bakers bake at 375°F, but for this cobbler, 350°F is the sweet spot. The lower temperature ensures the topping bakes evenly without burning while the apples finish cooking. If you push the heat too high, the caramel will scorch before the apples are tender. I’ve seen a few of my friends bake at 400°F and end up with a bitter, burnt crust. Keep it steady, and the result will be a golden, caramel‑kissed masterpiece.
Why Your Nose Knows Best
As the caramel bubbles, the aroma is a clear indicator of doneness. When the scent becomes rich and nutty, the sugar has caramelized correctly. If you notice a sharp, burnt smell, the sugar has gone past its prime. Trust your nose; it’s a reliable guide that will save you from a disastrous batch.
The 5‑Minute Rest That Changes Everything
After the cobbler comes out of the oven, let it sit for 5 minutes before cutting. This rest period allows the caramel to thicken slightly, preventing a runny mess when you scoop. It also lets the flavors meld, creating a harmonious blend of sweet and buttery notes. Skipping this step often leads to a soggy topping that clings to the spoon.
Use a Cast‑Iron Skillet for Extra Crunch
If you’re aiming for an extra crispy crust, bake the cobbler in a cast‑iron skillet. The metal conducts heat better, producing a crispier top layer that breaks into fine, buttery flakes. The skillet also retains heat, keeping the cobbler warm longer—perfect for serving to guests who arrive a little late.
Keep the Apples Slightly Firm
When you add the caramelized apples to the pan, make sure they’re not fully soft. A firm apple slice holds its shape and provides a pleasant bite. If you cook them too long, they’ll turn mushy, and the cobbler will lose its structure. The key is to simmer just until they’re tender but still hold their form.
Finish with a Drizzle of Caramel
Right after baking, drizzle warm caramel sauce over the top. The caramel seeps into the crust and apples, creating a glossy finish that looks as good as it tastes. This step also adds an extra layer of sweetness that elevates the dish from good to unforgettable. Don’t skip it—your taste buds will thank you.
Creative Twists and Variations
This recipe is a playground. Here are some of my favorite ways to switch things up:
Maple‑Spiced Cobbler
Swap the brown sugar for maple syrup and add a pinch of ground ginger. The result is a warm, slightly spicy dessert that pairs wonderfully with a splash of bourbon or a scoop of vanilla ice cream. The maple flavor deepens the caramel notes, creating a comforting, autumnal treat.
Apple‑Pear Fusion
Add sliced pears to the apple mixture for a subtle sweetness that complements the caramel. Pears add a delicate, floral aroma, while apples provide the classic tartness. This variation is perfect for those who love a multi‑layered fruit experience.
Chocolate‑Caramel Surprise
Fold in dark chocolate chips into the topping before baking. The chocolate melts into the caramel, creating pockets of molten chocolate that burst with each bite. Pair this with a drizzle of white chocolate sauce for a decadent twist.
Spiced Rum Infusion
Add a tablespoon of dark rum to the caramel sauce for a boozy kick. The rum’s caramel and vanilla undertones enhance the dessert’s depth, making it ideal for a holiday gathering or a cozy evening with friends.
Vegan Version
Replace butter with coconut oil and use a dairy‑free caramel sauce. Swap milk for oat milk and use a plant‑based ice cream for serving. The result is a luscious, guilt‑free dessert that satisfies any vegan palate.
Nut‑Free Crunch
Omit the nuts entirely or replace them with toasted coconut flakes. Coconut adds a tropical sweetness and a subtle crunch that works well with the caramelized apples. This variation is ideal for those with nut allergies.
Storing and Bringing It Back to Life
Fridge Storage
Store leftover cobbler in an airtight container in the refrigerator for up to 3 days. The caramel will firm up slightly, but it remains delicious. To keep the topping from drying out, place a slice of parchment paper between the cobbler and the lid.
Freezer Friendly
Freeze individual portions in freezer‑safe containers for up to 2 months. Wrap each portion in plastic wrap before placing it in the freezer to prevent freezer burn. When you’re ready to enjoy, thaw overnight in the refrigerator.
Best Reheating Method
Reheat frozen or refrigerated portions in the oven at 350°F for 15–20 minutes, or until heated through. Add a splash of milk or a drizzle of caramel sauce before reheating to restore moisture and flavor. The result will be almost as good as freshly baked.