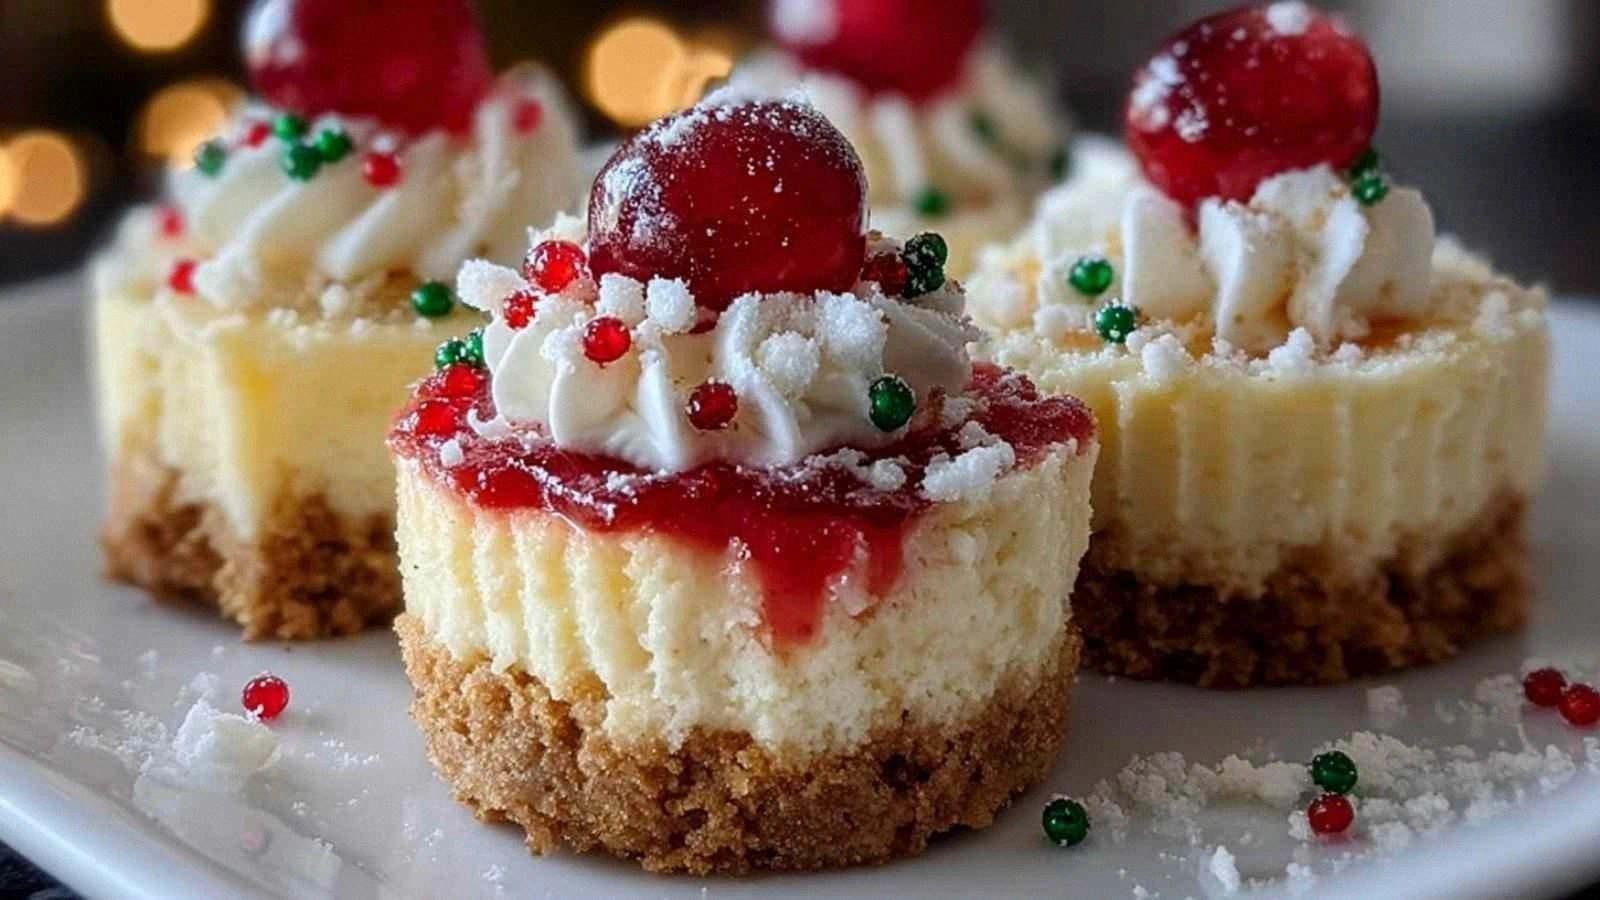
Picture this: the kitchen is a battlefield, flour dusting the air like snow, a stubborn oven timer ticking, and you, determined, chasing a dessert that feels like a holiday miracle. I was in the middle of a family gathering when a friend dared me to create a cheesecake that would outshine the traditional ones that have been handed down for generations. I knew I had to make something that was not only indulgent but also practically effortless, so I set out to craft the ultimate mini Christmas cheesecake that would fit neatly into a holiday spread and a busy schedule.
The first time I tasted the batter, the aroma hit me like a warm blanket—rich cream, subtle vanilla, and a hint of citrus from the sour cream. The sound of the spoon stirring was a gentle hiss, the kind that promises something sweet and silky is about to happen. Visually, the mixture glimmered like a polished marble, promising a creamy interior that would contrast beautifully with a golden crust. The texture was a silky blend that felt like velvet on the tongue, and the subtle tang from the sour cream lifted the flavor profile into a festive, almost celebratory zone. The moment I lifted a spoonful to my lips, I could taste the holiday cheer in every bite—soft, dreamy, and utterly satisfying.
What makes this version stand out from the crowd is that it eliminates the need for a heavy, time-consuming crust, uses only a handful of ingredients, and still delivers that classic cheesecake richness that everyone craves. I swear by the trick of using a chilled mini muffin tin; it keeps the mini cakes from spreading too much, ensuring a perfect bite every time. The secret is that the batter is so smooth that it practically glides onto the tin, creating a uniform, even layer that bakes into a flawless finish. And the best part? You can decorate them with holiday sprinkles that add a pop of color and crunch without overwhelming the delicate flavor.
I dare you to taste this and not go back for seconds. If you've ever struggled with the perfect cheesecake texture or a crust that turns out too soggy, this recipe is your new holy grail. The next few paragraphs will walk you through every single step—by the end, you'll wonder how you ever made it any other way. And trust me, once you try this, the kitchen will never be the same again.
What Makes This Version Stand Out
- Texture: The batter is silky and smooth, creating a dense yet airy crumb that melts in your mouth like a cloud of holiday joy.
- Flavor: A subtle citrus lift from the sour cream balances the richness of the cream cheese, making each bite bright and refreshing.
- Convenience: With only eight ingredients, the prep time is under 15 minutes, and the baking time is a quick 30 minutes.
- Mini Marvels: Each cheesecake is a bite-sized masterpiece, perfect for parties, gift baskets, or a festive treat for the kids.
- Color & Flair: A sprinkle of red and green holiday sprinkles adds a playful, celebratory look that will impress any guest.
- Make‑Ahead Friendly: Chill the batter for a few hours or overnight—this not only saves time but also intensifies the flavors.
- Versatility: Swap the vanilla for a dash of almond extract or add a splash of espresso for a mocha twist.
- All‑Day Delight: The cheesecake holds its shape and flavor for up to 48 hours in the fridge, making it the ultimate make‑ahead dessert.
Alright, let's break down exactly what goes into this masterpiece. And remember, the first step is always the hardest, but once you get the rhythm, the rest will feel like a walk in a snowy park.
Inside the Ingredient List
The Flavor Base
Cream cheese is the cornerstone of any cheesecake. The 8 ounces of cream cheese provide a creamy, tangy foundation that gives the mini cakes their signature richness. Using a room‑temperature cream cheese makes the batter smooth and prevents lumps. If you skip the cream cheese, you lose that velvety mouthfeel and the cheesecake will feel like a plain custard.
The Sweetener
Granulated sugar, at half a cup, balances the tartness of the sour cream and cream cheese. It dissolves completely, preventing a gritty texture. If you prefer a lower‑sugar version, replace with honey or agave syrup, but keep the volume the same to maintain consistency.
The Binding Crew
Two large eggs are essential for binding the mixture, giving it structure and a silky finish. Eggs also contribute to the slight caramelization on the top when baked. If you’re looking for a dairy‑free version, try flax eggs or chia seeds mixed with water; however, the texture will differ slightly.
The Tangy Touch
Half a cup of sour cream adds a subtle tang that cuts through the richness, creating a bright, refreshing contrast. It also adds moisture, keeping the cheesecake from drying out. Skipping it will result in a denser, heavier dessert that may feel too rich for the holiday palate.
The Crumb Layer
A quarter cup of graham cracker crumbs, combined with melted butter, forms a quick and easy crust. The crumbs add a subtle crunch and a buttery flavor that complements the creamy center. If you’re allergic to gluten, use a gluten‑free graham cracker alternative or crushed nuts for a nutty twist.
The Butter Boost
A quarter cup of unsalted butter, melted, ties the graham cracker crumbs together and adds a glossy, golden finish. Butter also contributes to the overall richness and mouthfeel. For a lighter version, replace with coconut oil; just be aware the flavor profile will shift slightly.
Everything's prepped? Good. Let's get into the real action.
The Method — Step by Step
-
Preheat your oven to 325°F (163°C). While the oven is heating, line a mini muffin tin with paper liners or lightly grease each cup. This ensures the cakes release easily after baking and keeps them from sticking.
-
In a medium bowl, beat the cream cheese on medium speed until it’s smooth and creamy. If you see lumps, let it sit for a minute and continue beating; the goal is a silky base that will carry the rest of the ingredients without clumping.
-
Add the granulated sugar and vanilla extract to the cream cheese mixture. Beat until the sugar is fully dissolved and the mixture is glossy. The mixture should feel light and airy, like a custard just before it starts to set.
-
Crack in the eggs, one at a time, beating gently after each addition. This gradual incorporation prevents curdling and ensures a smooth batter. The batter should have a silky consistency, not too runny.
-
Fold in the sour cream until evenly mixed. The sour cream adds moisture and a subtle tang; it’s the secret to preventing a dry, heavy cheesecake. The batter should feel like a thick, velvety mousse.
-
Prepare the crust by mixing the graham cracker crumbs with melted butter until the crumbs are coated and crumbly. Spoon a teaspoon of the crumb mixture into each muffin cup, pressing lightly to create a thin base. The crust should feel firm enough to hold the batter but not too dense.
-
Fill each cup about 3/4 full with the cheesecake batter, smoothing the top with a spatula. The batter should sit just above the crust, creating a neat, even layer. This step is the moment of truth; watch the batter as it settles.
-
Bake for 30 minutes, or until the edges are set and the centers still have a slight wobble. The tops should be a light golden brown. To test doneness, insert a toothpick; it should come out with a few moist crumbs.
-
Turn off the oven and let the cakes sit in the hot oven for 15 minutes with the door slightly ajar. This gradual cooling prevents cracks and ensures a smooth finish. Afterward, transfer the mini cheesecakes to a wire rack to cool completely.
-
Once cooled, top each cheesecake with a handful of red and green holiday sprinkles. Chill in the refrigerator for at least 2 hours before serving. The sprinkles add a festive crunch and a pop of color that makes each bite feel like a holiday gift.
That's it — you did it. But hold on, I've got a few more tricks that'll take this to another level.
Insider Tricks for Flawless Results
The Temperature Rule Nobody Follows
Many bakers bake mini cheesecakes at 350°F, but this recipe calls for 325°F to ensure even cooking. Lower temperatures keep the edges from browning too quickly while the center finishes baking. I once tried 350°F and the tops were burnt before the centers were set, ruining the silky texture.
Why Your Nose Knows Best
The aroma of baking cheesecake is a powerful indicator of doneness. When you smell the subtle vanilla and cream, it means the batter is setting. If you open the oven too early, the scent will be weak and the texture will be undercooked.
The 5-Minute Rest That Changes Everything
Letting the mini cheesecakes rest in the oven with the door ajar for 15 minutes after baking is a game changer. It prevents sudden temperature shifts that could crack the surface and also helps the interior set perfectly. This trick is often overlooked but makes the difference between a flawless and a mediocre cheesecake.
The Chill Factor
Refrigerating the batter for 2 hours before baking intensifies the flavors and creates a richer mouthfeel. If you’re short on time, simply chill the finished mini cakes for at least 4 hours; the flavors will meld beautifully.
The Sprinkle Surprise
Add the holiday sprinkles just before serving, not before baking. Sprinkling them in the oven can burn and create a bitter taste. I’ve seen people add them early and end up with a crunchy, burnt topping that ruins the festive vibe.
Creative Twists and Variations
This recipe is a playground. Here are some of my favorite ways to switch things up:
Peppermint Pop
Add a tablespoon of peppermint extract to the batter and top with crushed candy canes for a minty, festive twist. The peppermint pairs wonderfully with the creamy base, creating a refreshing holiday flavor.
Cranberry Crush
Fold in a handful of fresh or dried cranberries before baking. The tartness of the cranberries provides a bright contrast to the richness, and the berries pop in the mouth with each bite.
Nutty Delight
Replace the graham cracker crust with crushed walnuts or pecans for a crunchy, nutty foundation. The buttery flavor of the nuts complements the cheesecake, adding depth and texture.
Chocolate Swirl
Stir a few tablespoons of melted dark chocolate into the batter for a subtle chocolate undertone. The chocolate swirls through the cheesecake, creating a visually appealing marbled effect.
Lemon Zest
Add a tablespoon of lemon zest to the batter for a bright, citrusy lift. The lemon zest adds a fresh, bright note that cuts through the richness and feels like a holiday breeze.
Espresso Espresso
Stir a teaspoon of espresso powder into the batter for a coffee-infused twist. The espresso adds depth and a subtle bitterness that balances the sweetness, making it a sophisticated choice for adult gatherings.
Storing and Bringing It Back to Life
Fridge Storage
Store the mini cheesecakes in an airtight container in the refrigerator for up to 48 hours. The cool environment preserves the creamy texture and keeps the flavors fresh. Wrap each cheesecake individually in parchment paper to prevent them from sticking together.
Freezer Friendly
For longer storage, freeze the mini cheesecakes in a freezer-safe container for up to 2 weeks. Thaw them overnight in the refrigerator before serving. The texture remains silky, and the flavors stay vibrant.
Best Reheating Method
If you need to warm the cheesecake, place it in a preheated oven at 300°F for 10 minutes. Add a splash of water to the bottom of the pan to create steam, which keeps the cheesecake moist. This method revives the texture without drying it out.