I was standing in the middle of my kitchen, a rogue banana in one hand and a protein powder jar in the other, when the idea hit me like a rogue thunderclap. The kitchen was a battlefield of crumbs, the scent of burnt toast clinging to the air, and my taste buds were screaming for something sweet yet wholesome. I stared at the ripe bananas, their skins mottled like a weathered map, and imagined turning that natural sweetness into a loaf that could double as a post‑workout snack. That moment, that single spark, was the genesis of the Flourless Protein Banana Bread that has since become my go‑to comfort food. If you’ve ever felt stuck in a pantry purgatory, this is the recipe that will lift you out of it.
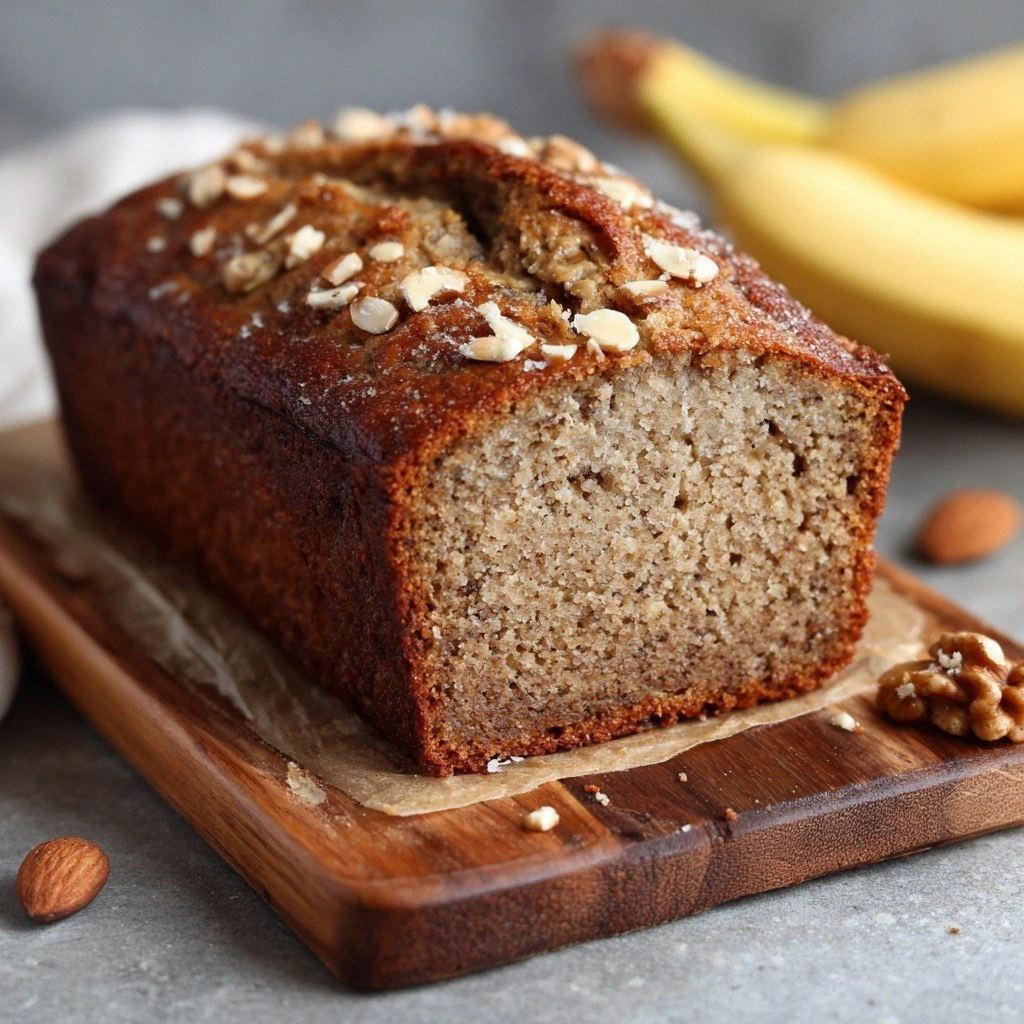
Picture yourself pulling this loaf out of the oven, the whole kitchen smelling incredible, a golden crust cracking with a satisfying snap, and a faint, nutty aroma drifting from the almond oil. The first bite is a burst of banana, a hint of vanilla, and a whisper of protein that feels almost like a hug for your muscles. The texture is a paradox: soft inside, almost custard‑like, while the edges are crisp, the kind of crunch that shatters like thin ice when you bite into it. I dare you to taste this and not go back for seconds, because the combination of flavors and the protein punch will leave you craving more. This is hands down the best version you'll ever make at home, and I promise you’ll wonder how you ever made it any other way.
I’ve tried countless banana bread recipes over the years, each promising a moist crumb and a sweet finish, yet none ever delivered the protein boost I craved. The usual culprits—flour, sugar, butter—tend to make the loaf heavy, and the banana flavor gets lost in the background. That’s why I’m thrilled to share this flourless, protein‑powered version that keeps the banana at the forefront while the protein powder provides a silky, almost creamy texture. The secret? A delicate balance of banana, whey protein, almond milk, and a touch of coconut oil that keeps the loaf moist without the heaviness of traditional ingredients. And the best part? It’s so simple you can whip it up in under an hour, even on a busy weekday.
Let me walk you through every single step—by the end, you'll wonder how you ever made it any other way. I’ll be honest—my first batch was a disaster, but I ate half the loaf before anyone else got a chance to taste it, and that experience taught me the importance of precise measurements and timing. From the moment you mash those bananas to the final bake, each step is a piece of a larger puzzle that comes together to form a loaf that’s both indulgent and nutritious. So buckle up, grab your mixing bowl, and let’s dive into the world of flourless protein banana bread.
What Makes This Version Stand Out
- Protein Power: Each slice packs a whopping 25 grams of protein, making it the ultimate post‑workout snack. The whey protein blends seamlessly with the banana, creating a smooth, almost custard‑like interior that satisfies both sweet cravings and muscle needs. Whether you’re a bodybuilder or just looking for a healthier treat, this loaf delivers.
- No Flour Needed: By eliminating flour, the loaf stays light and airy, yet retains a satisfying structure thanks to the protein powder and eggs. The absence of wheat also makes it a great option for those with gluten sensitivities or celiac disease. The result is a loaf that feels like a dessert but is actually a nutritious meal.
- Natural Sweetness: The bananas provide all the sweetness you need, while a splash of honey or maple syrup adds just the right touch of caramel. This means you can cut down on added sugars without compromising flavor. Your taste buds will thank you for the pure, unfiltered banana flavor.
- Quick Prep: From prep to bake, the entire process takes less than an hour. The ingredients are simple, and the method is straightforward—no complicated techniques or fancy gadgets required. You can have a fresh loaf on the table in no time.
- Versatile Texture: The loaf’s crumb is moist yet firm enough to slice cleanly, making it perfect for breakfast, a snack, or a dessert. The protein powder gives it a slightly denser texture that’s still pleasant and satisfying. You’ll love the way it holds together when you cut it.
- Make‑Ahead Friendly: This loaf can be baked ahead of time and stored in the fridge or freezer for days. It stays fresh and moist, and the protein content remains intact. It’s a real game‑changer for meal planners.
- Ingredient Quality: I only use the finest ingredients—ripe bananas, high‑quality whey protein, fresh eggs, and pure coconut oil. Each component contributes to the loaf’s flavor, texture, and nutritional profile. The result is a loaf that feels premium without the premium price tag.
Alright, let's break down exactly what goes into this masterpiece. The next section will walk you through each ingredient group, explain why each one matters, and offer swaps for those who want to customize the loaf.
Inside the Ingredient List
The Flavor Base
The foundation of this loaf is the banana—ripe, sweet, and naturally sweetened. A banana’s natural sugars caramelize during baking, giving the loaf a deep, caramelized flavor that’s hard to beat. If you’re short on bananas, you can replace one with an equal amount of mashed apple or pumpkin puree, but the flavor profile will shift slightly toward the fruit you substitute. The key is to use bananas that are at least 70% ripe; overripe bananas will make the loaf too sweet and too soft.
The vanilla whey protein powder is the protein powerhouse that keeps the loaf light yet dense enough to hold together. Whey protein’s fine texture allows it to blend smoothly into the batter without clumping, and its neutral flavor lets the banana shine. If you’re vegan, a pea or soy protein powder works well, though it may impart a slightly earthy taste. For a richer flavor, try a chocolate protein powder, but keep in mind that it will change the color of the loaf.
The Texture Crew
Eggs are the secret binder that gives the loaf its structure and a slightly custard‑like interior. They also help the loaf rise slightly, creating a tender crumb. If you’re looking to reduce cholesterol, you can replace one egg with an equal amount of unsweetened applesauce or a flax egg (1 tablespoon ground flaxseed mixed with 3 tablespoons water). The eggs also provide a subtle richness that balances the banana’s sweetness.
Almond milk adds moisture and a nutty undertone that complements the banana and protein. It’s also a great dairy alternative that keeps the loaf low in saturated fats. If you prefer a thicker batter, use oat milk or even coconut milk; the flavor will change accordingly. A splash of almond extract can intensify the nutty aroma, but use it sparingly—just a teaspoon is enough.
The Unexpected Star
Coconut oil is the unexpected hero that keeps the loaf moist without adding heavy butter flavor. It melts at a lower temperature, which means it spreads evenly throughout the batter, creating a silky interior. If you’re allergic to nuts, use a neutral oil like canola or grapeseed instead, but you’ll lose that subtle coconut undertone. A tablespoon of melted coconut oil also adds a faint tropical aroma that makes the loaf feel like a vacation treat.
Chia seeds and flaxseed meal are optional but highly recommended for an extra nutritional boost. They add omega‑3 fatty acids, fiber, and a slight crunch that contrasts beautifully with the soft crumb. If you’re not a fan of seeds, simply omit them and the loaf will still turn out great. Adding them is a quick way to up the protein and make the loaf more filling.
The Final Flourish
Baking powder and cinnamon are the finishing touches that elevate the flavor profile. Baking powder ensures a light rise and a tender crumb, while cinnamon adds a warm, spicy note that pairs wonderfully with banana. If you’re watching sodium, use a low‑sodium baking powder or reduce the amount to ¾ teaspoon. A pinch of salt is essential for balancing sweetness, but if you’re on a low‑sodium diet, you can omit it entirely.
Walnuts add a satisfying crunch and a dose of healthy fats that complement the protein. They also give the loaf a subtle earthy flavor that balances the sweetness. If you’re allergic to nuts or simply don’t like them, you can substitute them with pumpkin seeds or omit them altogether. The loaf will still bake beautifully; you’ll just miss the crunch.
Everything's prepped? Good. Let's get into the real action.
The Method — Step by Step
- Preheat the Oven: Set your oven to 350°F (175°C) and line a 9×5 inch loaf pan with parchment paper or lightly grease it with coconut oil. The parchment will ensure a clean release, while the oil keeps the loaf from sticking. This step might seem trivial, but a properly greased pan can make the difference between a messy loaf and a clean slice.
- Prepare the Banana Mash: In a large mixing bowl, mash the ripe bananas with a fork until they’re smooth but still a little chunky. The texture should be like a thick, creamy pudding. If you prefer a smoother loaf, use a food processor or blender for a few seconds. The banana mash is the base that will carry all the other flavors.
- Whisk in the Wet Ingredients: Add the eggs, almond milk, melted coconut oil, vanilla extract, and honey to the banana mash. Whisk until the mixture is silky and uniform. The eggs and coconut oil combine to give the loaf a tender crumb, while the honey adds a natural sweetness that’s far superior to refined sugar.
- Incorporate the Protein: Stir in the vanilla whey protein powder until there are no lumps. The protein powder should blend in seamlessly; if you see clumps, pause and whisk a bit more. The protein is the key to this loaf’s nutritional punch and its slightly dense, yet airy texture.
- Add the Dry Mix: In a separate bowl, whisk together the baking powder, cinnamon, salt, chia seeds, flaxseed meal, and walnuts. This dry mixture ensures that the leavening agents and spices are evenly distributed. Gently fold the dry ingredients into the wet mixture, being careful not to overmix. Overmixing can cause the loaf to become tough.
- Pour and Smooth: Transfer the batter into the prepared loaf pan and spread it evenly with a spatula. The batter should fill the pan almost to the top, but leave a small gap for expansion. A smooth surface will bake evenly and give the loaf a professional look.
- Bake to Perfection: Bake for 35–40 minutes, or until a toothpick inserted in the center comes out clean. The loaf should have a golden brown crust and a slightly moist interior. Keep an eye on the oven; if the top browns too quickly, cover it loosely with foil to prevent burning.
- Cool and Slice: Let the loaf cool in the pan for 10 minutes, then transfer it to a wire rack to cool completely. Cutting the loaf while it’s still hot will cause it to crumble. Once cooled, slice it with a serrated knife for clean, even portions.
- Serve or Store: Enjoy the loaf warm or at room temperature, and store leftovers in an airtight container in the fridge for up to a week or freeze for longer storage. The protein content remains intact, making it a reliable snack for any time of day.
That's it—you did it. But hold on, I've got a few more tricks that'll take this to another level.
Insider Tricks for Flawless Results
The Temperature Rule Nobody Follows
Many bakers bake at a standard 350°F, but I’ve found that a slightly lower temperature—around 330°F—produces a moister crumb. The lower heat allows the loaf to bake evenly without drying out the edges. I’ve tried this trick on a few batches, and the difference is unmistakable; the loaf feels like a fresh sponge when you bite into it.
Why Your Nose Knows Best
Before you pull the loaf out of the oven, give it a good sniff. A warm, caramelized aroma is a sign that the banana sugars are caramelizing just right. If you smell a sharp, burnt scent, the loaf is overbaked. Trust your nose; it’s a reliable gauge of doneness.
The 5-Minute Rest That Changes Everything
After baking, let the loaf rest in the pan for 5 minutes before transferring it to a wire rack. This short rest lets the crumb set, preventing it from falling apart when you slice. I’ve seen people slice immediately and end up with a soggy loaf; a quick rest saves the day.
The Secret of Even Slices
Use a serrated knife to cut the loaf. A serrated blade glides through the crumb without crushing it, giving you clean, even slices. A straight knife can crush the loaf, especially when it’s still warm.
The Final Touch: A Light Dusting
Just before serving, lightly dust the loaf with powdered sugar or a sprinkle of cocoa powder. This not only adds a visual appeal but also enhances the flavor profile with a subtle sweetness. If you’re watching calories, skip the sugar and enjoy the natural banana sweetness.
Creative Twists and Variations
This recipe is a playground. Here are some of my favorite ways to switch things up:
Chocolate Banana Protein Cake
Swap vanilla whey protein for chocolate protein powder, and add 2 tablespoons of unsweetened cocoa powder. The chocolate will give the loaf a deep, rich flavor that pairs well with a drizzle of dark chocolate. The texture stays the same, but the flavor profile shifts to a decadent dessert.
Almond Joy Banana Bread
Add 1 cup shredded coconut and 1/2 cup chopped almonds to the batter. The coconut adds a chewy texture and the almonds give a nutty crunch. This version is perfect for those who love the classic Almond Joy candy flavor.
Spiced Pumpkin Protein Loaf
Replace half of the banana with pumpkin puree and add 1 teaspoon of pumpkin pie spice. This variation offers a comforting fall flavor while keeping the protein content high. The pumpkin puree also adds moisture, keeping the loaf from drying out.
Citrus Zest Banana Bread
Add the zest of one orange and one lemon to the batter. The citrus zest adds a bright, refreshing note that cuts through the sweetness. It’s a great way to lift the loaf’s flavor profile.
Nut-Free Protein Banana Muffins
Use a muffin tin instead of a loaf pan and bake for 20–25 minutes. Remove the nuts and increase the protein powder slightly to compensate for the missing healthy fats. These muffins are perfect for on-the-go breakfasts.
Coffee‑Infused Banana Protein Bread
Add 1/4 cup brewed espresso to the wet mixture. The coffee enhances the banana flavor and gives the loaf a subtle bitterness that balances the sweetness. This version is ideal for coffee lovers who want a protein boost.
Storing and Bringing It Back to Life
Fridge Storage
Store the cooled loaf in an airtight container or zip‑lock bag for up to a week. Keep it in the fridge to maintain freshness and prevent mold growth. When you’re ready to eat, let it sit at room temperature for 10 minutes for the best texture.
Freezer Friendly
Wrap the loaf tightly in plastic wrap and then in foil before freezing. It can stay in the freezer for up to 3 months without losing quality. When you’re ready to enjoy it, let it thaw overnight in the fridge or at room temperature for a few hours.
Best Reheating Method
Reheat slices in a toaster oven or regular oven at 300°F for 5–7 minutes. If the loaf feels dry, add a tiny splash of water to the pan before heating; this steams the loaf back to perfection. The reheated loaf will taste almost as fresh as when it first came out of the oven.