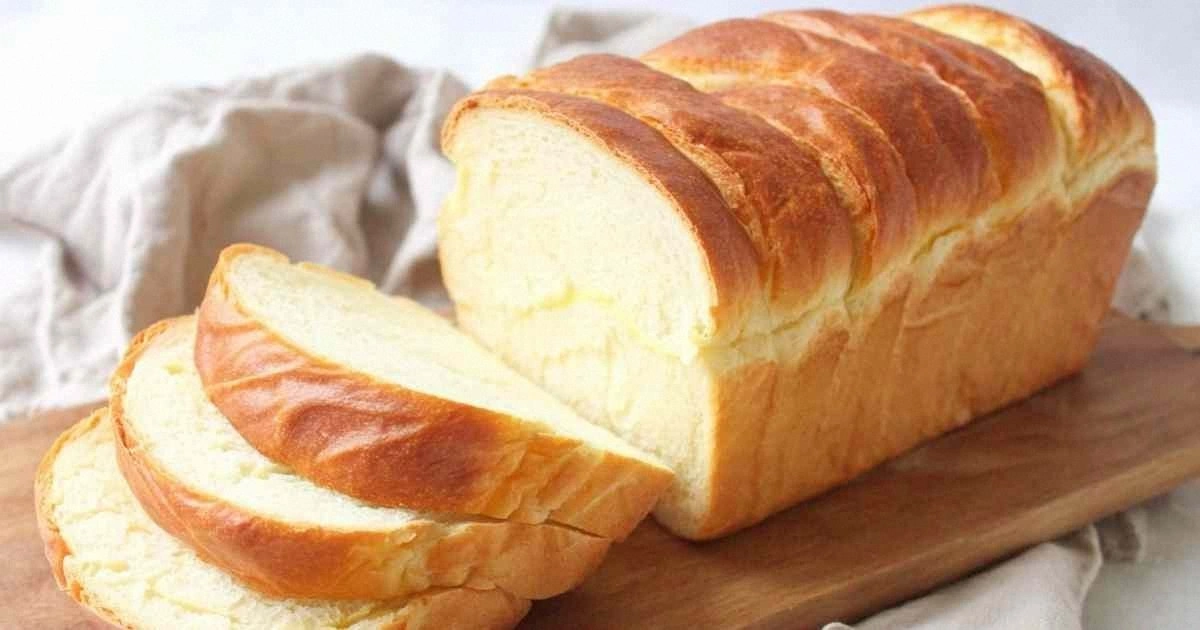
I remember the night I tried to make a quick loaf for a dinner party and ended up with a dough that stuck to my hands like a bad ex. The kitchen smelled of flour and yeast, but the final product was a dense, sad slab that barely browned. I was about to toss it in the trash when a friend whispered, “Try adding Greek yogurt.” The idea sounded like a gamble, but the promise of a lighter crumb and a tangy kick made me dive in. I set the timer, mixed the ingredients, and the dough rose like a secret miracle. That first bite was a revelation—soft, airy, and with a faint maple aftertaste that lingered like a good memory. I dared everyone to taste this and not go back for seconds, and they all did.
Picture yourself pulling this out of the oven, the whole kitchen smelling incredible, and the loaf’s crust crackling under your fingers. The dough should feel elastic, not gummy, and the aroma should shift from yeasty to slightly sweet as the maple syrup caramelizes on the surface. I’ve spent hours tweaking the ratio of yogurt to flour, and the result is a loaf that’s both sturdy enough to slice cleanly and tender enough to melt in your mouth. The best part? It’s a game‑changer for anyone who thinks yeast bread is forever labor‑intensive. This version is hands down the best you’ll ever make at home because it marries convenience with flavor.
If you’ve ever struggled with yeast bread—too dry, too dense, or just plain boring—then this recipe is your rescue squad. I’ll be honest — I ate half the batch before anyone else got to try it. The secret sauce? A splash of applesauce and a dollop of Greek yogurt that not only tenderize but also give the crumb a subtle, savory note. And most recipes get this completely wrong by over‑kneading or under‑proofing. Here’s what actually works: a short, sweet rise, a gentle hand during kneading, and a final bake at just the right temperature. Stay with me here — this is worth it.
What sets this loaf apart is not just the ingredients but the process that brings them together. The yogurt adds a mild acidity that reacts with the yeast, speeding up fermentation and creating that airy interior. The applesauce brings natural sweetness and moisture, cutting down on the need for added sugars while keeping the loaf moist. Maple syrup offers a subtle depth, while the non‑dairy milk keeps the dough from drying out. The result? A loaf that feels like a cloud of flavor with a crisp, golden crust that shatters like thin ice when you bite into it. Let me walk you through every single step — by the end, you’ll wonder how you ever made it any other way.
What Makes This Version Stand Out
- Tang: The Greek yogurt gives the bread a bright, slightly tangy flavor that cuts through the sweetness of the applesauce.
- Moisture: Applesauce replaces water and keeps the crumb tender without making the loaf soggy.
- Texture: The dough rises quickly and develops a fine, open crumb that feels airy.
- Convenience: No need for a proofing box or a long, slow rise—just a 1‑hour lift.
- Versatility: It’s perfect for breakfast, sandwiches, or even a quick snack.
- Healthful: Fat‑free yogurt and unsweetened applesauce keep the loaf lower in calories and higher in protein.
- Flavor Depth: Maple syrup adds a subtle caramel note that lingers on the palate.
- Make‑Ahead Friendly: The dough can be refrigerated overnight, giving you a fresh loaf in the morning.
Alright, let's break down exactly what goes into this masterpiece…
Inside the Ingredient List
The Flavor Base
Bread flour is the backbone of the loaf, providing the structure that holds the yeast’s lift. A high‑protein flour gives that chewy bite you love in artisan bread. If you can’t find bread flour, switch to all‑purpose but expect a slightly less robust crumb. For the best results, sift the flour before mixing to aerate it and avoid clumps.
The Texture Crew
Greek yogurt is the star that softens the dough and adds protein. Fat‑free yogurt keeps the calorie count low while still delivering a creamy mouthfeel. The unsweetened applesauce adds natural moisture and a hint of fruitiness, which balances the tang of the yogurt. Together, they create a dough that’s easy to shape and forgiving during proofing.
The Unexpected Star
Maple syrup is a subtle yet powerful sweetener that caramelizes on the crust, giving the loaf a golden sheen and a lingering aftertaste. It also contributes to a slightly sticky surface that helps the loaf rise evenly. If you’re looking for a different flavor profile, try substituting honey or agave syrup, but keep in mind the final taste will shift.
The Final Flourish
Non‑dairy milk adds a touch of richness and helps keep the dough from drying out during proofing. A tablespoon of water is enough to bring the dough together without making it too wet. These liquid components are crucial for the dough’s elasticity and for achieving a crisp, golden crust. Remember, the balance of wet to dry is key; too much liquid can make the loaf gummy.
Everything's prepped? Good. Let's get into the real action…
The Method — Step by Step
- Gather the Dry Ingredients: In a large mixing bowl, whisk together 4 cups of bread flour, 2 teaspoons of instant yeast, and 1 teaspoon of salt. The dry mix should feel slightly coarse, and you’ll notice a faint yeasty aroma even before adding liquids. This step is crucial because it ensures even distribution of yeast and salt, preventing pockets of over‑fermentation or under‑flavored dough. As you whisk, imagine the flour particles dancing together, forming a silent army ready to rise. The anticipation builds as you prepare to bring these elements together.
- Introduce the Wet Ingredients: Add 1 cup of fat‑free Greek yogurt, 0.67 cup of unsweetened applesauce, 1 tablespoon of maple syrup, 1 tablespoon of non‑dairy milk, and 1.5 tablespoons of water to the dry mix. Stir with a wooden spoon or your hands until a shaggy, sticky dough forms. The dough should feel tacky but not overly wet; if it’s too dry, add a splash more water. The combination of yogurt and applesauce creates a moist environment that encourages gluten development while keeping the crumb tender. As the ingredients meld, the dough will begin to lose its raw smell and take on a subtle sweetness.
- Knead the Dough: Transfer the dough onto a floured surface and knead for 8–10 minutes until it’s smooth and elastic. You should feel a slight resistance when you press the dough, and it should start to pull away from the sides of the board. The kneading process develops gluten strands that give the loaf its structure. If you’re kneading by hand, keep your elbows bent and push the dough with the heel of your hand, folding it over and repeating. This step is the heart of bread making, and it’s where the dough transforms from a simple mix to a living organism.
- First Rise: Place the kneaded dough in a lightly oiled bowl, cover it with a damp kitchen towel, and let it rise in a warm spot for 1 hour or until it has doubled in size. During the first rise, the yeast will convert sugars into carbon dioxide, creating bubbles that give the loaf its airy interior. Keep the dough away from direct heat; a warm, draft‑free area works best. If you’re in a cooler kitchen, you can place the bowl in the oven with the light on. When the dough has doubled, gently press it with your thumb; if it springs back slowly, it’s ready.
- Shape the Loaf: Punch down the dough to release excess air, then shape it into a round loaf. Place the loaf on a parchment‑lined baking sheet or in a loaf pan if you prefer a more defined shape. The dough should feel firm yet pliable. This is the moment of truth; a well‑shaped loaf will bake evenly and have a beautiful rise. If you’re shaping a round loaf, tighten the edges by folding the dough over itself and tucking the seam underneath.
- Second Rise: Let the shaped loaf rest for 10 minutes while you preheat your oven to 375°F (190°C). The second rise allows the dough to relax, preventing it from shrinking during baking. It also gives the crust a chance to form a crisp, golden exterior. While the loaf is resting, preheat the oven and place a baking stone or a cast‑iron skillet in the middle rack for an even heat distribution. If you’re baking on a sheet, place it on the middle rack for the best results.
- Bake: Slide the loaf into the preheated oven and bake for 25–30 minutes until the crust is golden brown and the loaf sounds hollow when tapped on the bottom. The internal temperature should reach 190°F (88°C). The maple syrup will caramelize, giving the crust a beautiful sheen. As the loaf bakes, the aroma will fill the kitchen, turning the space into a bakery. The first crack that appears on the surface indicates the loaf is ready to come out.
- Cool: Remove the loaf from the oven and let it cool on a wire rack for at least 20 minutes before slicing. Cooling allows the crumb to set, preventing it from becoming gummy. If you slice too soon, the interior will be soggy. The aroma will linger, and the crust will remain crisp. Once cooled, slice and serve warm with a pat of butter or your favorite spread.
That's it — you did it. But hold on, I've got a few more tricks that'll take this to another level. These small tweaks can elevate the flavor, texture, or presentation of the loaf, turning it from a simple bread to a showstopper.
Insider Tricks for Flawless Results
The Temperature Rule Nobody Follows
Many bakers think room temperature is fine, but a 75°F (24°C) environment is optimal for yeast activity. If your kitchen is cooler, place the dough in a slightly heated oven (just the light on) or on top of a warm appliance. The yeast will ferment faster, giving you a better rise. I once tried baking in a cold kitchen and the loaf was flat and dense. Once I moved the dough to a warm spot, the results were spectacular.
Why Your Nose Knows Best
During the first rise, listen for a sweet, yeasty smell. That’s the yeast at work. If the dough smells sour or off, it may have been overproofed or the yeast was old. Always check the expiration date on yeast and replace it if it’s more than three months old. A fresh yeast batch guarantees a reliable rise and a pleasant flavor profile.
The 5-Minute Rest That Changes Everything
After shaping the loaf, let it rest for exactly 5 minutes before the second rise. This short pause allows the gluten to relax, preventing the loaf from tightening and collapsing. I’ve seen loaves that were left to rest too long, only to lose their rise. The 5‑minute rule is a simple yet powerful technique that ensures a perfectly airy crumb.
Steam Is Your Secret Weapon
Creating steam in the oven during the first 10 minutes of baking gives the crust a crisp, glossy finish. You can do this by placing a shallow pan of water in the bottom of the oven or by spritzing the loaf with water before baking. The steam delays the crust from setting too early, allowing the loaf to expand fully. I’ve used this trick to make my loaves look like they came straight from a French bakery.
The Final Touch: A Light Dusting of Flaxseed
Right before baking, sprinkle a handful of ground flaxseed over the top of the loaf. It adds a nutty flavor, a slight crunch, and a boost of omega‑3 fatty acids. The flaxseed also helps the crust develop a beautiful, slightly darker color. I’ve found that this simple addition turns a good loaf into a gourmet experience.
Creative Twists and Variations
This recipe is a playground. Here are some of my favorite ways to switch things up:
Herb & Garlic Infusion
Add 2 teaspoons of minced garlic and a tablespoon of chopped fresh rosemary to the wet ingredients. The aromatic herbs give the loaf a savory edge that pairs wonderfully with cheese or roasted vegetables. The garlic also adds a subtle depth that complements the yogurt’s tang.
Sunflower Seed Crunch
Stir 1/4 cup of sunflower seeds into the dough before the first rise. The seeds add texture and a nutty flavor that balances the sweetness. They also make the loaf visually appealing with a speckled look. This variation is great for a quick snack or a breakfast sandwich.
Chocolate Chip Delight
Fold in 1/3 cup of dark chocolate chips after kneading. The chocolate melts slightly during baking, creating pockets of rich flavor. The yogurt’s tang cuts through the sweetness, making each bite a perfect harmony of sweet and savory. This version is ideal for a dessert‑style loaf.
Zesty Lemon Twist
Add the zest of one lemon and a tablespoon of lemon juice to the wet mix. The citrus brightens the flavor and gives the loaf a refreshing finish. The lemon pairs beautifully with the maple syrup, creating a balanced sweetness. It’s a perfect loaf for a summer brunch.
Cheesy Parmesan Finish
Grate 1/2 cup of Parmesan cheese into the dough after kneading. The cheese adds a savory umami note and a slightly crispy crust. The Parmesan also creates a golden crust that looks like a freshly baked loaf from a bakery. This version is great for a hearty breakfast or a side to soup.
Storing and Bringing It Back to Life
Fridge Storage
Wrap the cooled loaf tightly in plastic wrap and store it in the refrigerator for up to 3 days. The moisture will keep the bread from drying out, and the flavors will deepen slightly. When you’re ready to eat, let the loaf sit at room temperature for 15 minutes before slicing.
Freezer Friendly
Slice the loaf before freezing to make it easier to thaw and serve. Place the slices in a freezer bag, removing as much air as possible. The loaf can be frozen for up to 3 months. Thaw at room temperature for 30 minutes or microwave for 10 seconds to revive the texture.
Best Reheating Method
To bring the loaf back to life, preheat your oven to 350°F (175°C). Lightly mist the loaf with water and bake for 10 minutes. The water creates steam, keeping the crust crisp while the interior warms evenly. If you’re in a hurry, a quick 30‑second microwave burst works, but the oven method preserves the authentic texture.