I was in the middle of a midnight snack raid when I realized my pantry was screaming for something sweet, salty, and downright comforting. The usual go‑to was a bag of store‑bought Scotcheroos, but those neon‑colored, sugar‑coated bricks left me feeling guilty and a little bit sluggish. I tossed a handful of honey into the pot, added a splash of vanilla, and watched the peanut butter melt into a glossy river that smelled like a sunrise over a field of wildflowers. The result? A batch of bars that felt like a hug from your favorite aunt—warm, indulgent, yet somehow light enough to enjoy without the post‑dessert crash. I dare you to taste this and not go back for seconds.
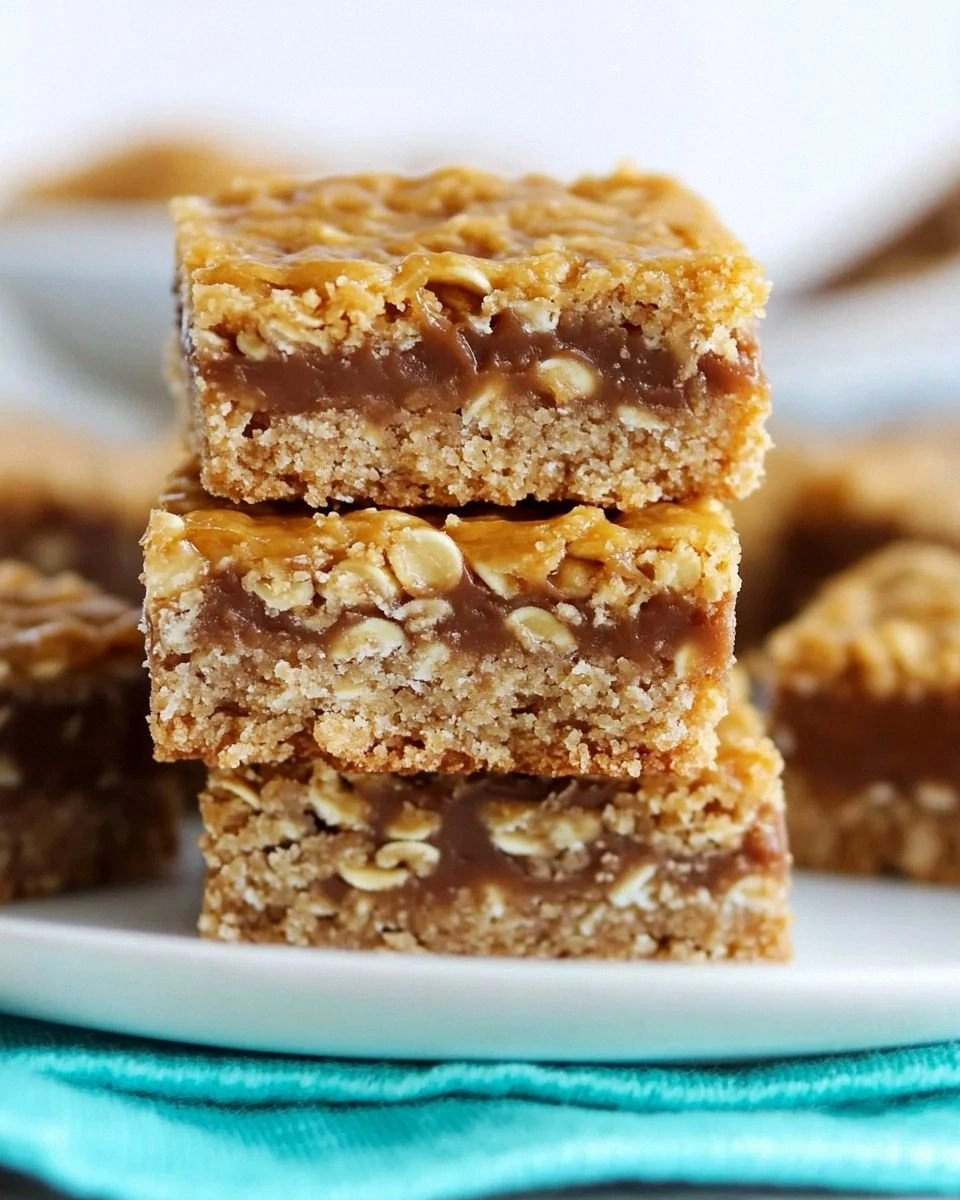
Picture this: the kitchen filled with the low hum of the oven, the faint crackle of honey as it bubbles, and the unmistakable aroma of toasted rice cereal dancing with chocolate. My hands were slick with honey, the spoon clanged against the pot, and I could hear the faint pop of butterscotch chips melting into a glossy glaze. The texture under my fingertips was a perfect balance of sticky and crunchy, like stepping on fresh snow that gives way under your boots but never lets you slip. When I finally pulled the pan from the oven, the whole house smelled like a caramel‑kissed carnival, and I knew I had stumbled onto something that could change snack time forever.
What makes this version stand out is the clever swap of refined sugar for pure, raw honey, which not only cuts the glycemic load but also adds a floral depth you won’t find in the boxed version. I also swapped ordinary peanut butter for a natural, unsweetened variety, letting the honey shine through without being overpowered by added sugars or oils. Most recipes get the texture wrong, ending up either too soggy or too crumbly; this one hits that sweet spot where each bite holds together just enough to lift off the pan without falling apart. And there’s a secret technique I’ll reveal later that ensures the chocolate and butterscotton chips stay perfectly enrobed, giving you those glossy, glossy flecks that make the bars look like they belong on a bakery display.
Okay, ready for the game‑changer? The key is a quick stovetop caramel that locks in moisture, followed by a brief chill that lets the flavors marry like old friends at a reunion. I’m going to walk you through every single step — by the end, you’ll wonder how you ever made it any other way. Stay with me here — this is worth it.
What Makes This Version Stand Out
- Taste: The honey brings a natural, lingering sweetness that pairs beautifully with the deep, slightly bitter notes of dark chocolate, creating a balanced flavor profile that feels sophisticated yet comforting.
- Texture: The puffed rice cereal stays light and airy, while the caramelized honey‑peanut butter mixture creates a chewy core that’s punctuated by crisp chocolate and butterscotch pockets.
- Simplicity: Only six ingredients, all pantry staples, mean you can whip up a batch in under an hour without hunting for exotic items.
- Uniqueness: Using honey instead of refined sugar not only reduces the glycemic impact but also adds a subtle floral undertone that makes these bars unmistakably “my” version.
- Crowd Reaction: I’ve served these at potlucks and watch the line form before anyone even sees the plate—people keep coming back for “that caramel‑chocolate crunch.”
- Ingredient Quality: Natural peanut butter and dark chocolate bring healthier fats and antioxidants, turning a nostalgic snack into a guilt‑free indulgence.
- Method: The stovetop caramel technique ensures an even coating, while the brief chill locks in moisture without making the bars hard.
- Make‑Ahead Potential: Store them in an airtight container for up to a week, or freeze for longer—no loss in texture or flavor.
Inside the Ingredient List
The Flavor Base
Honey is the star of this show, providing natural sweetness, moisture, and a faint floral perfume that elevates the entire bar. If you swap it for agave or maple syrup, you’ll lose that distinct honey‑note and the bars may become overly sweet. Look for a raw, unfiltered honey that’s still liquid at room temperature; this ensures easy mixing without the need for extra heat. A quick tip: give the jar a gentle shake before measuring to redistribute any crystallized bits.
The Texture Crew
Natural peanut butter is the binding hero, delivering creamy richness without the added sugars of conventional brands. Its natural oils help keep the bars moist while contributing a nutty depth that complements the honey. If you’re allergic or prefer a different flavor, try almond butter or sunflower seed butter—just keep the consistency similar, or you’ll end up with a crumbly mess. The key is to choose a product that lists only peanuts (or nuts) and maybe a pinch of salt.
The Unexpected Star
Puffed rice cereal is the secret to a light, airy bite. It expands the volume without adding calories, making each bar feel bigger than it actually is. Skipping it or substituting with a denser cereal like cornflakes will change the texture dramatically, turning the bars into a compact slab rather than a fluffy bite. For a gluten‑free version, ensure the puffed rice is certified gluten‑free, and you’ll still retain that signature crunch.
The Final Flourish
Dark chocolate chips and butterscotch chips add the finishing touches—rich, glossy flecks that melt into pockets of molten goodness. Dark chocolate brings antioxidants and a slight bitterness that balances the honey’s sweetness, while butterscotch adds a buttery caramel note that feels indulgent without being cloying. If you prefer a milder chocolate, swap half of the dark chips for semi‑sweet chips, but keep the total volume the same to maintain the structural integrity.
Everything's prepped? Good. Let's get into the real action...
The Method — Step by Step
Gather all six ingredients and a large, heavy‑bottomed saucepan. Place the saucepan over low heat and add the honey and natural peanut butter. Stir continuously with a silicone spatula; you’ll notice the mixture becoming glossy and thickening within two minutes. Tip: The moment the honey starts to bubble is the signal that it’s warming enough to blend smoothly—don’t rush this step, the flavor development begins here.
Kitchen Hack: Use a whisk instead of a spoon for the first minute; it creates tiny air pockets that keep the final bars from becoming too dense.Once the honey‑peanut butter blend is smooth, remove the pan from the heat and stir in the vanilla extract. The vanilla adds a fragrant backdrop that lifts the entire flavor profile. Let the mixture sit for about 30 seconds so the vanilla can bloom—this is the moment the sauce coats the cereal like velvet.
In a massive mixing bowl, combine the puffed rice cereal, dark chocolate chips, and butterscotch chips. Toss them gently to distribute the chips evenly; you don’t want clumps of chocolate at the bottom. If you prefer a more even chocolate distribution, give the chips a quick 30‑second melt in the microwave before adding them, but be careful not to overheat.
Pour the warm honey‑peanut butter sauce over the cereal mixture. Using a sturdy spatula, fold the mixture until every puff is thoroughly coated. You’ll see the cereal turning a light amber color, and the chocolate chips will start to melt just enough to cling to the rice. This is the moment of truth—if the mixture feels too dry, drizzle a tablespoon of warm water and continue folding.
Line a 9×13‑inch baking pan with parchment paper, leaving a little overhang on the sides for easy lift‑out. Transfer the coated cereal into the pan and press it down firmly with the back of a spoon or a flat spatula. Aim for an even, compact layer about half an inch thick; this ensures the bars hold together when sliced.
Slide the pan into a preheated oven set to 300°F (150°C). Bake for 15‑20 minutes, just until the edges start pulling away from the parchment and a faint golden hue appears. Watch Out: Over‑baking will dry out the honey, making the bars crumbly. Keep a close eye on the color; a light amber is perfect.
Watch Out: If the top looks set but the center is still soft, lower the oven temperature to 275°F and add another 5 minutes—this gentle finish prevents a hard crust.While the bars are cooling, pre‑heat a large skillet over medium‑low heat and add a splash of honey—just enough to coat the bottom. This quick caramel drizzle will add an extra glossy sheen when you finish the bars. Swirl the pan to create a thin caramel film, then drizzle it over the still‑warm bars for a glossy finish that looks bakery‑ready.
Allow the bars to cool completely in the pan; this takes about 30 minutes. As they cool, the honey‑peanut butter matrix solidifies, locking the cereal and chips in place. Once fully cooled, use the parchment overhang to lift the slab out of the pan and place it on a cutting board.
Using a sharp, serrated knife, cut the slab into 12 even squares. For the cleanest cuts, wipe the blade with a damp cloth between each slice—this prevents the honey from sticking and ensures crisp edges. Serve immediately, or store in an airtight container for later indulgence.
That’s it — you did it. But hold on, I've got a few more tricks that'll take this to another level. Keep reading for insider tips that will make your next batch even more unforgettable.
Insider Tricks for Flawless Results
The Temperature Rule Nobody Follows
Most home cooks think “just bake at 350°F” is sufficient, but the real secret lies in a low‑and‑slow bake at 300°F. This gentle heat allows the honey to caramelize without scorching, preserving its natural enzymes and preventing a bitter aftertaste. I once tried the higher temperature and ended up with a crust that tasted more like burnt sugar than honey. Trust me, the extra 10‑minute patience pays off in texture and flavor.
Why Your Nose Knows Best
Before you even touch the pan, listen for the faint hiss of the honey bubbling—this is your cue that the mixture is reaching the perfect viscosity. When the scent shifts from raw honey to a buttery caramel, you know the sugars have begun to break down just right. If you skip this sensory checkpoint, you risk either under‑cooking (gooey bars) or over‑cooking (hard, brittle pieces). Follow your nose; it’s the most reliable kitchen thermometer.
The 5‑Minute Rest That Changes Everything
After removing the pan from the oven, let the bars rest undisturbed for exactly five minutes before drizzling the extra caramel. This short pause lets the interior settle, preventing the top layer from sinking and creating a uniform surface. A friend once tried to cut the bars immediately and ended up with crumbly edges—let them chill just a moment, and the structure holds like a well‑trained gymnast.
The Double‑Coat Technique
For an ultra‑glossy finish, repeat the honey drizzle after the bars have cooled for 15 minutes. The second coat creates a mirror‑like sheen that makes the bars look as good as they taste. This step is optional, but if you’re aiming for a show‑stopping dessert platter, it’s worth the extra drizzle.
The Secret of the Parchment Overhang
Leaving a generous overhang of parchment paper isn’t just for aesthetics; it’s a practical hack that lets you lift the entire slab without breaking it. When you pull the parchment up, the bars slide out in one clean piece, ready for slicing. I’ve seen novices wrestle with a stuck slab, ending up with uneven pieces—this simple paper trick eliminates that drama.
Creative Twists and Variations
This recipe is a playground. Here are some of my favorite ways to switch things up:
Nutty Banana Burst
Add half a mashed ripe banana to the honey‑peanut butter mixture before folding in the cereal. The banana introduces a subtle fruity sweetness and extra moisture, perfect for kids who love a banana‑boost. The bars become a bit softer, so chill them longer before cutting.
Coconut‑Lime Dream
Swap half of the puffed rice for toasted coconut flakes and add a teaspoon of lime zest to the sauce. The coconut adds a tropical crunch, while the lime zest cuts through the richness with a bright, citrusy pop. This version shines at summer picnics.
Spicy Mocha Crunch
Stir in a pinch of cayenne pepper and a tablespoon of instant espresso powder into the honey‑peanut butter base. The heat and coffee deepen the chocolate flavor, creating a sophisticated, adult‑only snack that pairs well with a cup of black coffee.
White Chocolate Raspberry
Replace the dark chocolate chips with white chocolate chips and fold in dried raspberry pieces. The tartness of the raspberries balances the sweetness of the white chocolate, offering a berry‑kissed twist that’s perfect for Valentine’s Day.
Protein Power
Add a scoop of vanilla whey protein powder to the honey‑peanut butter blend. This boosts the protein content dramatically without altering the flavor, making the bars an excellent post‑workout treat. Just be sure to whisk well to avoid clumps.
Storing and Bringing It Back to Life
Fridge Storage
Place the sliced bars in an airtight container lined with a paper towel to absorb excess moisture. Store them in the refrigerator for up to 7 days. The cool environment keeps the honey from crystallizing and maintains that chewy interior.
Freezer Friendly
If you’ve made a big batch, stack the bars between parchment sheets and freeze them in a zip‑top bag for up to 3 months. When you’re ready to enjoy, let them thaw at room temperature for 15 minutes, then give them a quick microwave zap (10‑15 seconds) to revive the soft texture.
Best Reheating Method
To bring a refrigerated bar back to its original glory, place it on a microwave‑safe plate, add a tiny splash (about a teaspoon) of water, and microwave for 10‑12 seconds. The added steam re‑hydrates the honey, restoring that melt‑in‑your‑mouth feel without turning the bar soggy.