Okay, picture this: I was halfway through a Sunday roast, the turkey was finally golden, the potatoes were doing their thing, and then—boom!—my friend dared me to bring a side dish that could actually *steal* the spotlight from the main course. I laughed, grabbed a handful of carrots and a bag of green beans, and thought, “What if I give these humble veggies a sweet‑and‑savory makeover that even my picky cousin can’t resist?” The kitchen turned into a battlefield of sizzling butter, honey dripping like liquid sunshine, and a faint, intoxicating aroma that made the whole house feel like a five‑star bistro. I was nervous, I was excited, and I was definitely hungry for a win.
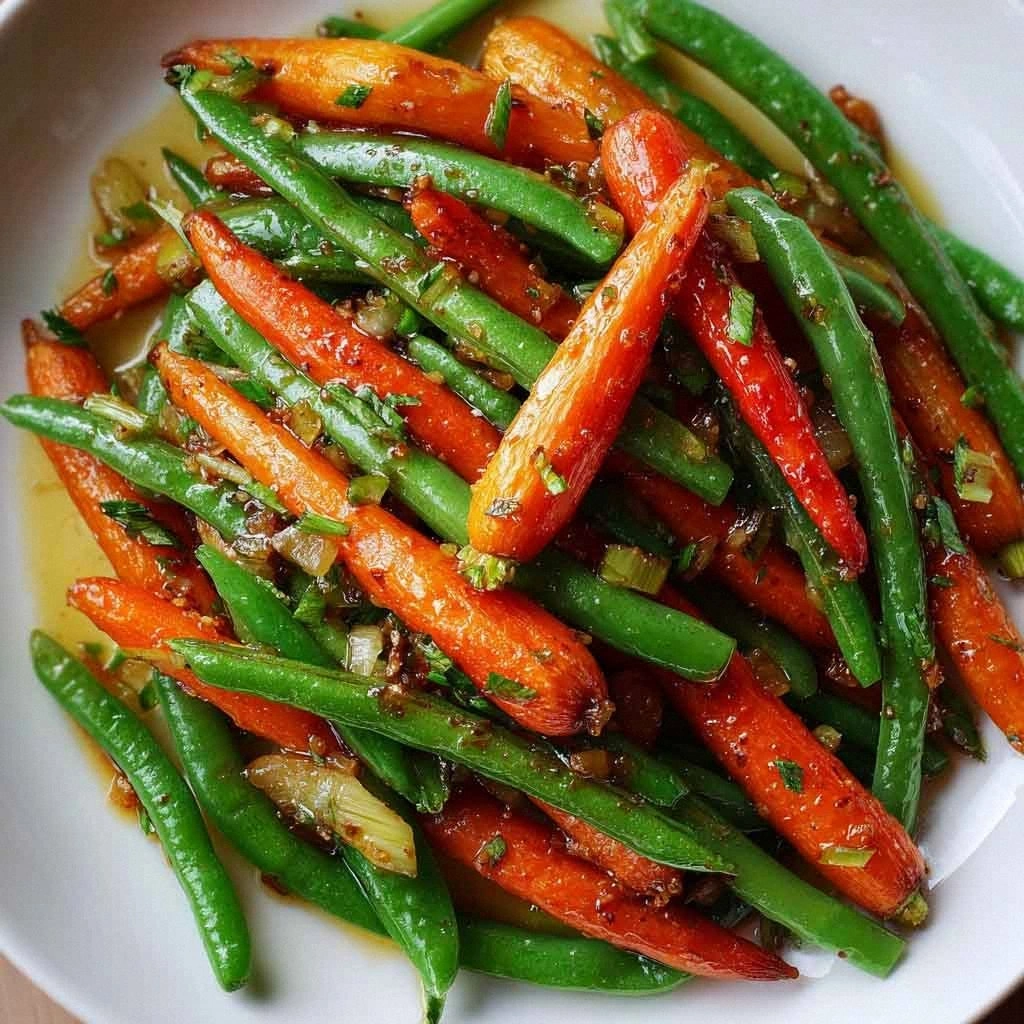
The moment the butter hit the pan, you hear that sizzle—Chef’s kiss, right? It’s the sound of transformation, the kind that makes you pause mid‑step and stare at the pan like it’s a magic trick. The carrots start to soften, the green beans stay crisp, and the honey begins to caramelize, coating every piece in a glossy glaze that looks like it was brushed on by an artist. The scent? A buttery, sweet perfume that dances with a hint of garlic and a whisper of lemon—so fresh you can almost taste it before the fork even touches the plate. I swear, the whole kitchen smelled like a summer garden after a rainstorm, and I could already feel my mouth watering.
Most recipes out there treat carrots and green beans like afterthoughts—over‑cooked, bland, or drenched in a sauce that drowns their natural flavor. This version? It’s the exact opposite. I’m talking about a glaze that clings just enough to give a glossy finish, yet lets the vegetables’ natural crunch shine through. The honey adds a subtle sweetness that never overpowers, while the lemon juice or balsamic adds a bright acidity that cuts through the richness. The result is a side dish that’s simultaneously sweet, tangy, buttery, and crisp—like a perfectly balanced symphony where every instrument has its moment.
And here’s the kicker: I’m going to reveal a tiny trick that most cooks completely miss—the secret of deglazing the pan with a splash of lemon or balsamic at just the right moment. This tiny splash is the game‑changer that lifts the glaze from “good” to “hands down the best version you’ll ever make at home.” I dare you to taste this and not go back for seconds. Let me walk you through every single step — by the end, you’ll wonder how you ever made it any other way.
⚡ What Makes This Version Stand Out
- Flavor Explosion: The honey‑butter glaze delivers a caramelized sweetness that hugs each vegetable, while the lemon or balsamic adds a bright pop that prevents the dish from feeling heavy.
- Texture Harmony: Carrots stay tender‑crisp, green beans stay snap‑ready, and the glaze creates a delicate, glossy coating that’s as satisfying as a fresh‑painted nail polish.
- Simplicity Meets Sophistication: Only seven core ingredients, yet the flavor profile feels like it took hours of culinary school to perfect.
- Ingredient Quality: Fresh, crisp green beans and sweet, earthy carrots are the stars; the honey’s natural sugars are what give that buttery sheen without artificial additives.
- Crowd Reaction: Even the most skeptical eaters—think toddlers and carb‑loving meatheads—will ask for the recipe, and you’ll get that smug “I told you so” grin.
- Cooking Method: A quick sauté‑glaze technique that locks in nutrients and flavor without the need for an oven, making it perfect for weeknight hustle.
- Make‑Ahead Potential: This dish reheats beautifully, meaning you can prep it ahead of a big dinner and still serve it hot and vibrant.
- Versatility: Swap honey for maple syrup, butter for olive oil, or add a pinch of smoked paprika for a smoky twist—endless possibilities.
🍋 Inside the Ingredient List
The Flavor Base
Butter (or olive oil/vegan butter): This is the golden river that carries the honey and garlic into every crevice of the vegetables. Butter adds a creamy richness that oil can’t replicate, while olive oil offers a lighter, fruitier note. If you skip it, the glaze will feel thin and the vegetables won’t get that luxurious mouthfeel. Swap tip: Use 2 tbsp of extra‑virgin olive oil for a dairy‑free version; the flavor will shift slightly toward a peppery finish.
Honey (or maple syrup/agave): The sweet star of the show, honey caramelizes quickly, creating that glossy, amber coat. It also balances the acidity of the lemon or balsamic. If you replace it with maple syrup, you’ll get a deeper, wood‑syrupped flavor that’s perfect for autumn. Skipping honey means you lose the signature caramel snap, and the dish can end up tasting flat.
The Texture Crew
Carrots: Fresh, medium carrots bring a natural sweetness and a firm bite that holds up under the glaze. Peel them and slice into sticks or rounds for even cooking. If you choose baby carrots, you’ll get a sweeter bite, but they may cook faster, so watch the timing. Buying tip: Look for carrots that are firm, bright orange, and free of cracks; they’ll stay crispier.
Green Beans: These little green wonders add a crisp contrast to the tender carrots. Trim the ends and keep them whole for that satisfying snap. If you over‑cook them, they’ll turn mushy and lose their vibrant color. Swap tip: Snap peas work as a substitute, offering a sweeter profile and a similar crunch.
The Unexpected Star
Garlic (optional): A single minced clove adds a subtle depth without overwhelming the delicate glaze. Garlic’s sulfur compounds caramelize quickly, giving a nutty undertone. If you’re not a fan, you can skip it, but you’ll miss that whisper of savory complexity that makes the glaze feel “grown‑up.”
Lemon Juice or Balsamic Vinegar: This acidity is the secret weapon that lifts the sweetness and prevents the glaze from feeling cloying. Lemon adds a bright, citrusy zing; balsamic brings a mellow, fruity tang with a hint of acidity. Too much, and you’ll overpower the honey; too little, and the dish can taste one‑dimensional.
The Final Flourish
Salt and Pepper: Simple yet essential. Salt amplifies the natural flavors of the vegetables, while pepper adds a gentle heat that balances the sweetness. Season in stages—first in the pan, then a final pinch before serving—to avoid over‑salting.
Fresh Parsley or Thyme: The herb garnish adds a pop of color and a fresh, herbaceous note that cuts through the richness. Parsley offers a clean, grassy finish; thyme adds an earthy, piney aroma. If you forget, no worries—just sprinkle a little extra lemon zest for brightness.
Everything's prepped? Good. Let's get into the real action...
🔥 The Method — Step by Step
-
Start by gathering all your ingredients and giving them a quick visual check—carrots sliced, green beans trimmed, butter melted, honey measured, and garlic minced. This “mise en place” ritual isn’t just for show; it’s the secret weapon that keeps you from pan‑picking and ensures a smooth flow. As you line everything up, the kitchen already starts to feel organized, like a conductor ready to lead an orchestra. Pro tip: If you’re short on time, you can slice the carrots and beans the night before and store them in a sealed container in the fridge.
🪄 Kitchen Hack: Use a vegetable peeler to create carrot ribbons for an extra‑fancy presentation—these ribbons soak up the glaze like a sponge. -
Heat a large skillet over medium‑high heat and add the butter (or olive oil). When the butter foams and turns a light golden brown, you’ll hear that unmistakable sizzle—Chef’s kiss. Add the minced garlic now if you’re using it; let it dance for about 30 seconds until fragrant, but don’t let it burn. Burnt garlic turns bitter, and we don’t want any bitterness stealing the spotlight.
-
Toss the carrot sticks into the pan first. Carrots are denser, so they need a few extra minutes to soften. Stir them constantly for about 3‑4 minutes, listening for that gentle crackle that tells you they’re starting to caramelize. The edges should begin to pull away from the pan, forming a thin, amber crust—this is the foundation of that gorgeous glaze.
👀 Watch Out: If the heat is too high, the butter will brown too quickly and the honey can burn, turning the glaze bitter. Adjust to medium if you see dark specks forming. -
Add the green beans to the pan, spreading everything in an even layer. The beans should sizzle on contact, and you’ll notice a fresh, green pop as they hit the hot surface. Keep stirring for another 3‑4 minutes; the beans should stay bright and crisp, not soggy. This is the moment where the vegetables start to mingle, and the flavors begin to marry.
🪄 Kitchen Hack: Sprinkle a pinch of sea salt at this stage; it helps draw out a little moisture, which accelerates caramelization. -
Now, drizzle the honey (or maple syrup) evenly over the vegetables. As the honey hits the hot pan, it will bubble and thicken, coating each piece in a glossy sheen. Stir gently to ensure every carrot stick and bean gets a sweet kiss. The glaze should start to thicken within a minute—watch for that glossy, almost syrupy consistency that clings without pooling.
-
Time for the bright finish: splash in the lemon juice or balsamic vinegar. This is the game‑changer I promised earlier. The acidity will deglaze the pan, lifting any caramelized bits (fond) and infusing the glaze with a tangy lift. The pan will hiss and steam—listen for that “whoosh” sound, a sign that the flavors are fully integrating. Keep stirring for another 30 seconds until the sauce thickens just enough to coat the veggies like a satin veil.
-
Season with salt and freshly cracked black pepper to taste. Taste a single piece; you should feel the sweet‑tart balance, a buttery richness, and a hint of garlic if you used it. Adjust the seasoning if needed—maybe a pinch more salt or an extra dash of pepper. Remember, seasoning is cumulative; a little now, a little later, and you’ll end up with a perfectly balanced dish.
-
Finally, turn off the heat and sprinkle chopped fresh parsley or thyme over the top. The herbs add a burst of color and a fresh aroma that lifts the entire plate. Give the pan a gentle toss to distribute the herbs, then transfer the vegetables to a serving dish. The glaze will still be glossy, catching the light like a jeweler’s setting. That’s it — you did it. But hold on, I’ve got a few more tricks that’ll take this to another level...
🏆 Insider Tricks for Flawless Results
The Temperature Rule Nobody Follows
Most home cooks crank the heat to “high” thinking it will speed things up, but that’s a recipe for burnt honey and soggy veggies. Keep the heat at medium‑high, allowing the butter to melt gently and the honey to caramelize without scorching. If you notice the glaze darkening too fast, drop the temperature a notch; the flavor will stay nuanced, and the texture will remain crisp. I once tried “full blast” and ended up with a bitter, smoky disaster—lesson learned.
Why Your Nose Knows Best
Your sense of smell is the hidden thermometer of the kitchen. When the glaze starts to emit a sweet, nutty aroma, you’re at the perfect caramelization point. If you smell a burnt, acrid scent, pull the pan off the heat immediately. Trust that nose—science backs it up: the Maillard reaction releases aromatic compounds that signal when sugars have reached their sweet spot.
The 5‑Minute Rest That Changes Everything
After you’ve plated the vegetables, let them sit for five minutes before serving. This short rest lets the glaze settle and the flavors meld, turning a good dish into a great one. The vegetables also continue to steam gently, achieving that perfect tender‑crisp bite. Skipping this step is like serving a song before the chorus—still good, but you miss the climax.
Seasoning in Layers
Instead of dumping all the salt at the end, season in two stages: a pinch during the sauté and a final dash after the glaze is done. This layered approach builds depth, ensuring every bite is consistently seasoned. A friend once tried “all at once” and ended up with uneven salt pockets—don’t be that friend.
The Herb Finish
Fresh herbs should be added at the very end, not cooked. Heat destroys their volatile oils, leaving you with a muted flavor. Toss the parsley or thyme just before serving, and you’ll get that bright, garden‑fresh pop that lifts the entire dish. If you love herbaceous notes, try a quick chiffonade of basil instead of parsley for an Italian twist.
🎨 Creative Twists & Variations
This recipe is a playground. Here are some of my favorite ways to switch things up:
Maple‑Miso Magic
Swap honey for pure maple syrup and add a teaspoon of white miso paste. The result is a deep, umami‑sweet glaze that feels like a cozy autumn hug. Perfect for a Thanksgiving side or a winter dinner.
Spicy Sriracha Splash
Add a tablespoon of sriracha to the glaze for a subtle heat that contrasts the sweetness. Finish with a sprinkle of toasted sesame seeds for crunch. This version pairs beautifully with grilled salmon or Asian‑style rice bowls.
Citrus‑Herb Burst
Replace lemon juice with orange zest and a splash of orange juice, then toss in fresh thyme instead of parsley. The citrus‑herb combo brightens the dish, making it an ideal spring accompaniment to lamb or roast chicken.
Nutty Crunch Upgrade
Toast a handful of slivered almonds or chopped pistachios and sprinkle them over the finished plate. The nuts add a buttery crunch that complements the glaze’s silkiness, turning the side into a textural masterpiece.
Vegan Victory
Swap butter for coconut oil and honey for agave nectar. The flavor profile shifts slightly sweeter, but the caramelization remains intact. Serve alongside a vegan mushroom stroganoff for a fully plant‑based feast.
❄️ Storing & Bringing It Back to Life
Fridge Storage
Place the cooled vegetables in an airtight container and store in the refrigerator for up to 3 days. The glaze will thicken as it cools, but a quick reheating will bring it back to its glossy glory. Avoid stacking heavy lids that could crush the beans.
Freezer Friendly
If you want to make a big batch, spread the cooked veggies on a parchment‑lined tray and flash‑freeze for 1‑2 hours. Transfer to a freezer‑safe bag and store for up to 2 months. When you’re ready, thaw in the fridge overnight, then reheat in a skillet with a splash of water or broth.
Best Reheating Method
The secret to reviving this dish is a gentle stovetop reheat. Add a tablespoon of water or broth, cover the pan, and warm over low heat for 3‑4 minutes, stirring occasionally. The added moisture creates a light steam that restores the glaze’s sheen without turning the veggies soggy. For a quick microwave fix, cover with a damp paper towel and heat in 30‑second bursts, stirring between each burst.