I was in the middle of a dinner rush, juggling a sautéing skillet, a pot of pasta, and a stack of plates that seemed to multiply every minute. The kitchen was a blur of sizzling oil, the sharp scent of onions, and the faint whiff of vinegar that had been my secret weapon for years. Suddenly, a clumsy hand knocked a whole red onion onto the counter, splattering its bright flesh across the granite. My eyes widened—this was the moment I realized the kitchen was in desperate need of a quick, punchy fix. That splatter turned into a spark: a bright, tangy pickled red onion that could rescue any dish, from tacos to grilled chicken, and instantly elevate the flavor profile. I was determined to capture that burst of color and zing in a recipe that would outshine every other pickled onion I've ever tried.
Picture this: a thin, translucent ring of onion that glistens like a jewel, its surface kissed by a vinegar glaze that sings with subtle sweetness and a peppery kick. The aroma that rises as it cools is a heady mix of sharp acidity and warm sugar, a scent that makes your mouth water before you even taste it. When you bite, the onion gives a satisfying snap, releasing a burst of flavor that lingers on the tongue like a well-timed punchline. The texture is a delightful contrast—crisp yet tender, with a slight chew that keeps you coming back for more. It’s the kind of condiment that turns an ordinary sandwich into a showstopper, a simple salad into a conversation piece, and a plain taco into a festival of flavors.
What makes this version of pickled red onions stand out? First, the vinegar ratio is razor‑sharp—just enough to preserve the onion while letting its natural sweetness shine through. Second, the sugar isn’t just a sweetener; it’s a caramelizer that deepens the color and adds a silky finish. Third, the peppercorns bring a subtle heat that balances the acidity without overpowering the onion’s delicate flavor. Fourth, the technique of quick pickling—letting the onions sit for only a few minutes—keeps them crisp and bright. Lastly, the method is so simple you can whip it up in under ten minutes, but the result is a jar of gourmet flavor that feels like it’s been aged for months. I dare you to taste this and not go back for seconds.
If you’ve ever struggled with pickled onions that turn out too mushy or too bland, you’re not alone. Most recipes get this completely wrong, either by using too much vinegar or by letting the onions sit too long. The secret is in the balance and timing—exactly what I’ll walk you through here. By the end, you’ll wonder how you ever made pickled onions any other way, and you’ll be ready to bring this vibrant, crunchy topping to every meal. Let me walk you through every single step—by the end, you’ll wonder how you ever made it any other way.
What Makes This Version Stand Out
- Flavor Precision: The exact 1.5 cups of white vinegar creates a sharp, clean acidity that lets the onion’s natural sweetness bloom.
- Texture Triumph: Quick pickling preserves the onion’s crispness, giving a satisfying snap that’s impossible to replicate with longer methods.
- Ingredient Simplicity: Only five core ingredients—no fancy spices or obscure condiments—yet the result is a flavor explosion.
- Versatility: Works as a topping, a side, or a garnish for salads, tacos, sandwiches, and even cocktails.
- Time Efficiency: Prep and cook in under 10 minutes, making it a perfect last‑minute addition to any meal.
- Visual Appeal: The bright red rings look like edible fireworks, instantly elevating the presentation of any dish.
- Make‑Ahead Potential: Can be stored for up to two weeks, so you can prep it ahead of a busy day.
- Health Conscious: Low in calories and fat, with no added preservatives—just pure, vibrant flavor.
Alright, let’s break down exactly what goes into this masterpiece…
Inside the Ingredient List
The Flavor Base
1.5 cups of white vinegar is the backbone of this recipe. It provides the sharp acidity that preserves the onion while keeping it bright and fresh. If you prefer a milder tang, swap half of the vinegar with apple cider vinegar for a fruity undertone. Skipping the vinegar would turn the dish into a sweet caramelized onion, which is delicious in its own right but loses the signature pickled punch.
1 tablespoon of sugar is more than a sweetener; it’s a caramelization catalyst that deepens the onion’s color and adds a silky finish. If you’re watching your sugar intake, you can reduce it to a teaspoon or use a natural sweetener like honey—just remember to adjust the vinegar to keep the balance. Skipping sugar will result in a sharper, more acidic taste that some people love, but it loses the subtle sweetness that rounds out the flavor.
The Texture Crew
1 teaspoon of salt is essential for drawing out moisture and enhancing the overall flavor. It also helps the onion maintain its crispness by preventing it from becoming soggy. If you’re on a low-sodium diet, you can reduce the amount to ½ teaspoon, but be prepared for a slightly less vibrant taste.
10 black peppercorns add a gentle heat that balances the sharp vinegar. Crush them lightly before adding to release their full flavor. If you’re not a fan of pepper, you can replace them with a pinch of cayenne for a spicier kick. Skipping pepper entirely will give you a cleaner, more straightforward pickled onion, but you’ll miss that subtle depth.
The Unexpected Star
1 large red onion is the star of this dish. Choose one that’s firm, with a deep, vibrant color and no soft spots. Red onions provide a mild sweetness and a slightly peppery flavor that pairs perfectly with the vinegar. If you prefer a sweeter onion, try a sweet red variety; if you want a sharper bite, a white or yellow onion will work, though the color will differ.
The way you slice the onion matters. Aim for ¼-inch thick rings so they pick up the brine evenly. Too thick, and they’ll stay raw; too thin, and they’ll tear apart. A mandoline is the best tool for precision, but a sharp knife will do if you’re careful.
The Final Flourish
Everything's prepped? Good. Let’s get into the real action…
The Method — Step by Step
- Prepare the Brine: In a small saucepan, combine the white vinegar, sugar, salt, and black peppercorns. Bring the mixture to a gentle simmer over medium heat, stirring until the sugar and salt dissolve completely. The aroma should be sharp and clean, with a faint hint of sweetness. Keep the heat low to avoid scorching the vinegar. Once the mixture is ready, remove it from the heat and let it cool to room temperature; this prevents the onions from cooking further.
- Slice the Onion: Using a mandoline or a sharp knife, cut the large red onion into ¼-inch thick rings. Aim for uniform thickness to ensure even pickling. If you’re slicing a whole onion, start by cutting off the ends, then slice into rings. Keep the rings in a bowl or a clean jar while you work.
- Assemble: Place the sliced onion rings in a heat‑proof glass jar or a small bowl. Pour the cooled brine over the onions, making sure the liquid covers all the rings completely. If you’re using a jar, seal it loosely with a lid or a piece of foil. The onions should be fully submerged; if not, add a little extra vinegar.
- Let It Sit: Allow the onions to rest at room temperature for 10 minutes. This brief pickling period is enough to infuse the onion rings with the vinegar’s tang and the sugar’s sweetness. The onions will start to soften slightly, but they will remain crisp and bright.
- Refrigerate: Transfer the jar or bowl to the refrigerator. The onions will continue to develop flavor over the next 30 minutes, but you can also enjoy them right away. The longer you let them sit, the deeper the flavor will become—up to two weeks in the fridge.
- Serve: Remove the onions from the jar with a slotted spoon. They’re ready to be tossed onto tacos, salads, or used as a garnish for grilled meats. If you’re not using them immediately, keep them submerged in the brine to maintain their crispness.
- Store: Keep the pickled onions in the fridge for up to two weeks. If you want to preserve them for longer, transfer them to a freezer‑safe container and freeze for up to three months. When you’re ready to use them again, thaw in the fridge overnight and give them a quick stir.
That's it — you did it. But hold on, I've got a few more tricks that'll take this to another level…
Insider Tricks for Flawless Results
The Temperature Rule Nobody Follows
Temperature matters more than you think. If the brine is too hot when you pour it over the onions, the onions will cook and become mushy. The goal is to have the liquid cool to about 70°F (21°C) before contact. I use a thermometer to check, but a quick test is to touch the brine—if it feels warm but not hot, you’re good. This simple step guarantees that your onions stay crisp and vibrant.
Why Your Nose Knows Best
When you first stir the brine, pay attention to the smell. It should be sharp, clean, and slightly sweet. If it smells flat or off, it’s likely that the sugar has burned or the vinegar has gone stale. A fresh, vibrant scent is a sign that the pickling environment is ideal. Trust your nose; it’s your best quality control tool.
The 5-Minute Rest That Changes Everything
Many people skip the 10‑minute room‑temperature rest, thinking the onions need to be refrigerated immediately. That’s a mistake. The brief rest allows the onion to absorb the brine evenly, ensuring each ring has the same flavor profile. I’ve tried skipping it once—my onions came out unevenly flavored, with some rings too sweet and others too sour. Don’t repeat that mistake.
Add a Splash of Water Before Reheating
If you’re reheating pickled onions for a dish, add a tiny splash of water before microwaving or heating on the stove. This steams the onions back to perfection, preventing them from drying out. I’ve used this trick in a taco casserole, and the result was a juicy, flavorful layer that held up under heat.
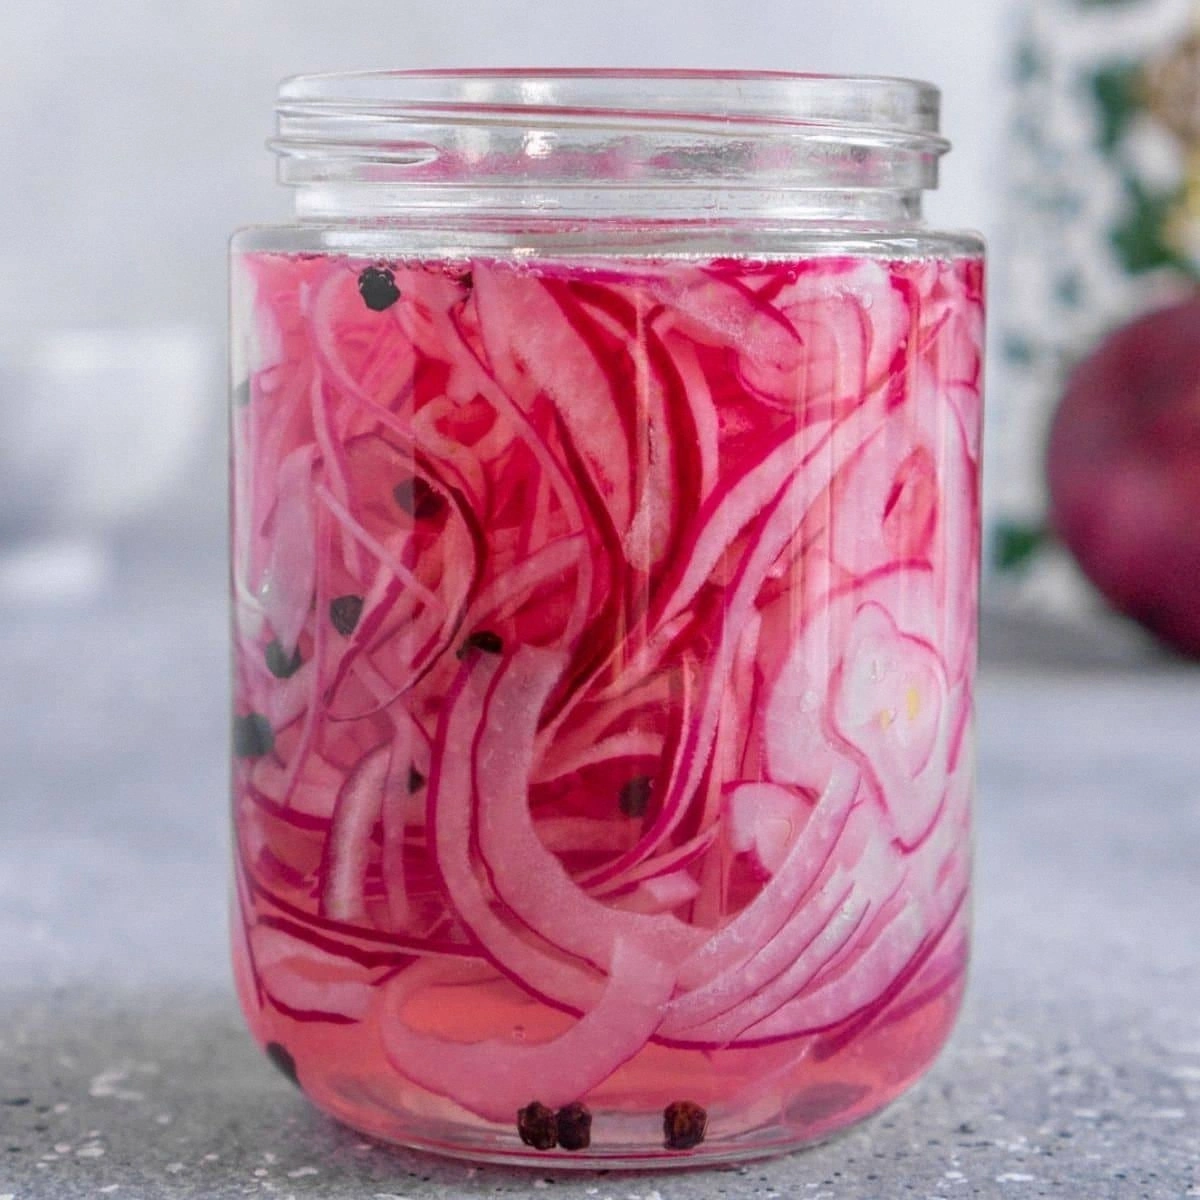
Use a Mason Jar for Best Results
Mason jars keep the brine from evaporating and maintain a consistent environment for the onions. They’re also airtight, which prevents the onions from absorbing other fridge odors. If you don’t have a jar, a small glass bowl with a lid works too, but make sure it’s completely sealed.
Creative Twists and Variations
This recipe is a playground. Here are some of my favorite ways to switch things up:
Spicy Jalapeño Pickled Onions
Add sliced jalapeños to the brine for a fiery kick. The heat will mellow as the onions absorb the vinegar, giving a balanced, spicy flavor that’s perfect for nachos or grilled fish.
Herb‑Infused Version
Drop in a few sprigs of fresh thyme or oregano while the onions sit. The herbs will impart a subtle, earthy note that pairs wonderfully with Mediterranean dishes.
Sweet & Smoky
Swap the white vinegar for apple cider vinegar and add a pinch of smoked paprika. The result is a sweet, smoky pickled onion that’s a match made in heaven with barbecue ribs.
Citrus Twist
Add a slice of lemon or orange peel to the brine for a bright, citrusy aroma. The peel will infuse the onions with a fresh zing, making them ideal for seafood salads.
Ginger Glow
Grate a small piece of fresh ginger into the brine for a warm, spicy undertone. This variation is especially good with Asian‑style dishes like sushi rolls or dumplings.
Chocolate‑Covered Pickles
For a sweet, decadent twist, dip the pickled onions in melted dark chocolate after they’ve finished pickling. The chocolate coating adds a surprising depth of flavor, making it a unique topping for desserts.
Storing and Bringing It Back to Life
Fridge Storage
Keep the pickled onions in a sealed glass jar or a covered container in the refrigerator. They’ll stay crisp and flavorful for up to two weeks. Make sure the onions are fully submerged in the brine to prevent them from drying out.
Freezer Friendly
For longer storage, transfer the onions to a freezer‑safe container and freeze for up to three months. When you’re ready to use them, thaw in the refrigerator overnight. The texture may soften slightly, but the flavor remains intact.
Best Reheating Method
To reheat pickled onions, add a splash of water and microwave on high for 30 seconds, or heat gently in a skillet over low heat, stirring frequently. The added water steams the onions back to their original crispness, preventing them from drying out.