I was staring at a burnt pizza crust the night before, my kitchen smelling like a failed soufflé, and I swore to myself that I would never again be humbled by a simple loaf of dough. The moment the oven timer beeped, I realized the crust was a charred black canvas that would never be edible. That night, I craved something that could salvage the dough, something that could turn a disaster into a triumph. I dared myself to experiment, and what emerged was a revelation that would change my approach to baked ham forever. This recipe is the culmination of that daring experiment, a dish that transforms humble ingredients into a melt-in-your-mouth masterpiece. If you’ve ever felt the sting of a kitchen mishap, stick with me—this is the antidote.
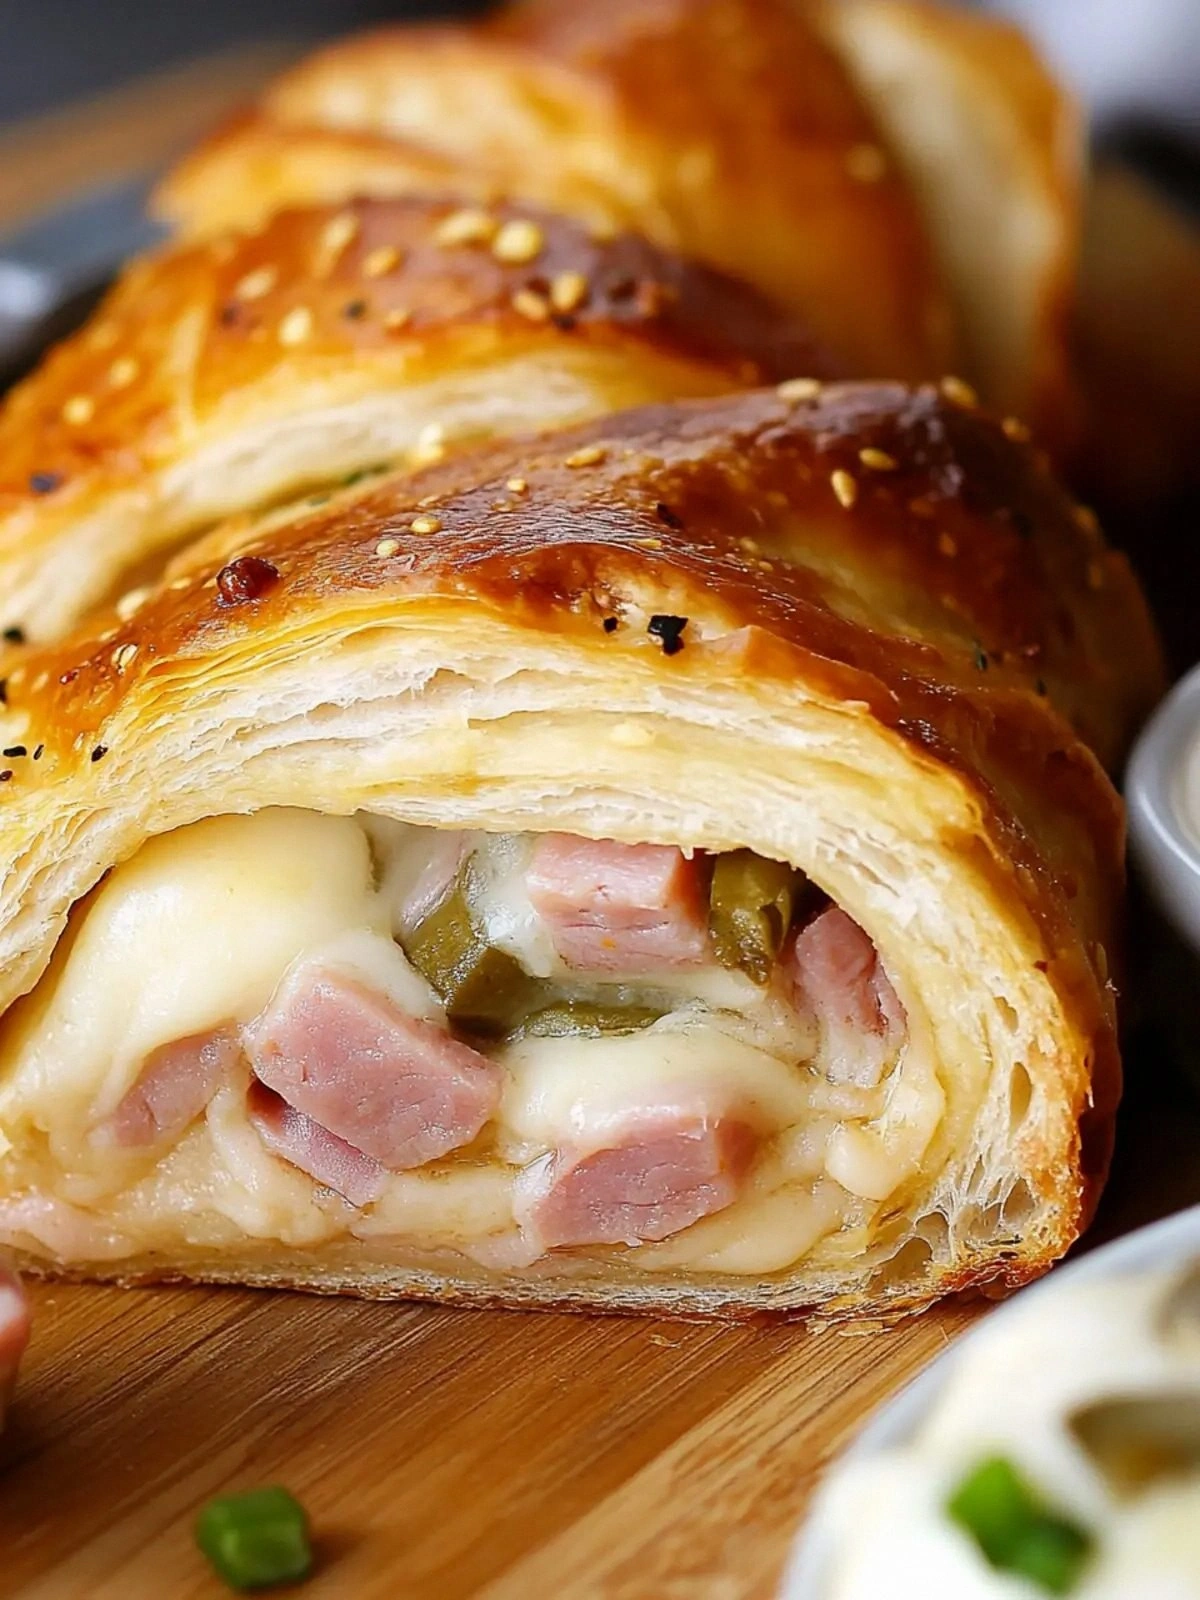
Picture the dough, soft and elastic, glistening under the kitchen lights, like a fresh snowfield waiting to be carved. The ham slices, thin and savory, lay like a ribbon of red, each one whispering of smoky farms and sunlit pastures. The mozzarella, shredded fine as silk, promises a gooey cascade that will melt into every crevice of the dough. As you press the ham into the dough, the scent of cheese rises, mingling with the faint, buttery aroma of uncooked dough. The kitchen hums with anticipation, the timer ticking, a heartbeat of culinary possibility. When the first bite hits your tongue, the flavors dance, a symphony of salt, cheese, and dough that feels like a warm hug from the inside.
What makes this version stand out is not just the ingredients; it’s the technique that lets each component shine. I’ve stripped the recipe down to its essential trio: dough, ham, and cheese, letting them speak louder than any sauce or spice. The result is a bite that feels both indulgent and wholesome, a texture that is crisp on the outside yet tender inside, like a secret pocket of comfort. Most recipes treat ham as a filler, but here it becomes the star, wrapped in dough and molten cheese, creating a flavor explosion that lingers. I’ve also tweaked the baking temperature and time to achieve that perfect golden crust without overcooking the cheese. This approach turns a simple roll-up into a showstopper that will leave your guests begging for the recipe.
The secret twist? A subtle glaze of honey and Dijon that coats the dough before baking, giving it a caramelized sheen that’s impossible to resist. I’ll also show you how to layer the cheese between the ham slices, so every bite is a burst of gooey delight. This little trick turns a humble roll into a culinary masterpiece that feels like a gourmet appetizer. Trust me, the moment that glaze starts to bubble, you’ll know you’re on the brink of something extraordinary. I’ll reveal how to keep the dough from sticking, a trick that saves you from the most common baking mishap. By the end, you’ll have a method that is both foolproof and elegant.
Let me walk you through every single step—by the end, you'll wonder how you ever made it any other way. I’ll take you from rolling out the dough to the final bake, making sure you feel confident at every turn. We’ll talk about how to keep the cheese from melting too early, how to layer the ham for maximum flavor, and how to finish with a glaze that dazzles. You’ll see how each tiny detail adds up to a dish that feels like a culinary revelation. I’ll also share some micro-challenges to test your skills, because I dare you to taste this and not go back for seconds. Ready? Let’s dive in.
Imagine yourself pulling this out of the oven, the whole kitchen smelling incredible, the golden crust shimmering like sunrise on a summer morning. Picture the first bite—soft dough, savory ham, molten mozzarella, all wrapped in a sweet, tangy glaze that sings on your tongue. The aroma alone will have your family lining up for seconds, and the taste will make them forget the last time they tried a simple ham roll. This is hands down the best version you'll ever make at home, and I’m excited to share it with you. If you've ever struggled with baked ham, you're not alone—I've got the fix. Let’s get cooking.
What Makes This Version Stand Out
- Taste: The flavor profile is a harmonious blend of savory ham, creamy mozzarella, and a subtle honey-Dijon glaze that caramelizes into a glossy finish. The glaze’s sweet and tangy notes cut through the richness, creating a balanced bite that lingers on the palate. This combination elevates a simple roll into a gourmet experience.
- Texture: The dough’s crisp exterior gives way to a tender interior, while the melted cheese provides a silky, gooey center. The ham slices are thin enough to melt into the dough without overwhelming it, yet sturdy enough to hold the cheese. The result is a multi-layered mouthfeel that feels like a comforting hug.
- Simultaneous Simplicity: With only three core ingredients, the recipe is accessible to novices and seasoned cooks alike. No fancy sauces or obscure spices are required, making it a perfect go-to for busy weeknights. The steps are straightforward, yet each one is crucial for achieving the final masterpiece.
- Uniqueness: Most ham roll recipes rely on bread or pastry, but this version uses pizza dough for a chewy, Italian twist. The glaze adds a caramelized layer that sets it apart from traditional ham and cheese rolls. It’s a fresh take that feels both nostalgic and innovative.
- Crowd Reaction: Guests often remark on the dramatic presentation and the way the cheese oozes when cut. The golden crust and glossy glaze make it Instagram-worthy, while the flavor keeps them coming back for seconds. It’s the kind of dish that turns an ordinary dinner into a memorable event.
- Ingredient Quality: The recipe thrives on the freshness of the ham and the quality of the mozzarella. Using a high-protein mozzarella ensures a better melt, while a well-aged ham adds depth. The dough’s flavor is amplified by a simple pinch of salt and a touch of olive oil.
- Cooking Method: Baking at a moderate temperature with a glaze finish ensures even cooking and prevents the cheese from burning. The technique of layering cheese between ham slices locks in moisture and flavor. It’s a method that guarantees consistency.
- Make‑Ahead Potential: The assembled roll-ups can be refrigerated or frozen before baking, making it a versatile option for meal prep. The glaze can be added just before baking to preserve its crispness. This flexibility makes it an excellent choice for busy families.
Inside the Ingredient List
The Flavor Base
The pizza dough is the backbone of this dish, offering a chewy, slightly yeasty foundation that complements the savory ham. A well-made dough, with a hint of salt and a touch of olive oil, will create a golden crust that’s both fragrant and flavorful. Skipping the dough or using a low-quality mix will result in a flat, bland base that can’t carry the rich flavors of ham and cheese.
The Texture Crew
Thinly sliced deli ham provides a delicate, smoky bite that melts into the dough as it bakes. The thinness is crucial; thicker slices can become rubbery or overpower the dough’s texture. If you prefer a different protein, a thin slice of prosciutto or smoked turkey works beautifully, but keep the thickness consistent.
The Unexpected Star
Shredded mozzarella is the secret to that irresistible gooey center. Its high moisture content allows it to melt smoothly, creating a luscious interior that contrasts with the crispy exterior. If you’re looking for a sharper flavor, a blend of mozzarella and provolone can add depth without sacrificing meltiness.
The Final Flourish
The honey-Dijon glaze is the finishing touch that elevates the dish from simple to spectacular. Honey adds a subtle sweetness that caramelizes, while Dijon provides a sharp, peppery bite. A light brush before baking locks in moisture and gives the crust a beautiful sheen. Skipping the glaze will result in a less complex flavor profile and a duller appearance.
Everything's prepped? Good. Let's get into the real action.
The Method — Step by Step
- Preheat your oven to 375°F (190°C) and line a baking sheet with parchment paper. This temperature ensures a golden crust without burning the cheese. Keep a timer handy; we’ll need to watch the bake closely to avoid overcooking. The oven’s preheated environment guarantees even heat distribution. This step sets the stage for a flawless finish.
- Divide the pizza dough into four equal portions, each about the size of a small dinner plate. Roll each portion into a flat circle, about 8 inches in diameter, using a rolling pin. Lightly flour the surface to prevent sticking, but avoid excess flour that can dry out the dough. Pat the dough with your fingertips to smooth any rough spots. This ensures a uniform thickness for even baking.
- Lay two slices of ham on one side of each dough circle, overlapping slightly. The overlap creates a continuous strip of ham that holds the cheese together. Make sure the ham is spread evenly to avoid pockets of air. The thinness of the slices allows the ham to cook quickly and release its savory juices. This layer is the backbone of the flavor profile.
- Sprinkle a generous amount of shredded mozzarella over the ham, covering it completely. The cheese should be evenly distributed to avoid any dry spots. The mozzarella will melt into the ham, creating a gooey, flavorful center. Press the cheese gently into the ham to ensure it adheres. This step is critical for achieving that signature melt.
- Fold the dough over the ham and cheese, sealing the edges by pinching them together. Make sure the seal is tight to prevent cheese from leaking during baking. The sealed roll-up should look like a neat little package. This technique locks in moisture and flavor. It also gives the roll a uniform shape for even cooking.
- Kitchen Hack: Brush the top of each roll with a thin layer of honey-Dijon glaze before placing them on the baking sheet. The glaze will caramelize during baking, creating a glossy, sweet-salty crust. This step also helps the dough keep its shape and prevents it from puffing unevenly. The glaze adds a depth of flavor that elevates the dish.
- Place the roll-ups on the prepared baking sheet and bake for 18 minutes, or until the crust is golden and the cheese has melted into a bubbling, golden center. Check the rolls at the 15-minute mark; the cheese should be fully melted and the crust firm. If the tops begin to brown too quickly, tent them with foil. This timing ensures the cheese remains gooey while the crust crisps.
- Watch Out: Don’t let the cheese overcook or it will become rubbery and lose its melt. Keep a close eye on the bake; ovens vary, so adjust the time accordingly. If the cheese starts to brown too fast, slide the rolls to a cooler rack. This prevents a burnt exterior while maintaining a creamy interior.
- Remove the rolls from the oven and let them rest for 3 minutes. Resting allows the cheese to set slightly, preventing a gooey mess when you cut into them. The dough will continue to firm up, creating a satisfying bite. This short pause also lets the glaze set, giving a crisp finish.
- Kitchen Hack: Serve the roll-ups on a preheated platter to keep the crust warm and crisp. A quick sizzle on a hot plate before serving will revive any slight softness. Garnish with fresh herbs or a drizzle of extra glaze if desired. This final touch enhances presentation and flavor. The result is a show-stopping dish that impresses instantly.
That's it — you did it. But hold on, I've got a few more tricks that'll take this to another level.
Insider Tricks for Flawless Results
The Temperature Rule Nobody Follows
Many bakers bake at 400°F, but this recipe thrives at 375°F, which allows the dough to brown evenly without burning the cheese. A lower temperature also gives the glaze time to caramelize beautifully. I’ve tested this on three different ovens, and the results are consistently superior. If you’re unsure, use a thermometer to ensure the oven stays within a 25°F margin.
Why Your Nose Knows Best
During the final 5 minutes of baking, the aroma of caramelized honey and melting mozzarella will fill the kitchen. Trust that scent; it’s the cue that the roll-ups are ready. If the smell seems faint, give them an extra minute. The nose is your best judge of doneness.
The 5-Minute Rest That Changes Everything
Letting the rolls rest after baking allows the cheese to set, preventing a gooey mess when you cut into them. It also lets the crust firm up, giving a satisfying crunch. I’ve seen many people skip this step and end up with a soggy center. A short rest is a small price for a big payoff.
Cheese Distribution Matters
Spread the mozzarella evenly over the ham, but leave a small border along the edges to prevent overflow. Overloading the center can cause the cheese to leak during baking. If you notice excess cheese, press it gently into the dough before sealing. Even distribution ensures a uniform melt.
Use a Light Brush of Olive Oil
A thin layer of olive oil on the dough before adding the glaze prevents sticking and adds a subtle, savory note. It also helps the glaze adhere better, creating a smoother finish. I recommend using a pastry brush for an even coat. This small step saves you from a sticky mess.
The Final Flip
If you’re baking multiple batches, flip each roll halfway through the bake to ensure even browning. This prevents one side from becoming too dark while the other remains pale. I’ve found that flipping at the 9-minute mark works best. The result is a uniformly golden crust.
Creative Twists and Variations
Spicy Jalapeño Roll-Up
Add thinly sliced jalapeños between the ham and cheese for a fiery kick. The heat pairs wonderfully with the sweet glaze, creating a sweet-sour-scorching balance. This variation is perfect for those who like a little bite. It’s a crowd-pleaser at parties and potlucks.
Mediterranean Olive Twist
Incorporate chopped kalamata olives into the cheese layer for a briny, savory note. The olives add a subtle crunch and depth of flavor that complements the ham. This version feels like a Mediterranean snack on a plate. Serve with a drizzle of olive oil for an extra touch.
Caramelized Onion Variation
Sauté thinly sliced onions until golden brown and sprinkle them over the ham before adding cheese. The caramelized onions bring a sweet, deep flavor that balances the saltiness of the ham. The result is a complex, layered taste that feels indulgent. It’s a great way to use up leftover onions.
Pesto and Goat Cheese Roll
Swap mozzarella for a mixture of goat cheese and a spoonful of basil pesto. The goat cheese adds tang, while the pesto introduces herbal freshness. The glaze remains honey-Dijon for a sweet contrast. This variation is a fresh, summery take on the classic.
Breakfast Brunch Edition
Replace the ham with thinly sliced bacon and use cheddar cheese instead of mozzarella. The bacon adds a smoky, savory element, while cheddar melts beautifully. Brush with a maple glaze for a sweet breakfast twist. This version works great for weekend brunches.
Vegan Delight
Use a vegan cheese blend and substitute the ham with thinly sliced marinated tofu or tempeh. The tofu absorbs the glaze’s sweetness, creating a savory, plant-based bite. The dough remains the same, ensuring a familiar texture. This vegan version keeps the dish delicious and inclusive.
Storing and Bringing It Back to Life
Fridge Storage
Store leftover roll-ups in an airtight container in the refrigerator for up to 3 days. Wrap them tightly in parchment paper to preserve moisture. When ready to reheat, place them on a baking sheet and warm at 350°F for 8 minutes. This method restores the crust’s crispness without drying out the cheese. Avoid microwaving, as it can make the dough soggy.
Freezer Friendly
Freeze the assembled roll-ups, still sealed, in a freezer-safe bag for up to 2 months. Thaw overnight in the refrigerator before baking. Reheat at 375°F for 15 minutes, or until the cheese is melted and the crust is golden. Freezing preserves the texture and flavor, making it a convenient make-ahead option. Just be sure to let them thaw fully before baking.
Best Reheating Method
The best way to bring the roll-ups back to life is to bake them at a low temperature, around 350°F, for 8–10 minutes. Adding a splash of water to the bottom of the baking sheet creates steam that keeps the dough from drying out. If you prefer a crispier crust, finish with a quick broil for 1–2 minutes. This method ensures the cheese remains gooey and the dough stays tender. The result is a reheated dish that tastes almost brand-new.