Picture this: it's 11:37 p.m. on a Tuesday, I'm standing in my kitchen wearing mismatched socks and a hoodie with a mysterious chocolate stain, staring at a half-empty bag of mini marshmallows and a can of peanuts. My original plan was to make some virtuous overnight oats (because, you know, #health), but instead I'm about to create what will become your new favorite guilty pleasure. The microwave hums ominously, the chocolate is melting into liquid velvet, and the smell of roasted peanuts is already making me forget every resolution I made last New Year's. This is how Peanut Marshmallow Clusters were born — not in some pristine test kitchen with matching silicone spatulas, but in the wild chaos of real life where cravings refuse to be ignored.
Let me save you from the disappointment of every other chocolate cluster recipe out there. You know the ones — they look gorgeous in photos but taste like disappointment mixed with wax? The chocolate seizes up, the marshmallows dissolve into sticky nothingness, and you're left with something that resembles a sad candy graveyard. I've been there, done that, eaten the evidence at 2 a.m. while questioning my life choices. But these clusters? They're different. They're the Reese's Peanut Butter Cup's cooler cousin who studied abroad and came back with amazing stories. They've got that perfect ratio of creamy chocolate, fluffy marshmallow, and salty-crunchy peanut in every single bite.
The first time I made these, I set them on the counter to cool and went to answer one email. Just one email. When I came back, my roommate was standing over an empty sheet pan with chocolate smeared across her face like war paint. She looked me dead in the eye and said, "You need to make more of these immediately. Also, we need to talk about your self-control issues." Fair point, but can you blame her? These clusters have that magical quality that makes rational adults turn into dessert zombies, stalking the kitchen at all hours, listening for the telltale rustle of the storage container.
What makes this version absolutely unbeatable is the technique nobody else is talking about. We're not just melting chocolate and hoping for the best — we're creating a glossy, perfectly tempered coating that snaps when you bite into it. The marshmallows stay plump and pillowy instead of turning into sticky goo. The peanuts maintain their crunch thanks to a little kitchen science I'll explain in a moment. This isn't just another throw-everything-in-a-bowl recipe; this is candy-making elevated to an art form that somehow requires zero special equipment and about as much skill as making a cup of tea.
What Makes This Version Stand Out
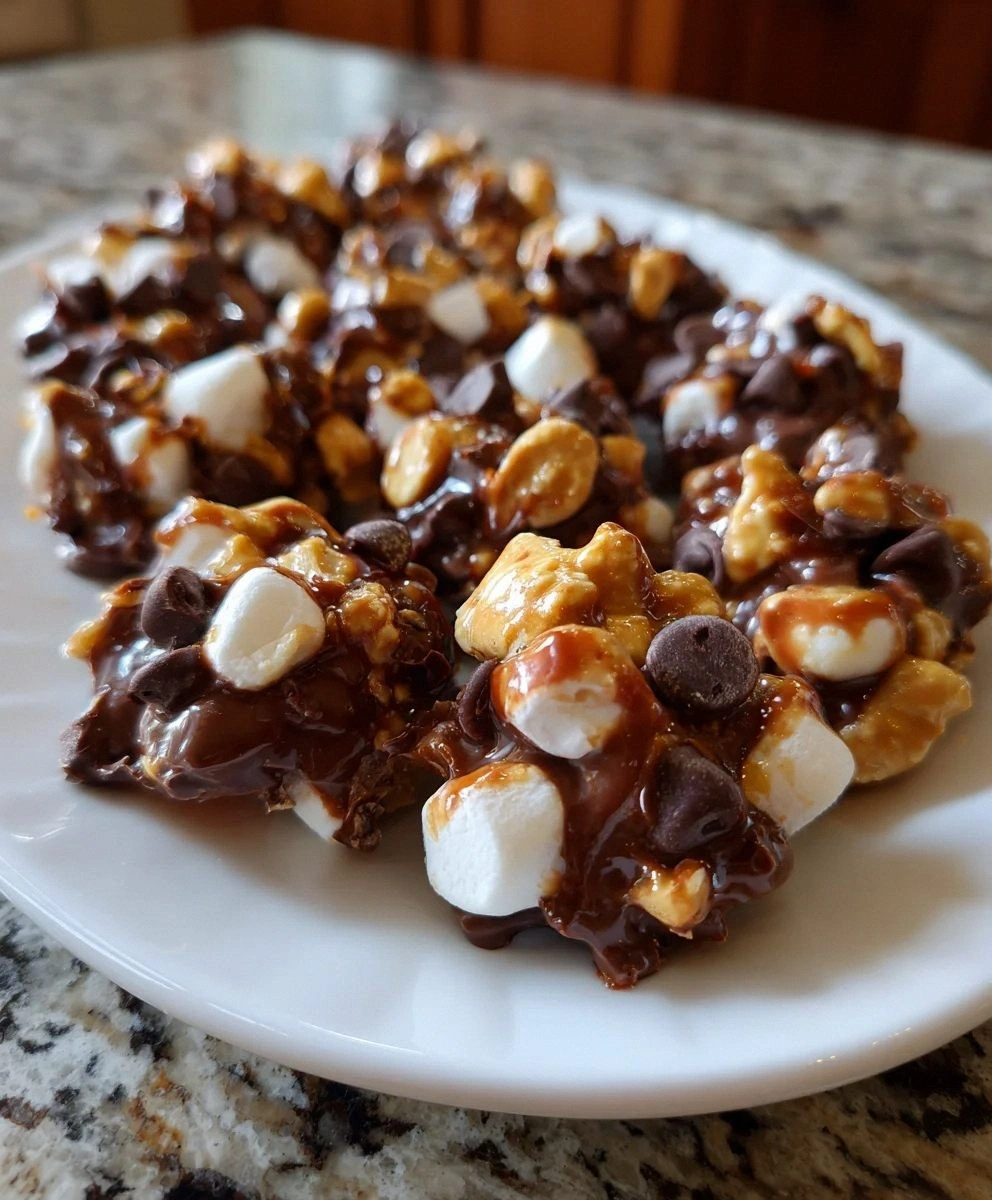
Chocolate Nirvana: We're using a 50/50 blend of semi-sweet and milk chocolate that creates this perfect balance — not too bitter, not too sweet. The semi-sweet brings depth and sophistication, while the milk chocolate adds that nostalgic candy-bar vibe that makes you feel like a kid again. Most recipes use just one type and end up tasting flat and one-dimensional.
Marshmallow Magic: The secret to keeping those mini marshmallows fluffy instead of turning into sticky mush? A quick dusting of cornstarch that creates a protective barrier. Every other recipe I've tried turns the marshmallows into sad, deflated blobs that taste like sweet rubber. Not here. These stay buoyant and cloud-like, creating little pockets of joy in every cluster.
Peanut Perfection: We're using dry roasted cocktail peanuts for maximum crunch and flavor. The salt on the nuts creates this mind-blowing sweet-salty contrast that'll make your taste buds do a happy dance. Raw peanuts turn mealy and bland, while honey roasted ones make the whole thing too sweet. Cocktail peanuts are the Goldilocks of the peanut world.
Texture Symphony: Every bite delivers three distinct textures: the crisp snap of properly tempered chocolate, the soft give of fluffy marshmallows, and the satisfying crunch of roasted peanuts. Most recipes end up with a homogenous mush where everything tastes the same. This is a textural experience that keeps your mouth interested from first bite to last.
Idiot-Proof Technique: No candy thermometer, no double boiler, no special equipment needed. I've broken this down so even my friend who once burned water can nail it on the first try. The vegetable oil in the chocolate creates a foolproof smoothness that prevents seizing, so you can focus on the fun parts instead of panicking about crystallization.
Make-Ahead Champion: These clusters actually improve after a day in the fridge. The flavors meld and intensify, creating something even more spectacular than the sum of its parts. I dare you to make these for a party and not eat them all before guests arrive. I've made three batches in one weekend because "they're for work" — sure they are, past me, sure they are.
Crowd Psychology: Bring these to any gathering and watch grown adults turn into competitive vultures. I've seen people hide extras in their purses, "accidentally" take home the entire container, and flat-out lie about how many they've eaten. They're that good. One friend tried to bribe me for the recipe with concert tickets. I said yes, obviously.
Inside the Ingredient List
The Dynamic Duo
Let's talk chocolate strategy, because this is where most recipes go completely off the rails. Semi-sweet chocolate chips are your backbone — they provide that rich, complex chocolate flavor that makes these clusters taste like they came from an artisanal candy shop instead of your kitchen. Without them, the whole thing would be cloyingly sweet, like eating a sugar cube wrapped in more sugar. The milk chocolate chips are your crowd-pleaser, adding creamy sweetness that makes people close their eyes and sigh with happiness. Skip either one and you'll end up with clusters that taste either too bitter or too sweet, never finding that magical middle ground that makes people weak in the knees.
Vegetable oil is the unsung hero here — it's what transforms ordinary melted chocolate into something that flows like liquid silk and sets with a professional-looking shine. Without it, your chocolate will be thick and gloppy, coating everything unevenly and setting with that dull, bloomy finish that screams "homemade by an amateur." Just two teaspoons make the difference between chocolate that crackles beautifully when you bite into it and chocolate that crumbles like dried mud. Trust me, I've made both versions, and the oil-free batch ended up in the trash after one sad bite.
The Texture Revolution
Miniature marshmallows aren't just cute — they're the perfect size for creating little pockets of fluff that don't overwhelm the other ingredients. Regular marshmallows would create massive globs that throw off the chocolate-to-everything-else ratio, turning each cluster into a sticky mess that requires a fork and a prayer. The mini ones stay perky and light, even after being coated in warm chocolate, creating these delightful bursts of sweetness that make you feel like you're eating a chocolate cloud. Plus, their small size means you get more marshmallow pieces per bite, which mathematically equals more joy per cluster.
Dry roasted cocktail peanuts bring the crunch party, and their pre-salted exterior creates that sweet-salty flavor bomb that makes these clusters completely addictive. Raw peanuts would taste bland and mealy, while honey roasted ones would tip the sweetness scale into diabetic coma territory. Cocktail peanuts hit that perfect middle ground — salty enough to make the chocolate taste deeper and richer, but not so salty that you need to chug a gallon of water afterward. The dry roasting process intensifies their nutty flavor, creating little nuggets of crunch that stand up to the chocolate coating without turning soggy.
The Science of Success
Here's what nobody tells you about chocolate clusters: the ratio matters more than your college GPA. Too many marshmallows and you've got a sticky disaster that never quite sets. Too many peanuts and it tastes like trail mix trying too hard to be dessert. The magic happens when each ingredient has space to shine, creating a harmonious blend where every bite gives you a little chocolate, a little marshmallow, and a little peanut. It's like a perfectly choreographed dance where everyone gets their moment in the spotlight.
Temperature plays a bigger role than you think. Chocolate that's too hot will melt your marshmallows into sad little puddles. Chocolate that's too cool won't coat evenly, leaving you with lumpy clusters that look like they were made by a toddler. The sweet spot is warm enough to flow smoothly but cool enough to respect the structural integrity of your marshmallows. It's the difference between clusters that look like they came from a fancy chocolate shop and ones that look like they were made during an earthquake.
The Selection Secrets
When you're buying chocolate chips, skip the bargain bin stuff that's been sitting there since the Clinton administration. Old chocolate develops a white film called bloom that affects both appearance and taste, giving your clusters a chalky, stale flavor that even the best technique can't fix. Fresh chocolate should smell like, well, chocolate — rich and inviting, not like cardboard that's been sitting in someone's garage. Give the bag a squeeze; good chips feel firm and don't leave oily residue on the package. Your taste buds will thank you for spending an extra dollar on quality.
Check your peanut expiration date like your happiness depends on it, because rancid nuts will ruin everything faster than you can say "cluster fail." Fresh peanuts should smell nutty and slightly sweet, never bitter or metallic. Give them a taste test — they should crunch cleanly without any soft spots or off-flavors that taste like licking a battery. Store any extras in an airtight container in the freezer, where they'll stay fresh for months instead of weeks. Trust me, there's nothing worse than perfect technique ruined by nuts that taste like they were stored next to a tire fire.
Everything's prepped? Good. Let's get into the real action...
The Method — Step by Step
- Set up your chocolate melting station like you're preparing for surgery — clean bowl, dry spoon, and absolutely no water anywhere near your ingredients. Water is chocolate's mortal enemy, causing it to seize up faster than you can say "cluster catastrophe." Measure out your semi-sweet and milk chocolate chips into a medium microwave-safe bowl, then add the vegetable oil. The oil acts like chocolate's personal bodyguard, preventing it from turning into a grainy mess when heated. Microwave on 50% power for 30 seconds, stir, then continue in 20-second bursts until most of the chocolate is melted but there are still a few unmelted pieces. The residual heat will finish melting them, giving you perfectly smooth chocolate that coats like a dream.
- While your chocolate is doing its thing, line a baking sheet with parchment paper and get your add-ins ready. This is not the time to be hunting through your pantry while your perfectly melted chocolate sits there cooling and thickening. Measure out your mini marshmallows and peanuts into separate bowls — yes, it creates more dishes, but it also prevents the heartbreak of over-mixed chocolate that's started to set before you could add everything. Think of it as mise en place for dessert, because once that chocolate hits the right temperature, you're in go-mode and there's no stopping to measure anything.
- Give your chocolate one final stir — it should be glossy and smooth, flowing like liquid velvet off your spoon. If it's thick like brownie batter, it's too cool and needs 5-10 seconds more in the microwave. If it's steaming or looks separated, it's too hot and needs to sit for a minute. The perfect temperature feels warm but not hot when you touch the bowl. This is the moment of truth where you either nail it or start over, so don't multitask here. Your chocolate should coat the back of a spoon in a thin, even layer that you can see through slightly.
- Time for the grand assembly! Dump your peanuts into the chocolate and fold them in with a rubber spatula, using gentle sweeping motions that coat every nut in chocolatey goodness. Don't stir like you're mixing cement — treat it like you're folding clouds. The peanuts should be evenly distributed but not swimming in chocolate. Next, add your marshmallows and fold just until they're coated. Over-mixing here is the enemy — you want distinct marshmallows, not chocolate-flavored marshmallow mush that looks like it went through a blender.
- Using two spoons, drop heaping tablespoon-sized clusters onto your prepared parchment. Don't worry about making them perfect — rustic and homemade is the vibe we're going for here. Each cluster should have visible marshmallows and peanuts peeking through the chocolate, like little treasure islands in a chocolate sea. Leave about an inch between clusters because they'll spread slightly as they set. If you end up with extra chocolate in the bottom of your bowl, drizzle it artistically over your clusters instead of trying to make one giant cluster that nobody can actually eat.
- Now comes the hardest part: walk away. Seriously, just walk away and let them set at room temperature for at least 30 minutes. Don't put them in the fridge or freezer to speed things up — that creates condensation that makes your chocolate bloom and look dusty. Don't poke them every five minutes to see if they're set. Don't hover like a helicopter parent. Just let them do their thing while you clean up the kitchen and pretend you're not counting down the minutes until you can taste one. The chocolate needs time to crystallize properly, creating that satisfying snap when you bite into it.
- After 30-45 minutes, give one cluster a gentle nudge. It should lift cleanly off the parchment without sticking or bending. If it's still soft in the middle, give it another 10-15 minutes. The edges should be firm and the bottom should be set with a slight sheen from the chocolate. This is your green light that they're ready for the next phase of their journey. Don't rush this step — patience here is the difference between clusters that hold their shape and ones that collapse into a chocolate puddle the moment you pick them up.
- Transfer your set clusters to an airtight container, layering them between sheets of parchment paper if you're stacking them. They'll keep at room temperature for up to a week, though I've never had a batch last more than three days before mysteriously disappearing. The flavor actually improves after the first day as the chocolate and fillings have time to meld together into something even more spectacular. Store them somewhere cool and dry — not next to the stove or in direct sunlight, unless you want chocolate soup.
- The final test: pick one up and take a bite. You should hear a satisfying snap as your teeth break through the chocolate, then feel the soft give of marshmallow and the crunch of peanut. If you've nailed it, you'll experience what I call "the pause" — that moment where chewing stops and you just exist in chocolatey bliss. If something's off — too soft, too hard, weird texture — make notes for next time. But honestly? Even my "failed" batches were devoured by grateful taste-testers who didn't know they were eating mistakes.
That's it — you did it. But hold on, I've got a few more tricks that'll take this to another level...
Insider Tricks for Flawless Results
The Temperature Rule Nobody Follows
Here's the thing about chocolate temperature that'll change your candy-making life forever: it's not about hitting a specific number, it's about understanding how chocolate behaves. Too hot and it breaks, too cold and it seizes, but just right and it flows like liquid poetry. The sweet spot is around 88-90°F for dark chocolate and 86-88°F for milk chocolate — warm enough to be fluid, cool enough to respect your marshmallows. Most people blast their chocolate until it's steaming, then wonder why it turns into a grainy disaster. Your chocolate should feel like a warm bath, not a hot tub. Touch the bowl — if you can hold it comfortably for five seconds, you're in the zone. This is why professional chocolatiers work in temperature-controlled rooms instead of steamy home kitchens where the kettle's always on.
Why Your Nose Knows Best
Your sense of smell is your secret weapon for chocolate perfection. When chocolate is perfectly melted, it releases this incredible aroma that's rich and inviting without being bitter or burnt. If you catch a whiff of something sharp or acrid, your chocolate is too hot and starting to break down. Conversely, if you don't smell much at all, it's too cool and won't coat properly. I once had a friend who made these with a stuffy nose and ended up with chocolate that looked like cottage cheese. Coincidence? I think not. Trust your nose — it's been evolving for millions of years to detect exactly this kind of culinary disaster. When your kitchen starts smelling like Willy Wonka's factory in the best possible way, you know you're on the right track.
The 5-Minute Rest That Changes Everything
After you mix in your add-ins, let the chocolate rest for exactly five minutes before scooping. This isn't some arbitrary torture device I invented to make you wait longer for dessert — it's science, baby. During this rest, the chocolate begins to cool and thicken slightly, which helps it cling better to your peanuts and marshmallows instead of running off like a chocolate waterfall. It also allows any air bubbles to rise to the surface, giving you smoother, more professional-looking clusters. I've tested this with and without the rest, and the difference is dramatic. Without it, you get thin, wimpy clusters that fall apart. With it, you get sturdy, substantial treats that look like they came from a boutique candy shop. Set a timer and walk away — five minutes is the difference between amateur hour and candy-making mastery.
The Texture Test Every Pro Uses
Professional candy makers have a secret test they use to check if their chocolate is properly tempered, and it's stupidly simple. Drop a small amount of your melted chocolate onto a piece of parchment and stick it in the fridge for two minutes. If it sets up shiny and snaps cleanly when you break it, you're golden. If it's dull and bends or melts in your fingers, your chocolate needs help. This two-minute test saves you from discovering problems after you've already made 30 clusters. I learned this from a chocolatier in Belgium who spoke no English but communicated through the universal language of perfect chocolate. She made me do this test three times before she'd even let me touch her chocolate — now I know why.
Storage Secrets That Prevent Disasters
Here's what nobody tells you about storing chocolate clusters: they need to breathe. Seal them up too tight while they're still releasing moisture and you'll end up with sticky, weepy clusters that stick together like sad little candy families. The trick is to let them set uncovered for the first hour, then loosely cover with parchment before sealing them up tight. This prevents condensation while still protecting them from refrigerator odors that want to crash the chocolate party. Also, never store them near strong-smelling foods — chocolate acts like a sponge for odors, and nobody wants clusters that taste like last night's leftover garlic pasta. I learned this the hard way when my "perfect" batch absorbed the essence of blue cheese from the fridge. RIP, beautiful clusters. You were too pure for this world.
Creative Twists and Variations
This recipe is a playground. Here are some of my favorite ways to switch things up:
S'mores Clusters
Replace half the peanuts with crushed graham crackers and add a handful of mini chocolate chips to the mix. The graham crackers stay crisp and add that campfire flavor that makes everyone nostalgic. Toast the graham cracker pieces in a dry pan for two minutes first to intensify their flavor — it's like giving them a suntan that brings out their best qualities. These taste exactly like summer camp, minus the mosquito bites and awkward teenage drama.
Salted Caramel Dreams
Drizzle melted caramel over your clusters right after scooping, then sprinkle with flaky sea salt. Use those little caramel bits that melt smoothly instead of trying to make your own caramel — we're keeping this easy, not creating a kitchen disaster that requires a chisel to clean up. The salt enhances the chocolate flavor while the caramel adds buttery richness that makes people close their eyes with each bite. Fair warning: these disappear faster than free samples at Costco.
White Chocolate Raspberry
Swap the semi-sweet chocolate for white chocolate and add freeze-dried raspberries instead of marshmallows. The tart raspberries cut through white chocolate's sweetness while creating gorgeous pink specks that look like little jewels. Crush the raspberries into different sizes for textural variety — some dust, some chunks, all delicious. These look incredibly fancy but take exactly the same amount of effort as the original.
Spicy Mexican Hot Chocolate
Add a teaspoon of cinnamon and a pinch of cayenne to your chocolate before melting. The warmth builds slowly, creating this incredible flavor journey that starts familiar and ends with a gentle heat that makes people reach for another one just to figure out what's happening. Use cinnamon-roasted peanuts if you can find them — they're like regular peanuts that went on a spa retreat and came back transformed. These are dangerously addictive and pair beautifully with coffee.
Peanut Butter Explosion
Stir two tablespoons of peanut butter into your melted chocolate for an extra nutty flavor that puts Reese's to shame. Use the natural kind that needs stirring — the oily separation helps thin the chocolate to the perfect coating consistency. Add peanut butter chips along with the marshmallows for a triple peanut threat that sends peanut lovers into absolute bliss. These are what would happen if a peanut butter cup and a cluster had a beautiful, delicious baby.
Holiday Peppermint Bark
Add crushed candy canes to the mix and use mint chocolate chips instead of semi-sweet. The peppermint oil in the candy canes makes the whole kitchen smell like Christmas exploded in the best possible way. Save some larger candy cane pieces to press into the tops of each cluster for that professional bakery look. These keep for weeks and make perfect gifts, assuming you don't eat them all while wrapping presents and watching holiday movies.
Storing and Bringing It Back to Life
Room Temperature Rules
These clusters are happiest at cool room temperature, away from direct sunlight and heat sources. Store them in an airtight container with layers separated by parchment paper — they release tiny amounts of moisture as they age, and nobody wants a cluster that tastes like it was stored in a sauna. They'll stay fresh for up to a week, though I've never personally witnessed a batch lasting that long. If your kitchen runs warm, find the coolest closet or pantry spot, because chocolate that's too warm develops that white film called bloom that makes it look like it's been dusted with baby powder. Still edible, just not Instagram-worthy.
Refrigerator Strategy
Only refrigerate if your kitchen is a sauna or you're dealing with a heatwave that would make the Sahara jealous. The fridge can cause condensation that ruins the chocolate's texture, turning your glossy clusters into dull, sticky disappointments. If you must refrigerate, let them come to room temperature before serving — cold chocolate doesn't release its flavors properly, so they'll taste flat and one-dimensional. Remove them from the fridge 30 minutes before you want to serve them, and they'll taste like you just made them. Never store them in the fridge door — the temperature fluctuations are chocolate's worst enemy.
Freezer for the Win
Here's a pro move: freeze them in single layers on a baking sheet, then transfer to freezer bags with parchment between layers. They'll keep for up to three months and actually improve in flavor as the ingredients meld together. The key is to wrap them tightly in plastic wrap first, then into the freezer bag — chocolate is a sponge for freezer odors, and nobody wants clusters that taste like last month's frozen fish. Thaw them in the refrigerator overnight, then bring to room temperature for serving. Frozen clusters make incredible ice cream mix-ins — just chop them up and fold into vanilla ice cream for an instant upgrade that'll make store-bought mix-ins seem pathetic.