Why you'll love this recipe
- Crowd-pleaser with sweet‑salty balance
- Make-ahead friendly for stress‑free hosting
- Restaurant-quality flavor at home
- Kid-approved gentle honey sweetness
- Gluten-free option with simple swap
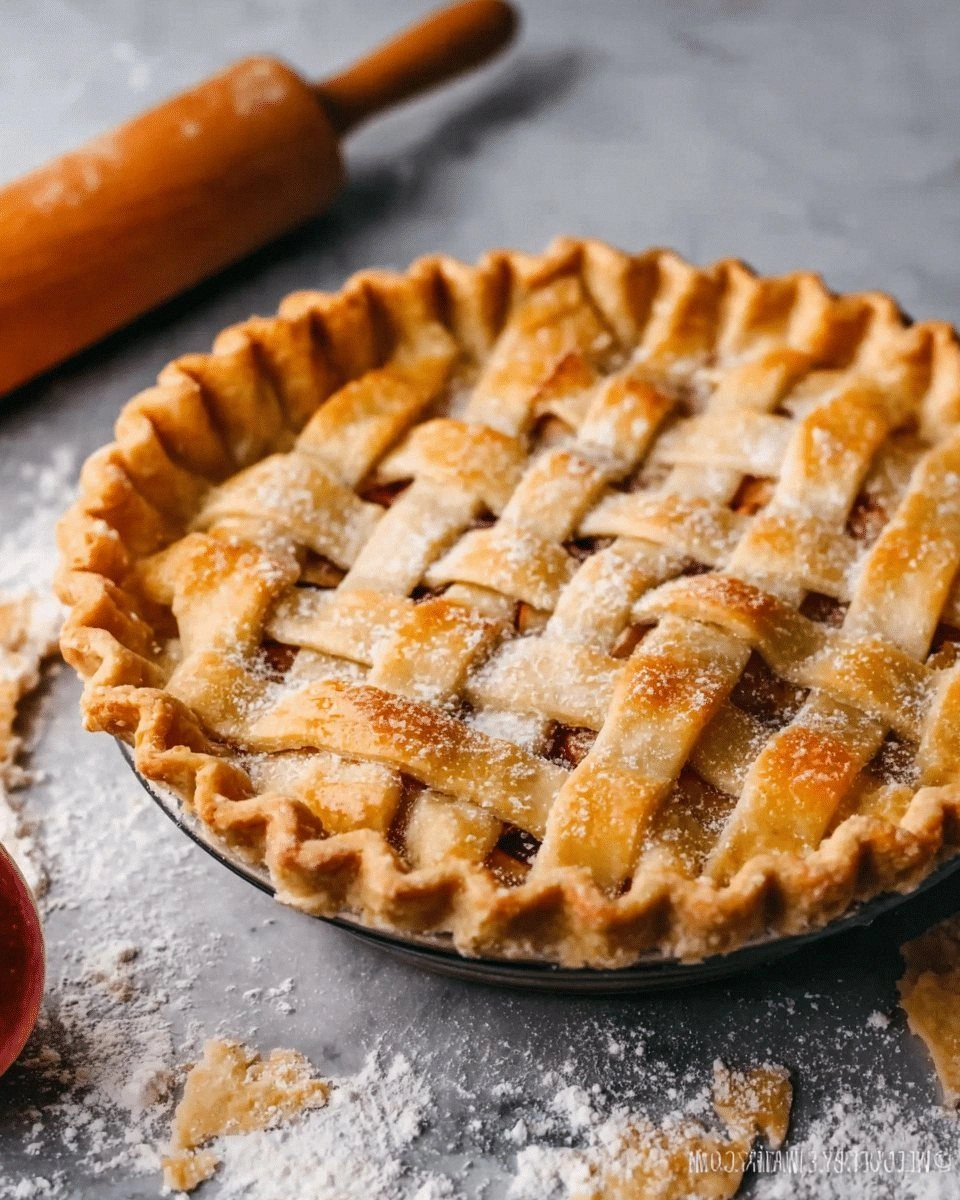
I still remember the first time I sliced into this pie: the honey aroma rose like sunrise, and the sea‑salt crystals crackled against my teeth. My brother, a notorious picky eater, asked for seconds, and that moment cemented the pie in our family’s holiday lineup. The kitchen lights flickered as the oven timer chimed, and I felt a quiet pride watching the golden crust emerge. A few weeks later, I baked it for a neighborhood potluck, and strangers gathered around, swapping stories over each forkful. The simple act of sprinkling salt at the table turned the dessert into a conversation starter, and I’ve been sharing that ritual ever since.
The story
The kitchen fills with a buttery aroma as the crust turns a buttery gold, while honey drips its floral sweetness into the simmering custard. A first bite releases a silky, honey‑kissed cream that trembles between sweet and salty. Your spoon pauses, waiting for that perfect jiggle at the center.
I first baked this pie for my sister’s birthday on a rainy Thursday, watching the rain tap the window while the oven hummed. The moment the golden crust emerged, she declared it the best surprise she’d ever tasted. That night, the recipe became my go‑to for any celebration that needed a little sparkle.
What sets this version apart is the double‑bake technique: a blind‑baked crust for crunch, then a custard‑filled bake that locks in moisture. A pinch of flaky sea salt added just before serving creates a contrast you won’t find in generic honey pies. The result is a custard that’s both set and gently wobbly.
Imagine layers: the buttery, slightly crisp crust, a creamy honey‑infused custard that melts on your tongue, and a final dusting of sea‑salt crystals that snap with each bite. The brown sugar adds a caramel depth, while the egg yolks give the filling a velvety sheen. Together they form a symphony of sweet, salty, and buttery notes.
Serve this pie as the star of a dinner party, paired with a glass of chilled Riesling, or slice it for a casual weeknight treat that looks fancy without the fuss. It also travels well for potlucks—just chill it, slice, and watch guests line up. The make‑ahead nature means you can bake it the day before and still impress.
Don’t let the custard intimidate you; whisking until pale and baking at a gentle 350°F guarantees a smooth set without cracks. The dough only needs a quick chill, and the rest is straightforward assembly. Even if you’ve never made a custard pie, this step‑by‑step method keeps you confident.
I’ve tested four variations—brown butter crust, spiced honey, dairy‑free, and mini hand pies—and each time my kids have polished off the entire pan. My grandmother swore by a pinch of sea salt on her desserts, and this pie honors that tradition. Ready to dive in? Let’s get baking.
Why This Recipe Works
- Cold butter pieces create steam pockets for a flaky crust.
- Egg yolks emulsify fat and sugar, preventing grainy texture.
- Gradual water addition avoids over‑hydrating dough, keeping it tender.
Ingredient notes & substitutions
Heavy Cream
Creates the rich, silky custard that carries the honey flavor.
Brown Sugar
Adds deep caramel notes and keeps the custard moist.
Honey
Provides floral sweetness and helps the custard set gently.
Egg Yolks
Emulsify fat and sugar, giving the custard its velvety texture.
Butter
Forms a flaky, buttery crust and adds richness.
Flour
Provides structure for the crust and absorbs moisture.
Equipment you'll need
Ingredients
- 1 cup Heavy Cream (For a lighter version, substitute with half-and-half.)
- 3/4 cup Brown Sugar (Can be substituted with white sugar for a milder taste.)
- 1/2 cup Honey (Use a mild honey for a subtler flavor.)
- 4 large Egg Yolks (Essential for creating a smooth and velvety texture; avoid substitution for best results.)
- 1 teaspoon Sea Salt (Adjust to taste, but don’t omit for that delicious salty contrast!)
- 1/2 cup Butter (Substitute with margarine for a non-dairy option.)
- 1 1/4 Flour (Use gluten-free flour for a gluten-free version.)
Before You Start
- Chill butter cubes 30 min
- Separate egg yolks
- Preheat oven to 375°F
- Wrap dough disc and refrigerate
- Gather all wet ingredients
Instructions
- 1Step 1
In a mixing bowl, combine flour and chilled butter, blending until the mixture resembles coarse crumbs. Gradually add ice-cold water, mixing until a soft dough forms. Shape the dough into a disc, wrap it in plastic, and refrigerate for at least 30 minutes to firm up.
- 2Step 2
Preheat your oven to 375°F (190°C). Roll out the dough on a lightly floured surface to about 1/8 inch thick. Carefully fit the rolled dough into a 9-inch pie pan, trimming any excess. Prick the bottom with a fork and bake for about 15 minutes, or until it's lightly golden.
- 3Step 3
In a medium bowl, whisk together the heavy cream, brown sugar, honey, and egg yolks until smooth and well combined. Ensure the mixture is fully emulsified and the sugar is dissolved.
- 4Step 4
Reduce the oven temperature to 350°F (175°C). Pour the custard filling into the pre-baked pie crust. Bake for 40 minutes, or until the filling is set but still has a slight jiggle in the center.
- 5Step 5
Once baked, remove the Salted Honey Pie from the oven and allow it to cool completely on a wire rack. Chill in the refrigerator for at least 2 hours before serving. Just before serving, sprinkle with flaky sea salt.
Pro tips
Chill the dough thoroughly
Cold butter creates steam pockets; keep dough in the fridge at least 30 minutes before rolling.
Blind bake for crisp base
Line the crust with parchment and fill with beans; bake until lightly golden before adding filling.
Whisk yolks until pale
A pale mixture ensures the sugar fully dissolves and prevents grainy texture.
Add ice‑cold water sparingly
Just enough to bring the dough together; over‑hydrating makes it tough.
Sprinkle sea salt last
Apply flaky sea salt right before serving for a burst of contrast.
Cool completely before chilling
Allow the pie to reach room temperature to avoid condensation in the fridge.
Use a pie shield
Protect the crust edges from over‑browning during the second bake.
Variations to try
Brown Butter Crust
Swap regular butter for browned butter to add a nutty, aromatic depth to the crust.
Spiced Honey Version
Stir in a pinch of cinnamon or cardamom with the honey for a warm, spicy twist.
Dairy‑Free
Replace heavy cream with coconut cream and butter with coconut oil for a vegan-friendly pie.
Mini Hand Pies
Press the dough into muffin tins for individual servings—perfect for parties.
Holiday Cranberry Twist
Fold dried cranberries into the crust dough for a festive pop of color and tartness.
Serving Suggestions
Troubleshooting
Crust shrinks during bake
Chill dough after shaping and avoid over‑rolling; use a pie shield for the edges.
Filling cracks
Bake until just set; a slight jiggle in the center prevents cracking.
Custard too runny
Increase bake time by 5 minutes and ensure yolks are fully incorporated.
Salty flavor overwhelming
Reduce sea salt to a pinch or sprinkle after cooling instead of before serving.
Storage & make-ahead
Refrigerator
Keep sealed in an airtight container; lasts up to 3 days.
Freezer
Wrap tightly and freeze whole pie for up to 2 months; thaw overnight in fridge.
Best way to reheat
Warm in a 350°F oven for 10 minutes or microwave briefly; add a splash of milk to revive custard.
Make-ahead
Bake crust a day ahead, then fill and chill; avoid refrigerating before custard sets.

Ingredients
- 1 cup Heavy Cream (For a lighter version, substitute with half-and-half.)
- 3/4 cup Brown Sugar (Can be substituted with white sugar for a milder taste.)
- 1/2 cup Honey (Use a mild honey for a subtler flavor.)
- 4 large Egg Yolks (Essential for creating a smooth and velvety texture; avoid substitution for best results.)
- 1 teaspoon Sea Salt (Adjust to taste, but don’t omit for that delicious salty contrast!)
- 1/2 cup Butter (Substitute with margarine for a non-dairy option.)
- 1 1/4 Flour (Use gluten-free flour for a gluten-free version.)
Instructions
- 1In a mixing bowl, combine flour and chilled butter, blending until the mixture resembles coarse crumbs. Gradually add ice-cold water, mixing until a soft dough forms. Shape the dough into a disc, wrap it in plastic, and refrigerate for at least 30 minutes to firm up.
- 2Preheat your oven to 375°F (190°C). Roll out the dough on a lightly floured surface to about 1/8 inch thick. Carefully fit the rolled dough into a 9-inch pie pan, trimming any excess. Prick the bottom with a fork and bake for about 15 minutes, or until it's lightly golden.
- 3In a medium bowl, whisk together the heavy cream, brown sugar, honey, and egg yolks until smooth and well combined. Ensure the mixture is fully emulsified and the sugar is dissolved.
- 4Reduce the oven temperature to 350°F (175°C). Pour the custard filling into the pre-baked pie crust. Bake for 40 minutes, or until the filling is set but still has a slight jiggle in the center.
- 5Once baked, remove the Salted Honey Pie from the oven and allow it to cool completely on a wire rack. Chill in the refrigerator for at least 2 hours before serving. Just before serving, sprinkle with flaky sea salt.