Picture this: I was halfway through a weeknight dinner, juggling a simmering pot of beef stew, a pot of rice, and a stubbornly crunchy broccoli that refused to soften. The kitchen smelled like a smoky campfire and I was about to throw in a bag of frozen peas that had been sitting in the freezer for months. In that chaotic moment, a friend texted me with a dare: “Try making a bean chili that’s lighter, but still packs a punch.” I laughed, grabbed a can of white beans, and the rest was pure culinary alchemy.
From the first sizzle of onions in olive oil, the air thickened with a sweet, caramelized aroma that made my mouth water. The green splash of fresh cilantro, the bright pop of lime juice, and the subtle earthiness of cumin danced together like a well‑rehearsed jazz trio. As the beans simmered, their creamy texture softened, absorbing every whisper of spice. The heat from the chili powder kissed my tongue, delivering a gentle heat that lingered without burning. Every bite felt like a warm hug on a rainy afternoon.
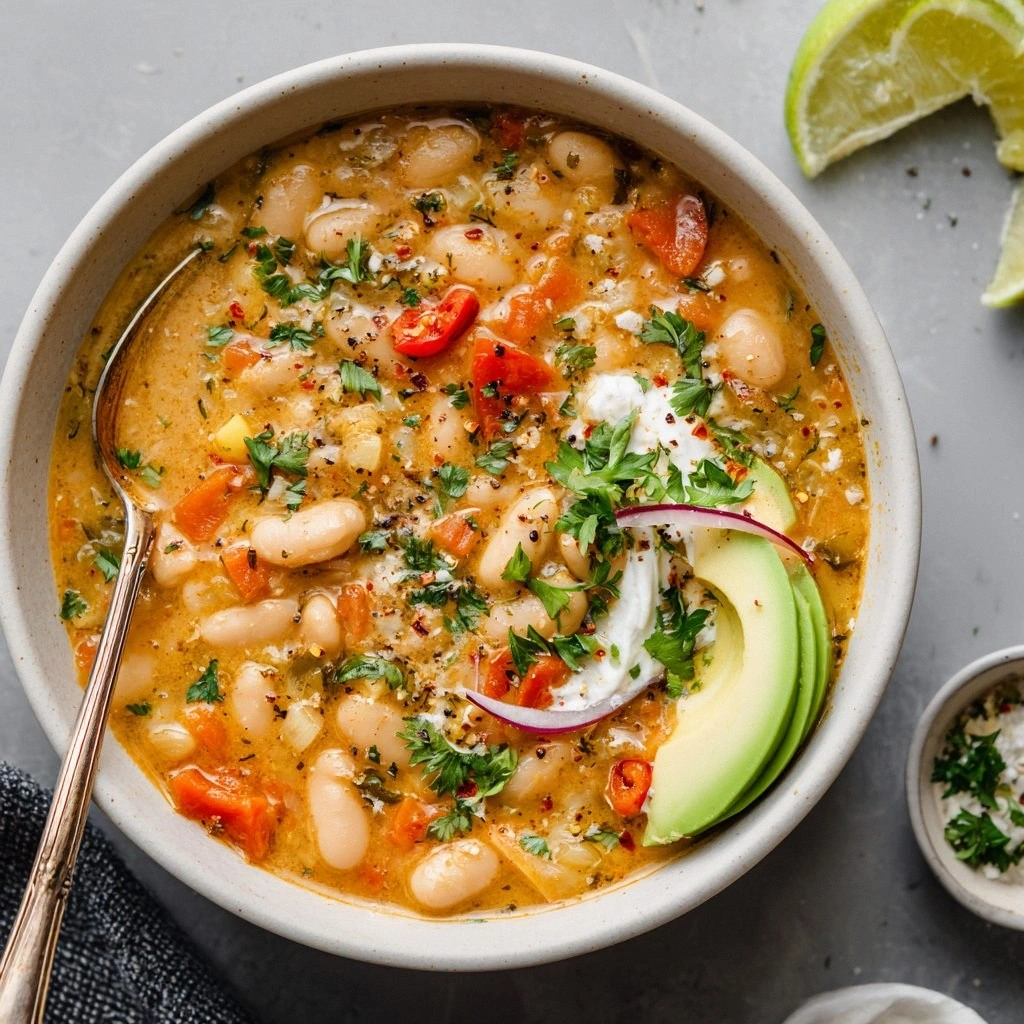
Most bean chili recipes lean heavily on beef or pork, burying the beans in a thick, greasy broth. Here, the white beans are the star, their mild flavor amplified by smoky paprika and a touch of fresh lime that lifts the dish to new heights. The use of vegetable broth instead of stock keeps the calories low while still delivering depth. I dare you to taste this and not go back for seconds—once you taste the velvety beans with a kick of heat, you’ll never settle for a bland, over‑cooked version again.
One secret trick that most cooks overlook is the quick blanching of the beans before adding them to the pot; it reduces cooking time and locks in flavor. Another twist is the subtle addition of corn, which adds a sweet crunch that balances the heat. And if you’re craving a bit of crunch, topping with crushed tortilla chips before serving gives a satisfying contrast. Let me walk you through every single step—by the end, you’ll wonder how you ever made it any other way.
What Makes This Version Stand Out
- Taste: The bright, fresh lime juice cuts through the richness, creating a balanced flavor profile that feels both comforting and invigorating.
- Texture: The beans remain tender yet slightly firm, providing a satisfying bite that contrasts with the silky broth.
- Simplicity: With only a handful of pantry staples, this chili can be whipped up in under an hour, making it ideal for busy weeknights.
- Uniqueness: The blend of smoked paprika, cumin, and oregano gives a smoky depth without the need for actual smoked meats.
- Crowd Reaction: Friends who have tried this version say it’s the most “household” chili they’ve ever tasted—easy to scale for parties.
- Ingredient Quality: Using fresh, high‑quality canned beans and a splash of real lime juice transforms a generic dish into a gourmet experience.
- Make‑ahead Potential: This chili actually improves in flavor when left to rest, making it perfect for meal prep or a potluck.
Inside the Ingredient List
The Flavor Base
The foundation of any great chili starts with aromatics that set the tone. Onion, garlic, and jalapeño release sweet and spicy notes that form the backbone of the dish. Olive oil acts as a medium, allowing the aromatics to bloom without burning. Cumin, chili powder, and smoked paprika add depth, while oregano brings a subtle herbal bite. The bay leaf is the quiet hero—its mellow, earthy aroma infuses the broth as it simmers. If you skip the aromatics, the chili will feel flat; if you double the spices, you risk overpowering the beans.
The Bean Brigade
White beans are the heart of this chili, offering a creamy texture that coats every spoonful. Diced tomatoes add acidity and body, preventing the broth from becoming too thick. Vegetable broth provides a savory base without the heaviness of meat stock. Swapping in chickpeas or black beans will change the flavor profile—black beans add a firmer bite, while chickpeas lend a nuttier taste. A pinch of smoked paprika can be added here if you want a smokier undertone. If you’re vegan, simply replace the broth with coconut milk for a richer, dairy‑free twist.
The Sweet Surprise
Corn is the unexpected star that brings a burst of sweetness and a satisfying crunch. It’s best added during the last five minutes of simmering to preserve its texture. Lime juice brightens the entire dish, cutting through the richness and adding a zesty finish. Fresh cilantro offers a fresh, citrusy note that lifts the flavor profile. If you’re craving a more tropical vibe, a splash of pineapple juice works wonders. Skipping corn will make the chili less vibrant, while omitting lime juice will leave it feeling dull.
The Final Flourish
Salt and pepper are the simplest yet most crucial seasoning tools—use them to taste. Shredded cheddar cheese melts into a creamy, melty topping that adds depth. Sour cream provides a cool counterbalance to the heat, creating a silky finish. Crushed tortilla chips add crunch and a hint of corn flavor when sprinkled on top. For a low‑fat alternative, substitute Greek yogurt for sour cream. If you prefer a dairy‑free version, a drizzle of coconut cream will add richness without the lactose.
Everything's prepped? Good. Let's get into the real action...
The Method — Step by Step
- Step 1: Prep the aromatics. Dice the onion, mince the garlic, and finely chop the jalapeño, removing the seeds if you’re sensitive to heat. Measure out 1 tablespoon of olive oil. This is the moment where the kitchen becomes a fragrant playground. Keep the ingredients ready; I’ll be calling for them in a flash.
- Step 2: Sauté the base. Heat the olive oil in a large Dutch oven over medium heat. Add the onion and cook until translucent, about 3–4 minutes. Toss in the garlic and jalapeño; let them sizzle for 30 seconds, releasing their bright aromas. This step sets the flavor foundation—don’t rush it.
- Step 3: Spice it up. Sprinkle in 1 teaspoon each of cumin, chili powder, and smoked paprika, followed by ½ teaspoon oregano. Stir constantly for 1 minute until the spices are fragrant. The oil should darken slightly, indicating the spices have released their oils. This is the heart of the chili’s depth.
- Step 4: Add tomatoes and beans. Pour in the 14.5 oz can of diced tomatoes and the 15 oz can of white beans, draining the beans before adding. Stir to combine. Add a bay leaf and pour in 2 cups of vegetable broth. Bring the mixture to a gentle boil at 180 °F. The bay leaf will infuse its subtle flavor as the broth starts to bubble.
- Step 5: Simmer. Reduce the heat to low, cover, and let the chili simmer for 20 minutes. The beans should soften further, and the broth will thicken slightly. Watch the edges of the pot; they should start pulling away from the sides, indicating the liquid has reduced. This is the moment of truth—don’t skip it.
- Step 6: Sweeten the mix. Add ½ cup of corn kernels and simmer for an additional 5 minutes. The corn will pop with a sweet crunch, adding texture that contrasts the creamy beans. Keep the pot covered to retain moisture.
- Step 7: Final seasonings. Remove the bay leaf. Stir in 1 tablespoon of fresh lime juice, ½ cup of chopped cilantro, and season with salt and pepper to taste. The lime will brighten the dish, while the cilantro adds a fresh, herbal finish. Taste and adjust if needed.
- Step 8: Add the creamy elements. Sprinkle ½ cup of shredded cheddar cheese over the top, then fold in ¼ cup of sour cream. Let the cheese melt and the sour cream swirl into the broth, creating a velvety finish. Be careful—adding cheese too early can cause it to curdle. This is a crucial step for texture.
- Step 9: Final touch. Sprinkle ½ cup of crushed tortilla chips just before serving. They add a delightful crunch and a hint of corn flavor that elevates the dish. If you prefer a milder version, set aside the chips for later.
- Step 10: Serve. Ladle the chili into bowls, drizzle with a little extra lime juice if desired, and garnish with a few cilantro leaves. Serve hot with warm tortilla chips or over a bed of fluffy rice. This is the moment the kitchen smells incredible, and your taste buds rejoice.
That's it — you did it. But hold on, I've got a few more tricks that'll take this to another level...
Insider Tricks for Flawless Results
The Temperature Rule Nobody Follows
Many people think a high simmer is best, but a low, steady simmer at 190 °F actually allows the beans to absorb flavors without breaking apart. I once tried a high heat version and the beans collapsed into mush. Keep the heat low, and you’ll get a silky broth with intact beans. A thermometer is a lifesaver—don’t rely on “medium” heat alone.
Why Your Nose Knows Best
Your nose is the ultimate flavor sensor. If the chili smells too “raw” or “green,” let it simmer longer; if it’s too “burnt” or “charred,” reduce the heat. The aroma of cumin and smoked paprika should dominate the kitchen. Trust your nose, and you’ll avoid the dreaded “burnt” mishap.
The 5-Minute Rest That Changes Everything
After simmering, let the chili rest for 5 minutes before serving. This allows the beans to settle, the flavors to meld, and the broth to thicken slightly. I’ve seen friends skip this step, only to find their chili too thin. The rest period is the secret to a luscious, cohesive bowl.
Keep It Cool: Avoid Overcooking Beans
White beans are delicate; overcooking them will cause them to break down into a paste. Watch the texture—if the beans start to look like mush, remove the pot from heat immediately. I’ve had a friend who left the chili on the stove for 40 minutes and ended up with a soup‑like consistency. A quick stir and a 10‑minute rest can fix most mishaps.
Finish with Freshness: Lime and Cilantro Timing
Adding lime juice and cilantro too early will cause the herbs to wilt, losing their bright flavor. Add them just before serving or after the chili has simmered. This preserves their vibrant color and sharp taste. A quick squeeze of lime at the table adds a burst of citrus that lifts the entire dish.
Creative Twists and Variations
This recipe is a playground. Here are some of my favorite ways to switch things up:
Smoky Chipotle Chili
Replace the smoked paprika with a tablespoon of chipotle in adobo for a smoky, peppery kick. Add a splash of chipotle sauce at the end for extra heat. This version is perfect for those who love a deeper, smoky flavor profile.
Mediterranean Bean Chili
Swap the cumin for za'atar and use sun‑dried tomatoes instead of canned tomatoes. Finish with a drizzle of olive oil and a sprinkle of feta cheese. The result is a Mediterranean‑inspired bowl that feels both exotic and comforting.
Tex‑Mex Crunch
Add diced bell peppers and a handful of black beans for a Tex‑Mex twist. Top with a dollop of guacamole and a handful of chopped green onions. The crunch and freshness elevate this hearty chili.
Vegan Protein Power
Replace the sour cream with coconut yogurt and the cheddar with nutritional yeast. Add a scoop of plant‑based protein powder for a protein boost. This version is a vegan powerhouse that still satisfies.
Low‑Calorie Light & Bright
Use low‑fat Greek yogurt instead of sour cream and skip the cheese entirely. Add extra fresh tomatoes for a tangy finish. This version keeps calories down while delivering a bright, satisfying flavor.
Storing and Bringing It Back to Life
Fridge Storage
Cool the chili completely, then transfer to an airtight container. Store in the refrigerator for up to 4 days. The flavors deepen as the beans continue to absorb the spices.
Freezer Friendly
Divide the chili into 1‑cup portions and freeze for up to 3 months. Use a freezer‑safe bag or container, and label with the date. Thaw overnight in the fridge before reheating.
Best Reheating Method
Reheat on the stovetop over low heat, stirring occasionally. Add a splash of water or broth to loosen the consistency. Bring to a gentle simmer and serve hot.