The first time I tried to make breakfast granola cups, I was halfway through a batch of muffins and the kitchen smelled like burnt sugar. My friend dared me to finish the muffins and I, ever the culinary daredevil, decided to turn the disaster into a triumph. I grabbed the leftover oats, coconut, and nuts, mixed them with honey and vanilla, and pressed the batter into a silicone muffin tin. The result? A golden, crunchy cup that sang with caramelized honey and nutty undertones, and I was left wondering how I ever ate breakfast the old way. That night, I dreamed of a perfect, portable breakfast that could be prepped in minutes and eaten on a run or a lazy Sunday.
Imagine the first bite: a crunch that echoes like a gentle applause, followed by a sweet, buttery melt of honey and coconut that lingers on your tongue. The aroma that wafts from the oven is a warm, comforting hug that makes you feel like you’ve been transported to a sun‑kissed kitchen in the South. The texture is a delightful contrast—crisp edges that shatter like thin ice, a chewy center that holds the flavors together, and a glossy glaze that invites a second bite. I dare you to taste this and not go back for seconds. Most breakfast recipes get this completely wrong, but here we have a single cup that packs a punch of flavor and nutrition in one bite.
The secret to this version is the meticulous balance of sweet and savory, the careful selection of ingredients, and a technique that ensures each cup is perfectly formed and evenly baked. I’ve spent countless hours tweaking the ratios, swapping in different nuts, and experimenting with spices until I found the combination that sings. The result is hands down the best version you’ll ever make at home, with a crunch that feels like a crisp morning breeze and a sweetness that feels like a hug from a grandmother. Picture yourself pulling these cups out of the oven, the whole kitchen smelling incredible, and the first bite taking you straight to a sunny breakfast table. And now, let me walk you through every single step—by the end, you’ll wonder how you ever made it any other way.
This isn’t just another granola recipe; it’s a culinary revelation that transforms a simple breakfast into an experience. The cups are not only delicious but also versatile—perfect for a quick grab-and-go, a packed lunch, or a snack that satisfies cravings without the guilt. I’ll be honest—I ate half the batch before anyone else got to try it. If you've ever struggled with making granola that sticks together, you’re not alone, and I've got the fix. Stay with me here—this is worth it.
What Makes This Version Stand Out
- Taste: The marriage of toasted oats, coconut, and nuts creates a complex flavor profile that is simultaneously sweet, nutty, and slightly caramelized. The honey and vanilla infusion adds depth without overpowering the natural ingredients. The subtle pinch of cinnamon ties everything together, giving a warm, comforting note that lingers on the palate.
- Texture: Each cup delivers a satisfying crunch that gives way to a chewy center, creating a multi‑sensory experience. The batter’s consistency is carefully calibrated to hold together yet allow the edges to crisp up beautifully during baking. The result feels like a miniature, bite‑size cookie with the wholesome goodness of granola.
- Simplicity: With just a handful of pantry staples, you can produce a breakfast that feels indulgent yet is easy to prepare. No complicated sauces or exotic ingredients—just oats, nuts, seeds, and a few sweeteners.
- Uniqueness: Unlike traditional granola bars that often crumble, these cups maintain structure thanks to the coconut oil binder and the silicone muffin tin’s gentle heat distribution. The result is a bite‑size treat that doesn’t fall apart.
- Crowd Reaction: Friends and family rave about how the cups can be topped with yogurt, fresh fruit, or a drizzle of chocolate, making them perfect for parties or picnics. The portable nature means they’re a hit on the go.
- Ingredient Quality: The use of high‑quality coconut oil, pure honey, and fresh nuts ensures that every bite is packed with flavor and nutrition. The recipe is flexible enough to accommodate organic or locally sourced ingredients.
- Cooking Method: Baking in a silicone muffin tin ensures even heat distribution and a quick bake time, eliminating the need for a stovetop or oven pre‑heat ritual.
- Make‑Ahead Potential: Once baked, the cups stay fresh for up to a week in an airtight container, making them a perfect prep‑ahead breakfast for busy mornings.
Inside the Ingredient List
The Flavor Base
Rolled oats are the foundation of any granola, providing a hearty, nutty base that holds the mixture together. They absorb the honey and coconut oil, creating a cohesive batter that doesn’t crumble. If you skip oats, the cups will lack structure and crumble when you try to lift them. For a gluten‑free version, replace rolled oats with gluten‑free oats or quinoa flakes. Choose a brand that’s not pre‑flavored to keep the taste pure.
The Texture Crew
Shredded coconut adds a chewy, slightly sweet texture that balances the crunch of the oats. Almonds and pecans contribute a buttery crunch that adds depth and a subtle nutty aroma. Pumpkin seeds and sunflower seeds bring a satisfying crunch and a dose of healthy fats. If you’re allergic to nuts, substitute with pumpkin seeds or sunflower seeds alone, or use a nut‑free seed blend. The key is to ensure each cup has a variety of textures that bite and melt simultaneously.
The Unexpected Star
Dried cranberries bring a tart sweetness that cuts through the richness of honey and coconut oil. They also add a pop of color, making the cups visually appealing. If you prefer a milder flavor, try dried blueberries or raisins. A pinch of sea salt enhances every other flavor, preventing the sweetness from becoming cloying. Remember, a small pinch is enough to elevate the entire cup.
The Final Flourish
Honey and coconut oil act as the glue that binds all the dry ingredients together. Honey provides natural sweetness and a caramelized finish when baked, while coconut oil ensures a smooth, glossy coating. Vanilla extract adds a warm, aromatic undertone that ties everything together. Ground cinnamon provides a subtle spice that complements the sweetness and adds a comforting warmth. Milk or almond milk is added to achieve the right batter consistency; too thick and the cups won’t spread, too thin and they’ll collapse.
Everything's prepped? Good. Let's get into the real action...
The Method — Step by Step
- Preheat your oven to 350°F (175°C). Line a 12‑cup silicone muffin tin with parchment paper or lightly grease each cup. This step ensures even baking and makes cleanup a breeze. As the oven heats, the smell of toasted oats will begin to rise, signaling that the kitchen is turning into a fragrant haven.
- In a large bowl, combine 2 cups rolled oats, 1 cup shredded coconut, 1 cup mixed nuts (almonds, pecans), 1 cup pumpkin seeds, and 1 cup sunflower seeds. Toss until evenly coated. The mix should feel like a dry, sandy beach—ready for the sweet tide of honey.
- Add 1 cup dried cranberries to the dry mixture, ensuring they’re evenly distributed. The cranberries add a burst of tartness that balances the sweetness of honey. If you’re using a different dried fruit, adjust the quantity to maintain the same volume.
- In a separate saucepan, warm 1/2 cup honey and 1/4 cup coconut oil over low heat until the mixture becomes liquid and silky. Stir in 1 tsp vanilla extract and 1 tsp ground cinnamon. The aroma of vanilla and cinnamon should envelop the kitchen, creating a warm, inviting atmosphere.
- Pour the honey mixture over the dry ingredients, stirring until everything is evenly coated. The batter should feel like a sticky, golden sand that clumps together when pressed. This is the moment of truth; if the mixture is too dry, add a splash of milk until it reaches a firm but pliable consistency.
- Add a pinch of sea salt to the batter and mix thoroughly. The salt will bring out the sweetness and balance the flavors, preventing the cups from feeling flat.
- Fill each cup of the silicone tin about ¾ full with the batter. Press gently with a spoon or your hand to ensure the mixture is compact and evenly spread. The batter should sit flat at the bottom of each cup, creating a uniform surface for baking.
- Place the tin in the preheated oven and bake for 25–30 minutes, or until the edges are golden brown and the cups feel firm to the touch. The aroma of toasted coconut and honey will fill the kitchen, making the wait feel like a sweet prelude.
- Remove the tin from the oven and allow the cups to cool in the tin for 10 minutes before transferring them to a wire rack. Cooling in the tin helps maintain the cup shape and prevents the edges from cracking.
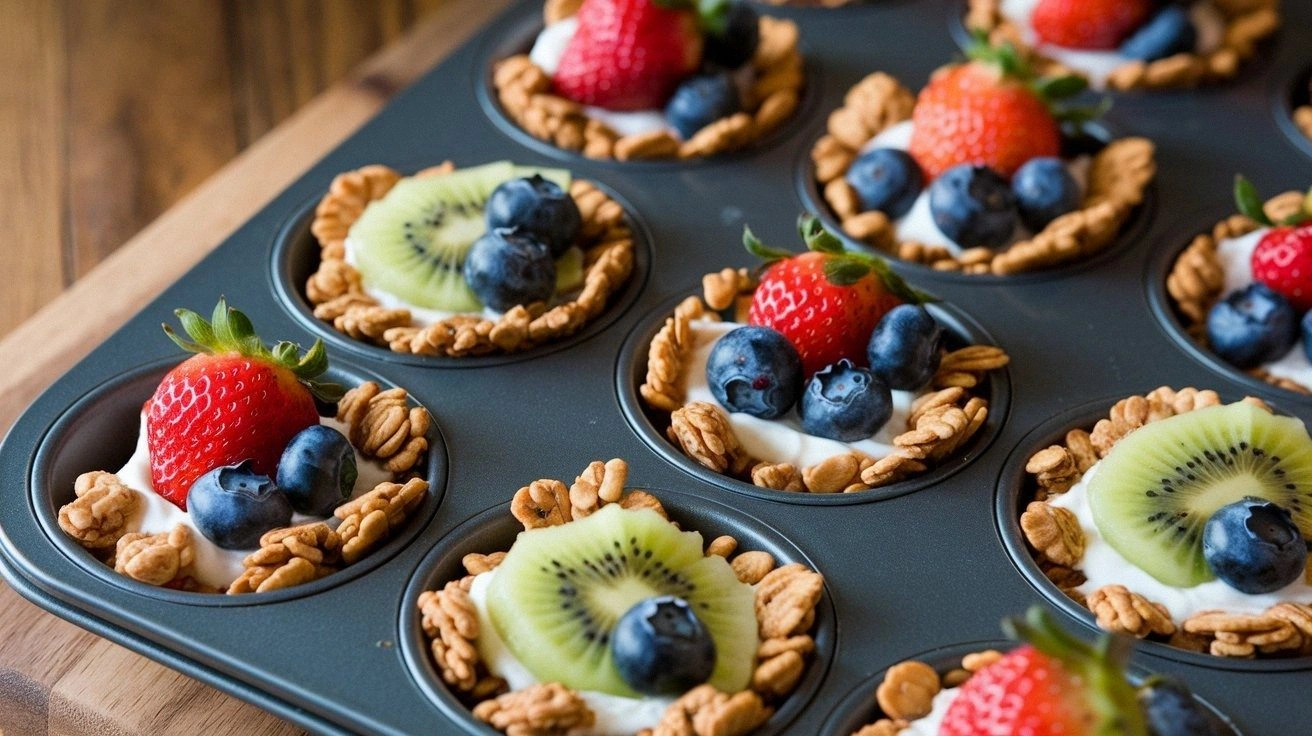
- Once cooled, you can top each cup with a dollop of yogurt, fresh fruit, or a drizzle of chocolate. Store any leftovers in an airtight container at room temperature for up to a week.
That's it — you did it. But hold on, I've got a few more tricks that'll take this to another level...
Insider Tricks for Flawless Results
The Temperature Rule Nobody Follows
Many bakers bake granola cups at 375°F, which can burn the edges before the center cooks. By baking at 350°F, you allow the heat to penetrate evenly, ensuring a golden crust without a charred interior. This subtle temperature tweak is the difference between a mediocre bite and a mouth‑watering experience. I once baked at 375°F and the cups were as hard as a rock; the next time I lowered the temperature, they were the perfect balance of crisp and chewy.
Why Your Nose Knows Best
Trust the aroma. As soon as the honey mixture hits the dry ingredients, a sweet, caramelized scent will rise. If the smell is weak, the batter is too dry; if it’s too overpowering, the mixture is too wet. Use your nose as a gauge to achieve the ideal batter consistency. I’ve lost count of how many times I’ve let the scent guide my adjustments, and it’s been a game‑changer.
The 5‑Minute Rest That Changes Everything
After removing the tin from the oven, let the cups rest for five minutes before transferring them to a wire rack. This brief pause allows the interior to set, preventing the cups from cracking or sticking to the tin. The rest period also lets the flavors meld, creating a deeper, more harmonious taste. I’ve seen people skip this step and end up with cups that crumble on the first bite.
The Secret of the Silicone Tin
Silicone tins are forgiving; they allow for easy removal and prevent burning. However, if your tin has uneven sides, the cups may bake unevenly. Use a level tin or place a piece of parchment paper on the bottom to create an even surface. This small adjustment ensures each cup looks as good as it tastes.
The Quick Chill Trick
If you’re in a hurry, place the freshly baked cups in the refrigerator for ten minutes to set them quickly. This method works well when you’re prepping for a busy morning or a picnic. Just remember to let them come to room temperature before serving; otherwise, they’ll feel cold and less inviting.
Creative Twists and Variations
This recipe is a playground. Here are some of my favorite ways to switch things up:
Cocoa Crunch Edition
Add 1/2 cup unsweetened cocoa powder to the dry mix for a chocolatey twist. Top with a drizzle of dark chocolate for an indulgent treat. This version is perfect for chocolate lovers who still want the wholesome crunch.
Spiced Pumpkin Delight
Incorporate 1 tsp pumpkin pie spice into the batter for a seasonal flavor. Replace the dried cranberries with dried pumpkin pieces for an extra burst of sweetness. This variation is ideal for fall breakfasts.
Tropical Breeze
Swap the dried cranberries for dried mango or pineapple chunks. Add a splash of coconut milk to the batter for a richer coconut flavor. These cups will transport you to a beachside brunch.
Savory Savant
Omit the honey and replace it with a savory sauce like miso or tahini. Add chopped spinach or kale for a green, protein‑packed breakfast. This version is great for those who prefer a savory start to their day.
Nut-Free Nibbles
Omit all nuts and replace them with pumpkin seeds, sunflower seeds, and chia seeds. Add a teaspoon of ground flaxseed for extra omega‑3s. These cups remain crunchy and flavorful without any nuts.
Berry Burst
Add 1 cup dried blueberries or a mix of dried berries to the dry mix. Top with fresh berries after baking for a fresh, juicy finish. This variation is perfect for a spring or summer breakfast.
Storing and Bringing It Back to Life
Fridge Storage
Place the cooled cups in an airtight container and store them in the refrigerator for up to seven days. The cold environment helps preserve the crunch and prevents the coconut oil from melting. When you’re ready to eat, let them sit at room temperature for a few minutes to regain their optimal texture.
Freezer Friendly
Wrap each cup individually in parchment paper, then place them in a freezer bag. They will stay fresh for up to three months. When you’re ready to enjoy a frozen breakfast, pop a cup out and let it thaw at room temperature for 10 minutes.
Best Reheating Method
To revive a refrigerated or frozen cup, place it in a preheated oven at 350°F for five minutes. Add a tiny splash of water to the bottom of the tin to create steam, which will keep the cup moist and prevent it from drying out. This simple trick ensures every bite is as fresh as the day it was baked.